Coupon Codes
Coupons codes are used with cart price rules to apply a discount when a set of conditions is met. For example, a coupon code can be created for a specific customer group, or for anyone who makes a purchase over a certain amount. To apply the coupon to a purchase, the customer can enter the coupon code in the cart, or possibly at the cash register of your brick and mortar store. Here are a few ways that you can use coupons in your store:
- Email coupons to customers
- Produce printed coupons
- Create in-store coupons for mobile users
Coupon codes can be sent by email, or included in newsletters, catalogs, and advertisements. The list of coupon codes can be exported and sent to a commercial printer. You can also create in-store coupons with a quick response code that shoppers can scan with their smart phones. The QR code can link to a page on your site with more information about the promotion.
If dotdigital is enabled, you can use the dotdigital Coupon URL Builder to dynamically generate personalized URLs with coupon codes that can be used in your dotdigital email campaigns. You can also resend a previously generated coupon code to the same contact. To learn more, see Dynamic content: Coupon codes - Magento 2 in the dotdigital Help Centre.
Method 1: Create a specific coupon
-
Follow the instructions to create a cart price rule.
-
In the Rule Information section, set Coupon to
Specific Coupon. -
Enter a Coupon Code to be used with the promotion.
The format of the code as numeric, alphanumeric or alphabetical is determined by the configuration.
-
To limit the number of times the coupon can be used, do the following:
- Enter the number of Uses per Coupon.
-
Enter the number of Uses per Customer.
For unlimited use, leave these fields blank.
 Coupon Information
In case of simultaneous use of the same coupon by multiple customers at the same time, it is possible that the usage limit that is set could be exceeded due to delayed coupon processing.
-
To make the coupon valid for a period of time, do the following:
-
Complete the From and To dates. To select the date, click the Calendar (
 ) icon next to each field. If you leave the date range empty, the rule does not expire.
 -
Do one of the following:
Schedule New Update:
-
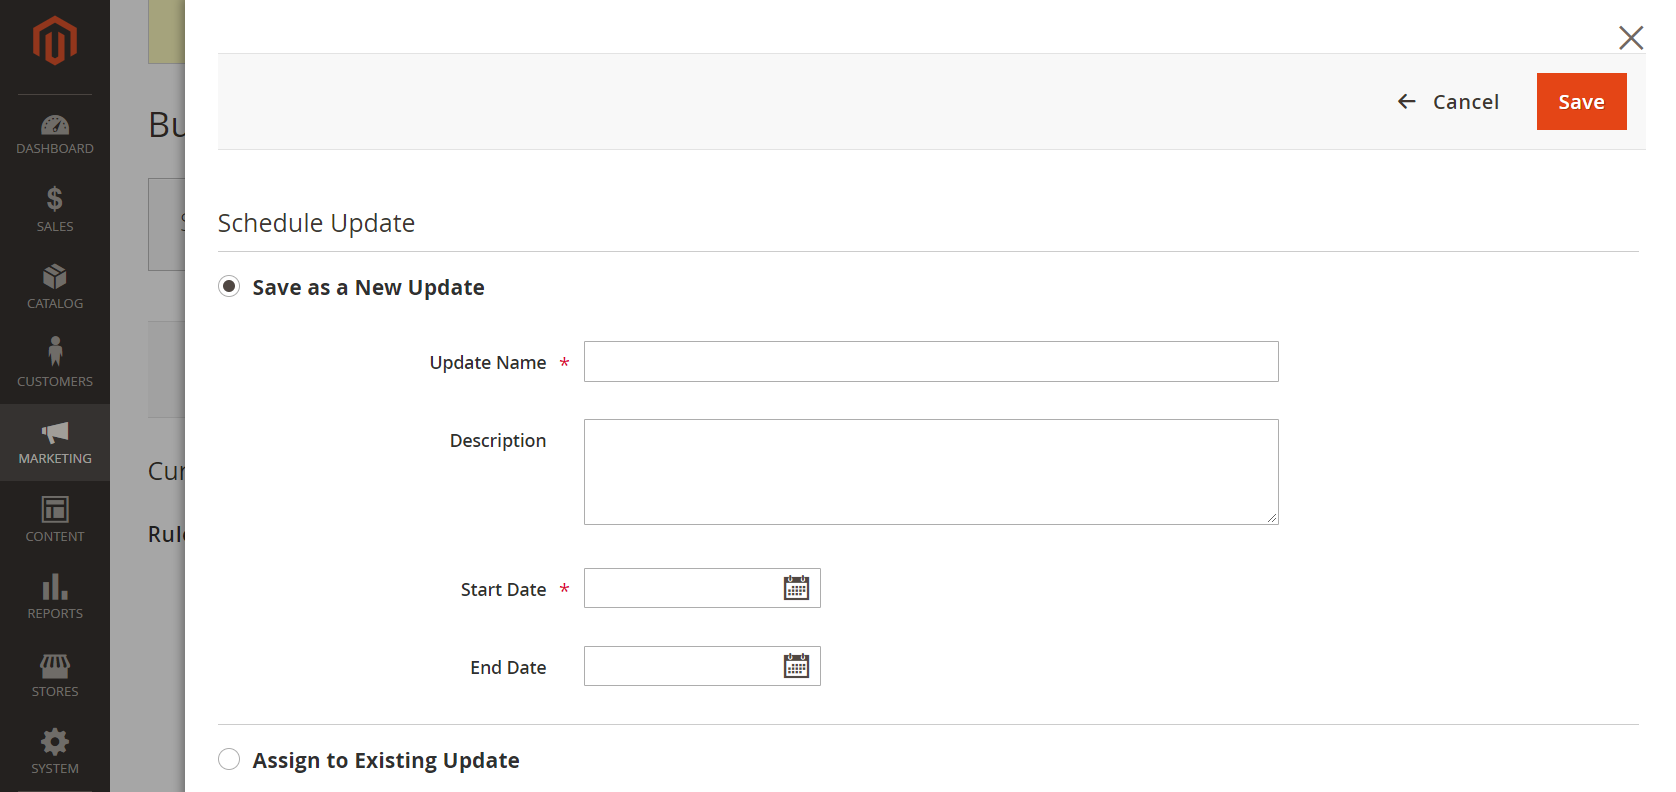
Click Schedule New Update in the upper-right corner of the page. Then, do the following:
 Schedule Update
 -
Enter the Update Name and Description.
-
Choose the Start Date and End Date from the Calendar (
 ). If you leave the date range empty, the rule will not expire.
 -
When complete, click Save.
 Scheduled Change
Assign to Existing Update:
-
Select Assign to Another Update.
-
Find the update in the list, and click Select.
-
-
-
Complete the cart price rule as needed.
Method 2: Generate a batch of coupons
The generation of discount coupons is an asynchronous operation, which executes in the background so that you can continue working in the Admin without waiting for the operation to finish. The system displays a message when the task is complete.
-
Follow the instructions to create a cart price rule.
-
Under Coupon Code, select the Use Auto Generation checkbox.
-
To limit the number of times each customer can use the coupon, enter the number of Uses per Customer.
 Generate Auto-numbered Coupons
In case of simultaneous use of the same coupon by multiple customers at the same time, it is possible that the usage limit that is set could be exceeded due to delayed coupon processing.
-
Scroll down and expand
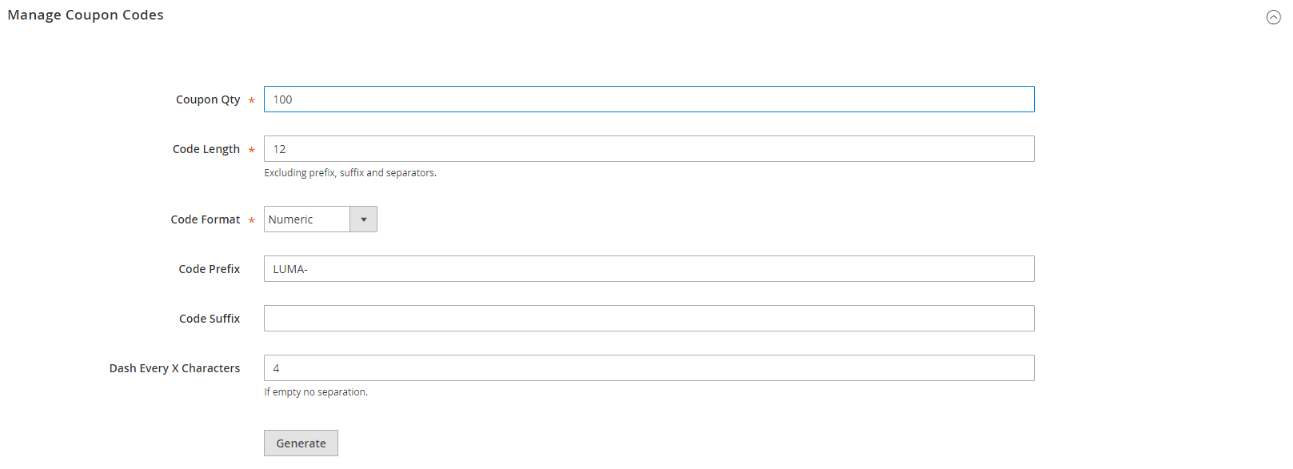
 the Manage Coupon Codes section. Then, do the following:
 Manage Coupon codes
-
For Coupons Qty, enter the number of coupons that you want to generate.
-
Enter the Code Length, not including the prefix, suffix, or separators.
-
Set the Code Format to one of the following:
AlphanumericAlphabeticalNumeric
-
(Optional) Enter a Code Prefix to be added to the beginning of the code.
-
(Optional) Enter a Code Suffix to be added to the end of the code.
-
(Optional) In the Dash Every X Characters field, enter the number of characters between each dash. For example, if the code is twelve characters long, and there is a dash every four characters, it will look like
xxxx-xxxx-xxxx. Dashes make codes easier to read and enter.
-
-
When complete, click Generate.
The list of generated codes appears below.
 Generated Codes
Method 3: Generate a dynamic dotdigital coupon URL
-
Create a cart price rule with the following settings:
- Set Coupon to
Specific Coupon. - Select the Auto Generation checkbox.
- Set Coupon to
-
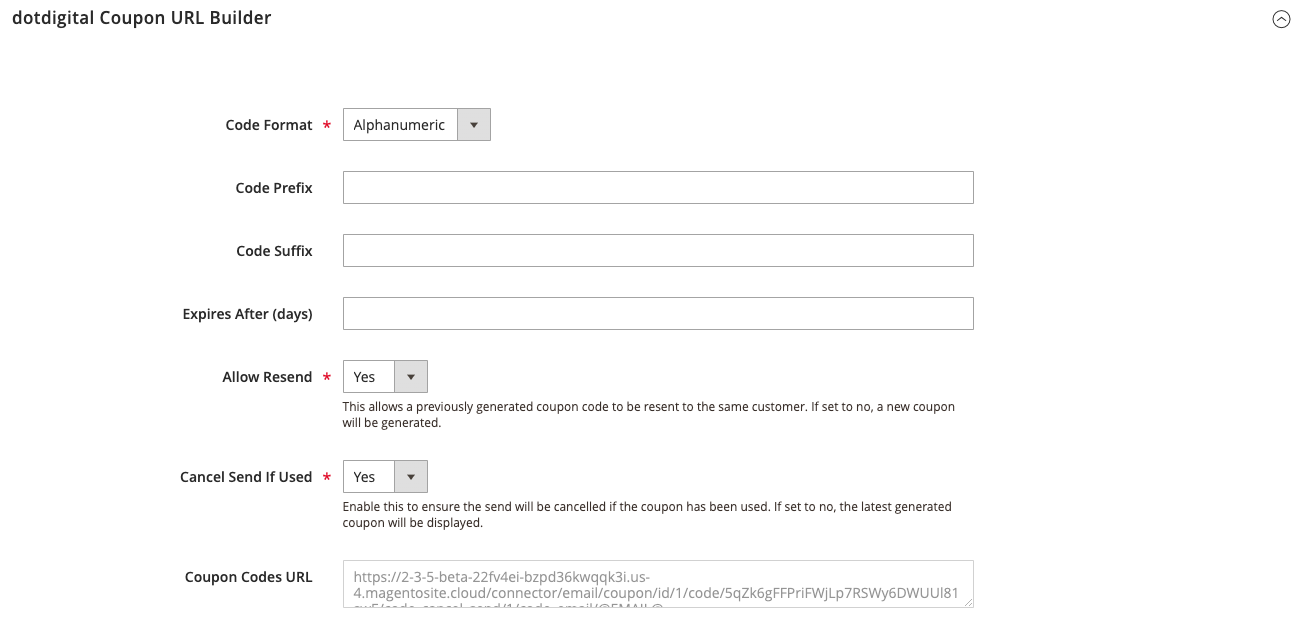
Expand the dotdigital Coupon URL Builder section.
 dotdigital Coupon URL Builder
 -
To use a specific code format, set Code Format to one of the following:
- Alphanumeric
- Alphabetical
- Numeric
-
Enter the Code Prefix and Code Suffix if applicable.
-
For Expires After (days), do one of the following:
- Enter the number of days the coupon code is valid.
- Leave the field blank for a dynamic expiration date.
-
Do one of the following:
- To always generate a new coupon URL, set Allow Resend to
No. - If you want to allow a previously-generated coupon URL to be resent to the same contact, set Allow Resend to
Yes.
- To always generate a new coupon URL, set Allow Resend to
-
To prevent a coupon URL from being used multiple times, set Cancel Send if Used to
Yes. -
Click the Coupon Codes URL field to copy the URL to the clipboard.
This URL can now be pasted into a dotdigital email campaign to send a personalized and dynamically generated coupon code to a client. The coupons are retrieved and inserted at point of send. To learn more, see Dynamic content: Coupon codes - Magento 2 in the dotdigital Help Centre.
-
To view the dotdigital coupon codes that you have generated from Magento, do the following:
- Expand the Manage Coupon Codes section and find the coupon in the grid.
- To filter the list, set the Generated by dotdigital filter at the top of the fourth column to
Yesand click Search.
 Coupon Generate by dotdigital
Test your dotdigital coupon code URLs
Do the following to test the dynamic coupon code URLs that you generate with the dotdigital Coupon URL Builder.
Method 1: Run a test campaign
-
Generate the dynamic URL as described above and insert it into a dotdigital test campaign.
-
Run the test campaign and check your email for the code.
-
From your Magento store, make a test purchase and apply the code in the shopping cart.
Method 2: Add your IP address to the IP restriction allow list
-
In the Magento configuration, go to DOTDIGITAL > Developer.
-
Scroll down to the Dynamic Pages IP Restriction section.
-
Add your IP address to the end of the list, separated from the previous entry by a comma.
-
Click Save Config.
-
Go to System > Tools > Cache Management and clear any invalid cache.
-
Use the dotdigital Coupon URL Builder to generate a URL.
-
Click the generated URL to copy it to the clipboard and paste it into the address bar of a new browser tab.
-
At the end of the URL, replace the
@EMAIL@placeholder with an email address that you use for testing and press return to display the coupon code. -
Copy the coupon code that appears in the browser.
-
Make a test purchase in your Magento store and apply the coupon code in the shopping cart.