Braintree
Deprecation Notice
Due to the Payment Service Directive PSD2 and the continued evolution of many APIs, this payment integration is at risk of becoming outdated and no longer security compliant. For this reason, it is now deprecated and we are recommending that you disable it in your Magento 2.3.x configuration and transition to the official Braintree payment extension from Magento Marketplace.
This integration has been deprecated from current versions of 2.3.x. and replaced with a different Braintree integration in 2.4.0 and later.
Braintree offers a fully customizable checkout experience with fraud detection and PayPal integration. Braintree reduces the PCI compliance burden for merchants because the transaction takes place on the Braintree system.
Braintree account credentials
Go to Braintree Payments and sign up for an account. You will need the account credentials to connect your account in the Magento Admin.
Set up Braintree in Magento
Click Save Config at any time to save your progress.
Step 1: Complete the basic settings
-
On the Admin sidebar, go to Stores > Settings > Configuration.
-
In the left panel, expand Sales and choose Payment Methods.
-
If your Magento installation has multiple websites, stores, or views, set Store View to the store view where you want to apply this configuration.
-
In the Merchant Location section, select the Merchant Country where your business is located.
 Merchant Country
 -
Expand
 the Deprecated Payment Methods section and the Braintree (Deprecated) section.
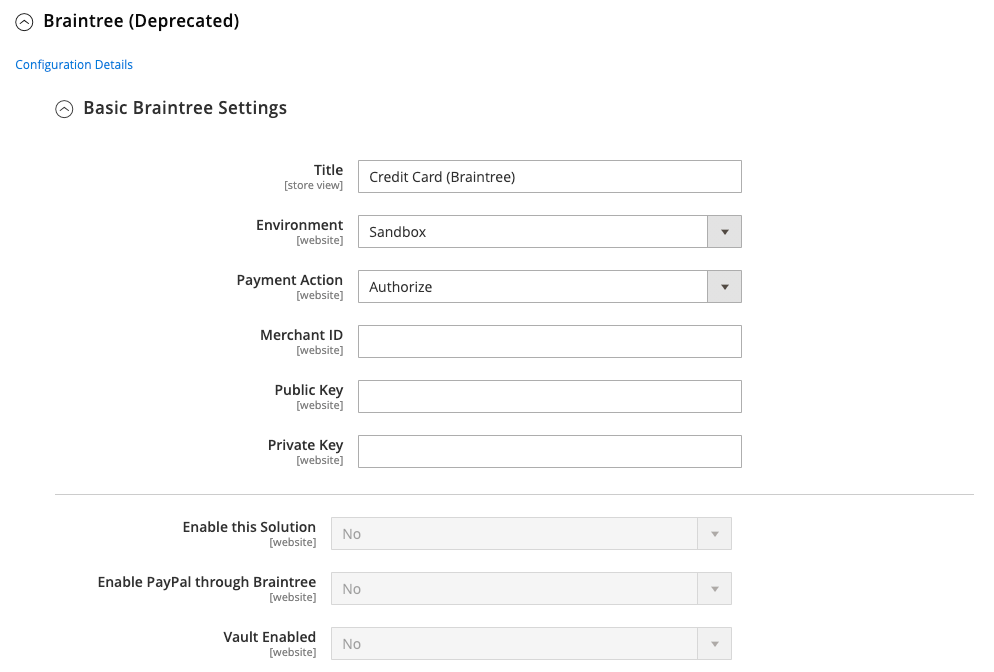 Basic Braintree Settings
 -
Enter a Title to identify Braintree as a payment option during checkout.
-
Set the current operating Environment for Braintree transactions to one of the following:
SandboxProduction
When testing the configuration in a sandbox, use only credit card numbers that are recommended by Braintree. When you are ready to go live with Braintree, set Environment to
Production. -
Set Payment Action to one of the following:
Authorize OnlyApproves the purchase and puts a hold on the funds. The amount is not withdrawn from the customer bank account until the sale is captured by the merchant. Authorize and CaptureThe amount of the purchase is authorized and immediately withdrawn from the customer account. -
Enter the Merchant ID from your Braintree account.
-
Enter the following credentials from your Braintree account:
- Public Key
- Private Key
-
Set Enable this Solution to
Yes. -
To include PayPal as a payment option with Braintree, set Enable PayPal through Braintree to
Yes. -
If you want the ability to store customer information securely, so customers don’t have to reenter it each time they make a purchase, set Vault Enabled to
Yes.
Step 2: Complete the advanced settings
-
Expand
 the Advanced Braintree Settings section.
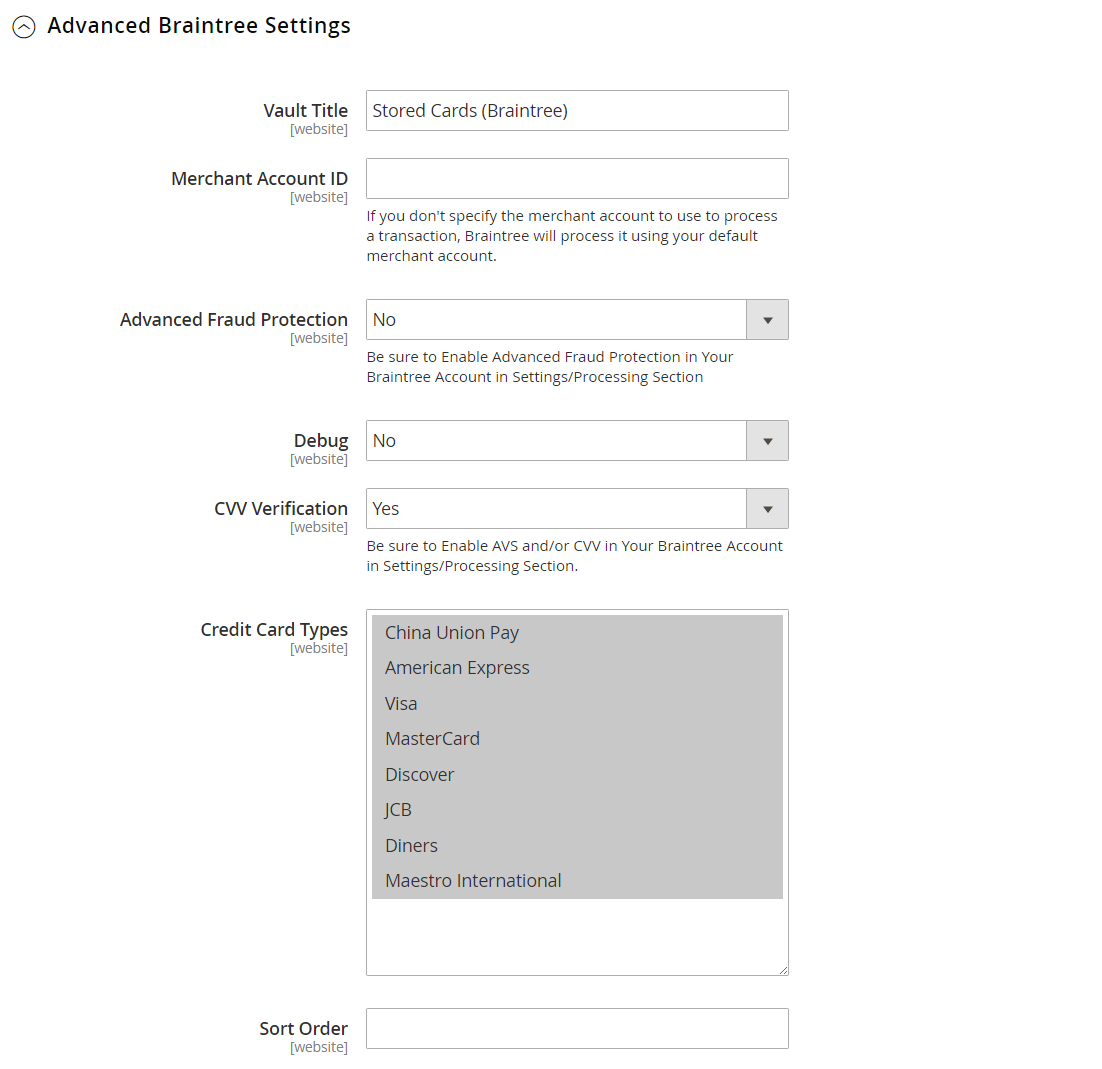 Advanced Settings
 -
For Vault Title, enter a descriptive title for your reference that identifies the vault where your customer card information is stored.
-
Enter the Merchant Account ID from your Braintree account.
-
To use Braintree fraud protection for all transactions, set Advanced Fraud Protection to
Yes.Make sure that Advanced Fraud Protection is enabled in the Settings/Protection section of your account.
-
If you want the system to save a log file of interactions between your store and Braintree, set Debug to
Yes. -
To require customers to provide the three-digit security code from the back of a credit card, set CVV Verification to
Yes.If using CVV verification, make sure to enable AVS and/or CVV in the Settings/Processing section of your Braintree account.
-
For Credit Card Types, select each credit card that is accepted by your store as payment through Braintree.
To select multiple card types, hold down the Ctrl key (PC) or the Command key (Mac) and click each option.
-
If you offer multiple payment methods, enter a number for Sort Order to determine the sequence in which Braintree appears when listed with the other payment methods.
This is relative to the other payment methods. (
0= first,1= second,2= third, and so on.)
Step 3: Complete the country specific settings
-
Expand
 the Country Specific Settings section.
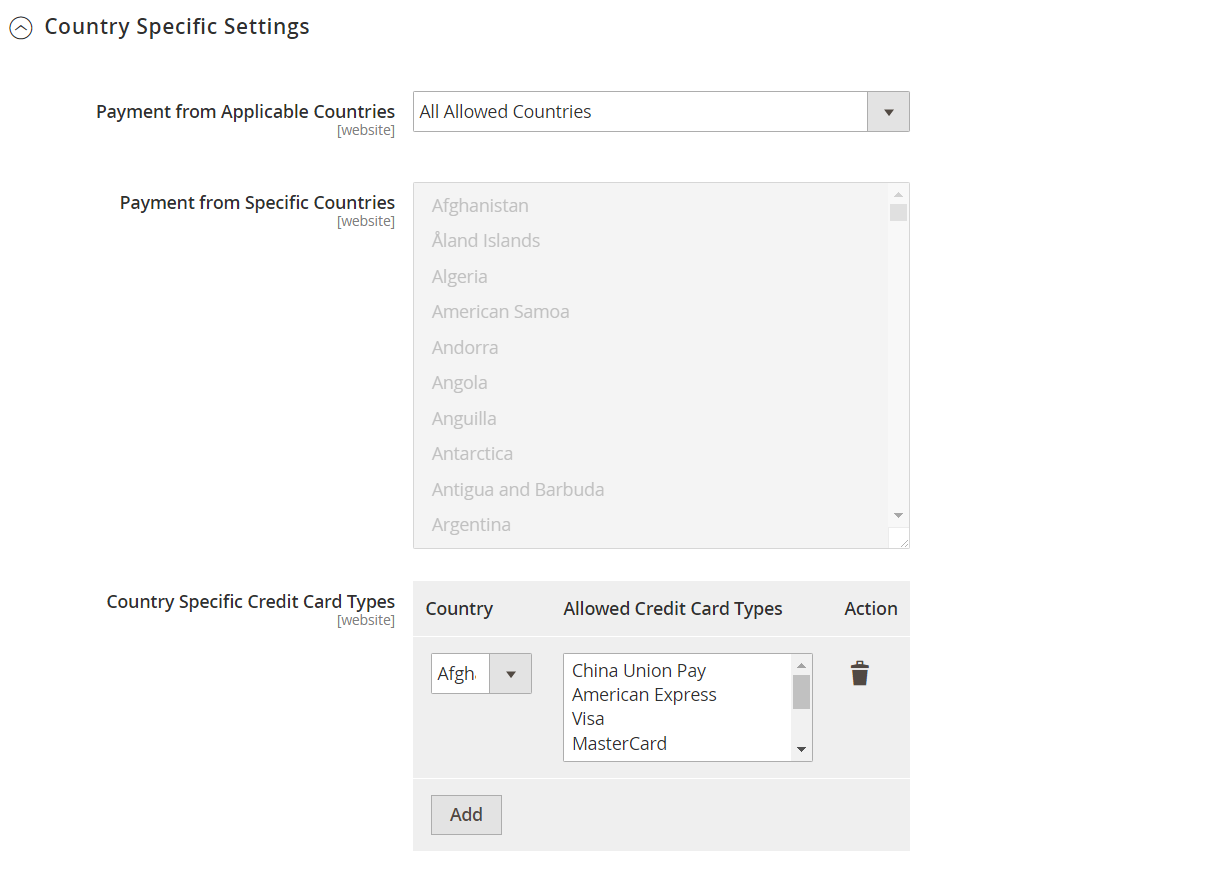 Country Specific Settings
 -
Set Allowed Countries to one of the following:
All Allowed CountriesCustomers from all countries specified in your store configuration can use this payment method. Specific CountriesAfter you choose this option, the Payment from Specific Countries list is available. To select multiple countries, hold down the Ctrl key (PC) or the Command key (Mac) and click each option. -
To set up Country Specific Credit Card Types, do the following:
-
Click Add Rule.
-
Set the Country and choose each Allowed Credit Card Type.
-
Repeat to identify the credit cards that are accepted from each country.
-
Step 4: Complete the PayPal through Braintree settings
-
Expand
 the PayPal through Braintree section.
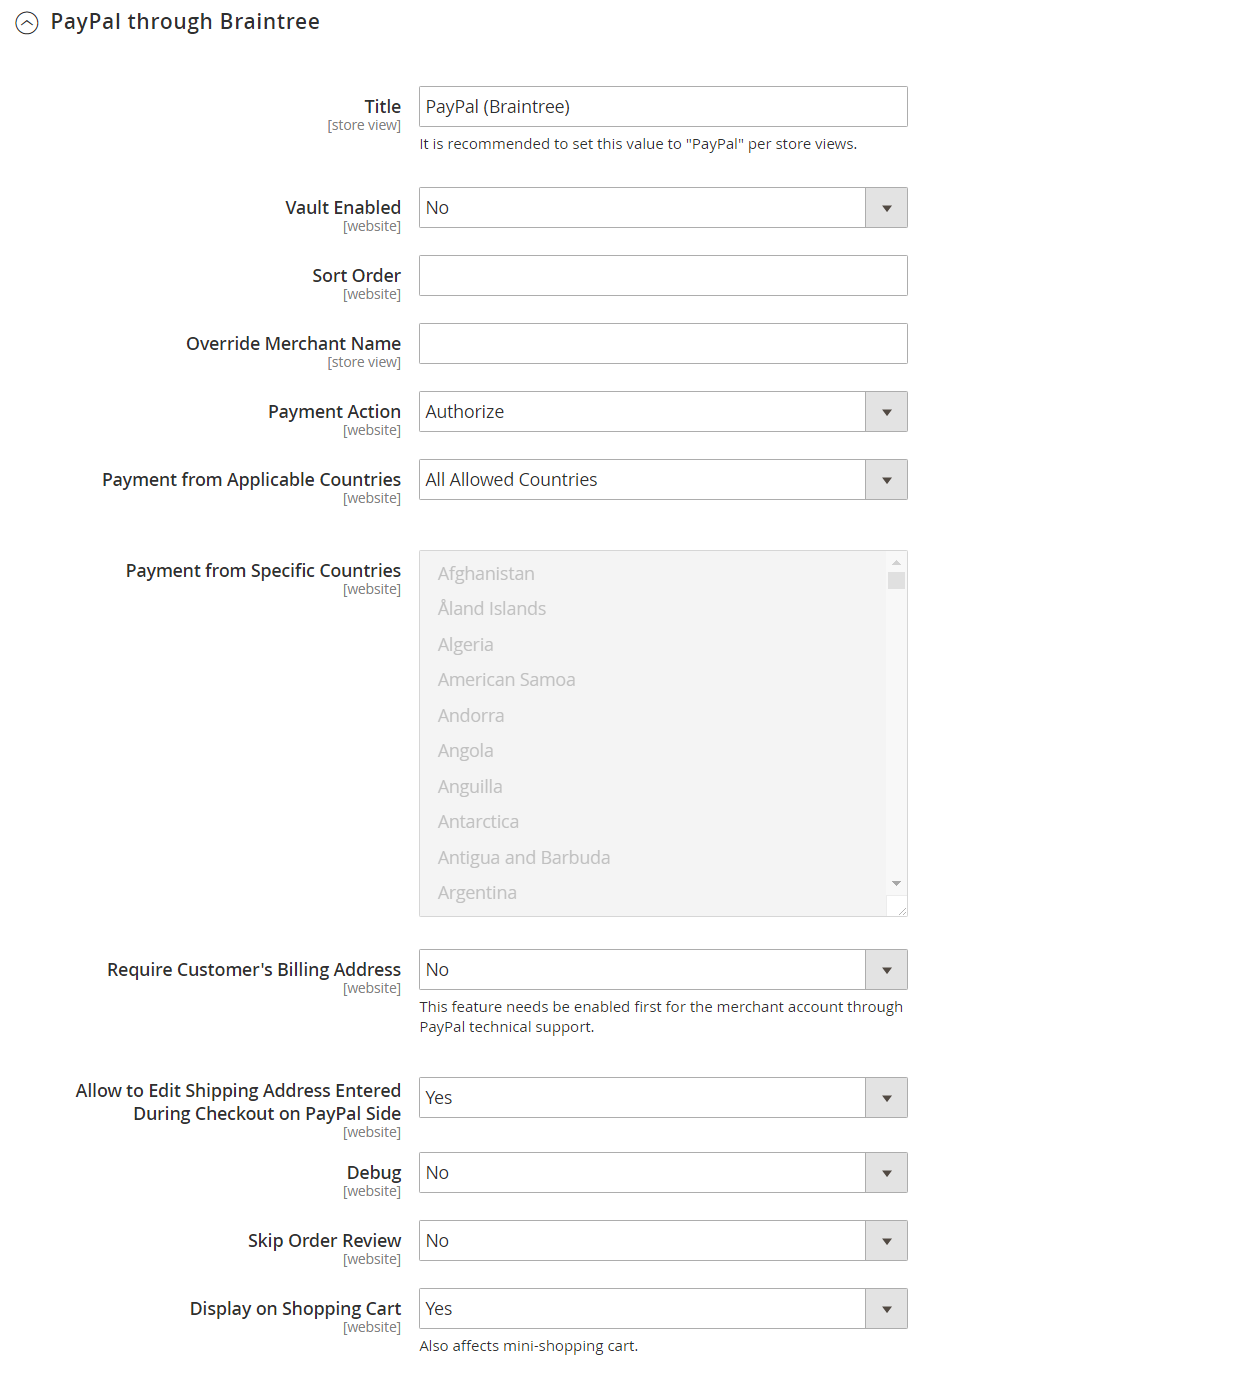 PayPal through Braintree Settings
 -
Do the following to identify your PayPal through Braintree configuration:
-
Enter a Title to identify Braintree payment by PayPal option during checkout.
-
For Vault Title, enter a descriptive title to identify the vault where your customer card information is to be stored.
-
For Sort Order, enter a number to determine the sequence in which Braintree PayPal payment option appears when listed with other payment options during checkout.
-
To display your merchant name differently than what is defined in your store configuration, enter the name as you want it to appear for Override Merchant Name.
-
-
Set Payment Action to one of the following:
Authorize OnlyApproves the purchase and puts a hold on the funds. The amount is not withdrawn from the customer bank account until the sale is captured by the merchant. Authorize and CaptureThe amount of the purchase is authorized and immediately withdrawn from the customer’s account. -
Set Payment from Applicable Countries to one of the following for Braintree transactions processed by PayPal:
All Allowed CountriesCustomers from all countries specified in your store configuration can use this payment method. Specific CountriesAfter you choose this option, the Payment from Specific Countries list is available. To select multiple countries, hold down the Ctrl key (PC) or the Command key (Mac) and click each option. -
To require that customers provide a billing address, set Require Customer’s Billing Address to
Yes.This feature must first be enabled for your account by PayPal Technical Support.
-
If you want customers to be able to edit the shipping address while completing a PayPal transaction, set Allow to Edit Shipping Address Entered During Checkout on PayPal Side to
Yes. -
To save a log file of interactions between your store and PayPal through Braintree, set Debug to
Yes. -
To display the PayPal button on both the mini shopping cart and shopping cart page, set Display on Shopping Cart to
Yes. -
If you want to bypass the Order Review step before the order is submitted, set Skip Order Review to
Yes.By default, Order Review is the last stage of the checkout process.
Step 5: Complete the 3D verification settings
-
Expand
 the 3D Secure Verification Settings section.
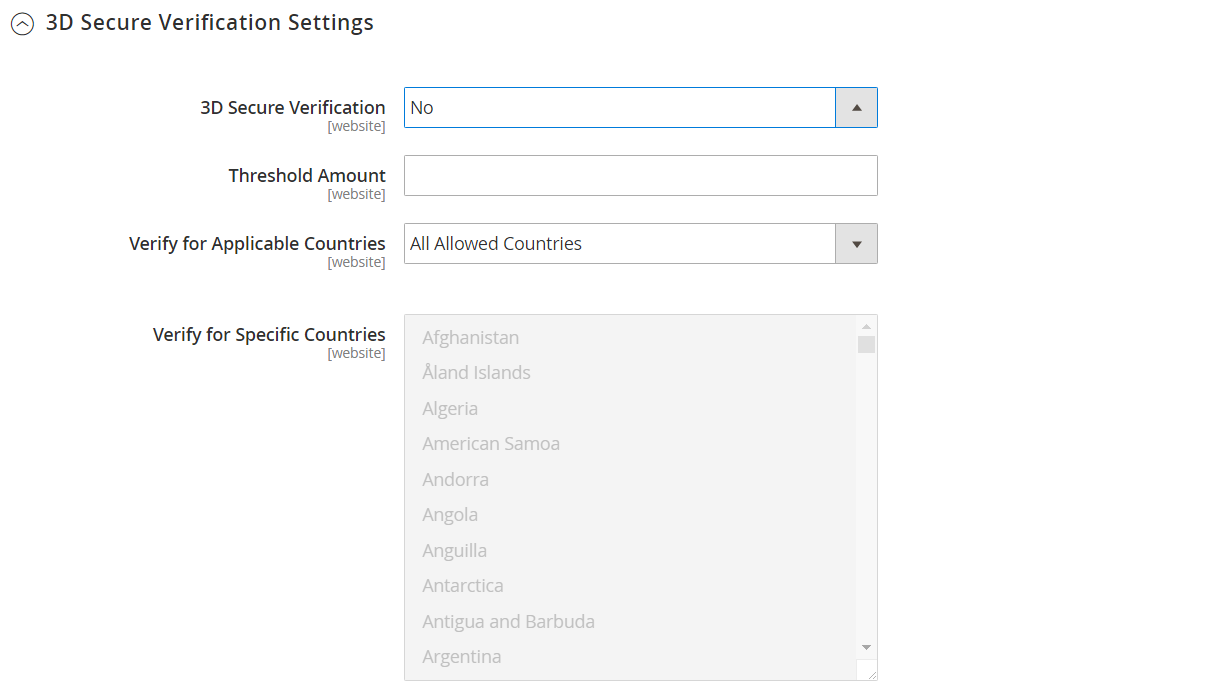 3D Verification Settings
 -
If you want to add a verification step for customers using credit cards that are enrolled in a verification program such as Verified by VISA, set 3D Secure Verification to
Yes.During the process, the transaction amount that is submitted for verification is checked against the amount that is sent for authorization.
-
For Threshold Amount, enter the minimum order amount that is required to trigger 3D verification.
-
Set Verify for Applicable Countries to one of the following:
All Allowed CountriesCustomers from all countries specified in your store configuration can use this payment method. Specific CountriesAfter you choose this option, the Verify for Specific Countries list is available. To select multiple countries, hold down the Ctrl key (PC) or the Command key (Mac) and click each option.
Step 6: Define the dynamic descriptors
The descriptors are used to identify purchases on customer credit card statements. You can reduce the number of chargebacks by clearly identifying the company that is associated with each purchase. If Dynamic Descriptors are not enabled for your account, contact Braintree support.
-
Expand
 the Dynamic Descriptors section.
 -
Enter the dynamic descriptor for the Name, Phone, and URL according to these guidelines:
Name There are two parts to the Name descriptor, which are separated by an asterisk (*). For example: company*myproduct
The first part of the descriptor identifies the company or DBA, and the second part identifies the product. The length of the Company and Product parts of the descriptor can be allocated in the following ways, for a combined length of up to twenty-two characters.
Characters in Name Descriptor
Option 1: Company must be three characters, Product may be up to 18 characters
Option 2: Company must be seven characters, Product may be up to 14 characters
Option 3: Company must be 12 characters, Product may be up to nine charactersPhone The Phone descriptor must be ten to 14 characters in length, and can include only numbers, dashes, parentheses, and periods. For example:
9999999999
(999) 999-9999
999.999.9999URL The URL descriptor represents your domain name and can be up to thirteen characters long. For example: company.com -
When your Braintree configuration is complete, click Save Config.