Setting Up Klarna
To offer your customers the benefit of paying with Klarna, you must first sign up for a Klarna account and gain access to the Klarna Merchant Portal. Then, complete the Klarna configuration from the Admin of your Magento store.
Important: Klarna does not support currency switches to display multiple currencies in one website. Magento uses a base currency and tax configured at the website level (not store view) to avoid rounding and mismatch issues. To support multiple currencies, create a website per currency, using different URLs configured at the Magento website level (not store view).
Generate API credentials for your Klarna account
-
Go to the Klarna Merchant Onboarding page.
-
Do one of the following:
-
To create a new account, click Get Started. Then, complete the onboarding process to create an account. When you receive the confirmation email from Klarna, click Activate account to log in.
-
If you already have an account, click Log in in the upper-right corner.
-
-
To generate your API Credentials for the Klarna Playground environment, do one of the following:
- On the Home page of your account under Preferences, click Settings.
- In the upper-left corner of the page, click the Menu icon. Then in the left sidebar under Preferences, click Settings.
-
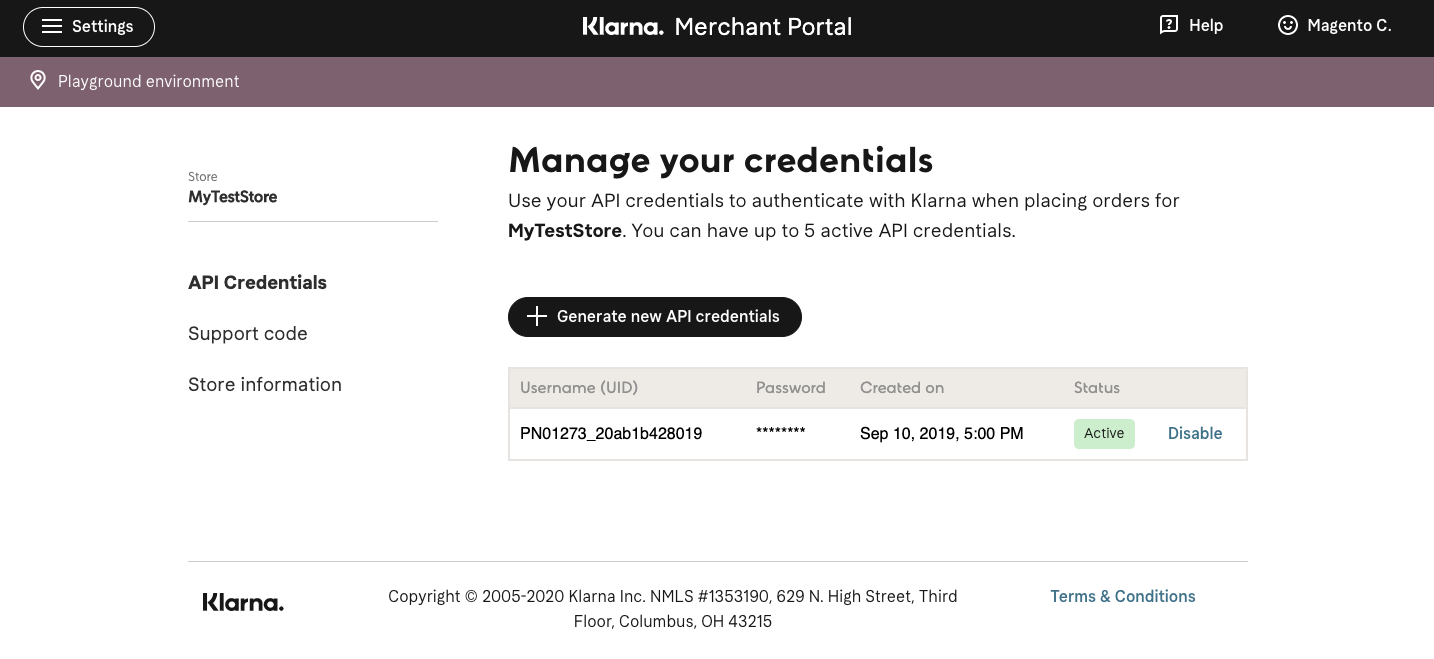
On the API Credentials tab, click Generate new API credentials.
-
When prompted, click Create credentials.
-
After your credentials are generated, click Download as .txt.
-
Select the checkbox to confirm that you have saved your credentials and click Close.
You can return to your Klarna account later to complete the remaining settings.
 Generate Klarna API Credentials
Set up Klarna Payments in Magento
When you have API credentials associated with your Klarna account, you can complete the Klarna setup in the Magento Admin.
Click Save Config at any time to save your progress.
Step 1: Begin the Magento configuration
-
On the Admin sidebar, go to Stores > Settings > Configuration.
-
In the left panel, expand Sales and choose Payment Methods.
-
If your Magento installation has multiple websites, stores, or views, set Store View to the store view where you want to apply this configuration.
-
If needed, expand
 the Other Payment Methods section.
 -
For Klarna, click Configure.
-
Expand
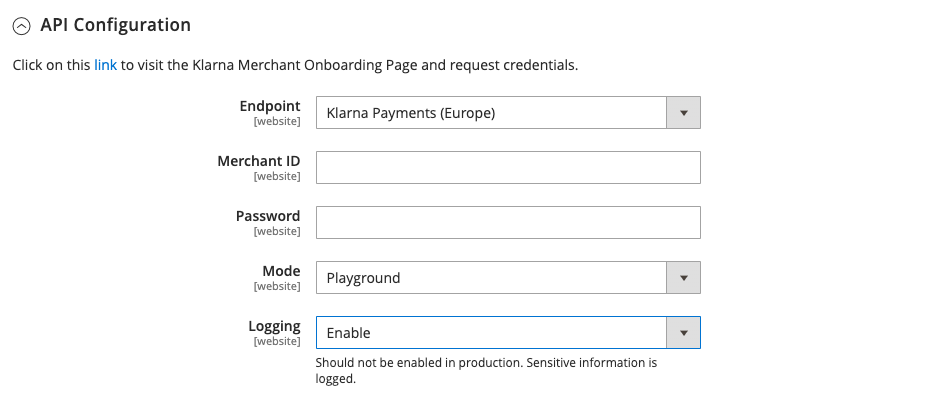
 the API Configuration section.
 -
Set Endpoint to one of the following:
- Klarna Payments (North America)
- Klarna Payments (Europe)
- Klarna Payments (Oceana)
Klarna supports the following countries: AT, DE, DK, FI, NL, NO, SE, US, AU, NZ
-
For Klarna API username, enter the
Username (UID)from your Klarna API credentials.Do not enter the
Merchant IDfrom your Klarna account. -
Enter the Klarna API Password from your Klarna API credentials.
-
To use the Klarna Playground for test transactions, set Mode to
Playground. -
To generate a record of interactions while testing the integration, set Logging to
Enable.Set Logging to
Disabledbefore going live with Klarna in your production store.
Step 2: Configure the Klarna payment settings
-
Expand
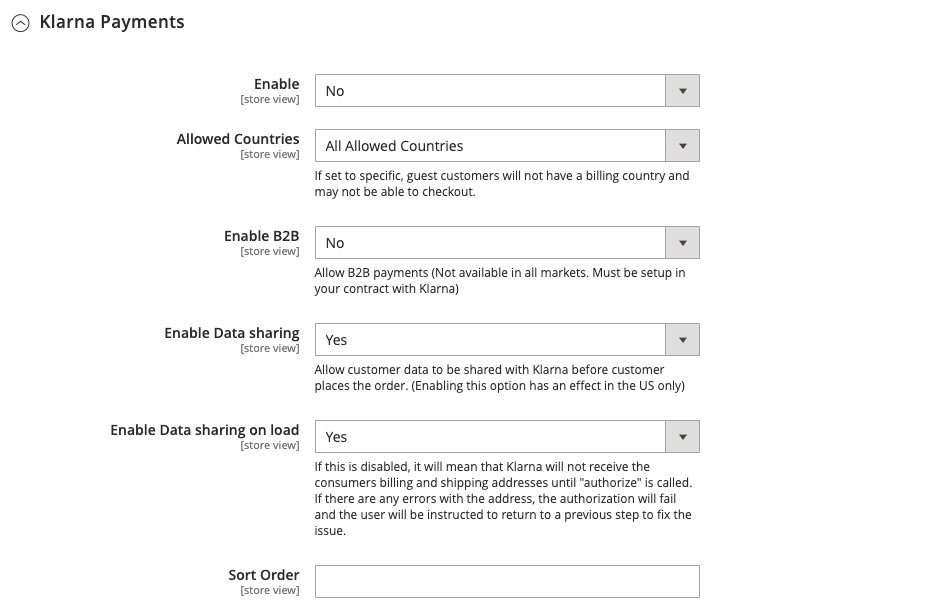
 the Klarna Payments section.
 -
Set Enable to
Yes. -
Set Allowed Countries to one of the following:
All Allowed CountriesCustomers from all countries specified in your store configuration can use this payment method. Specific CountriesAfter you choose this option, the Payment from Specific Countries list appears. To select multiple countries, hold down the Ctrl key (PC) or the Command key (Mac) and click each option. -
If your Klarna account supports B2B payments, set Enable B2B to
Yes. -
If you want Klarna to prepare a set of personalized credit options for each customer, set Enable Data sharing to
Yesand set Enable Data sharing on load to one of the following:NoCustomer billing and shipping address information is shared with Klarna after the transaction is authorized. If a shipping address error is encountered during authorization, the customer is instructed to return to the previous step and correct the problem. YesCustomer billing and shipping address information is shared with Klarna when the payment method is selected during the checkout process. -
If you offer multiple payment methods, enter a number for Sort Order to determine the sequence in which Klarna appears when listed with the other payment methods.
This is relative to the other payment methods. (
0= first,1= second,2= third, and so on.)
Step 3: Configure the design settings (optional)
-
Expand
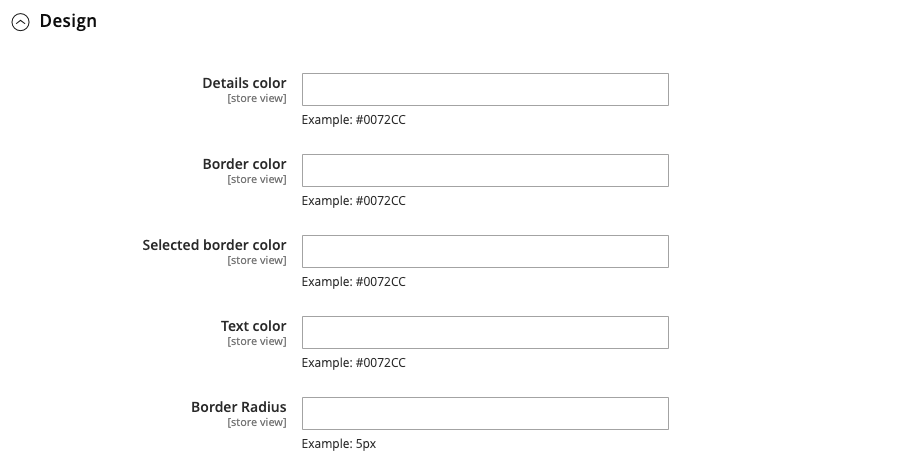
 the Design section.
 -
Enter the hexadecimal value of the color that you want to use for the following elements.
You can use the color chooser to experiment with different colors for each design element to match your store’s theme. The results might vary, depending on theme.
- Details color
- Border color
- Selected border color
- Text color
- Border radius
Step 4: Complete the setup
-
When complete, click Save Config.
-
Click Cache Management in the message at the top of the page, and refresh all invalid caches.


