PayPal Payflow Pro
PayPal Payflow Pro gateway, formerly known as Verisign, is available for customers of the United States, Canada, Australia, and New Zealand. Unlike other PayPal payment methods, merchants are charged a fixed monthly fee, plus a fixed fee for each transaction, regardless of the number.
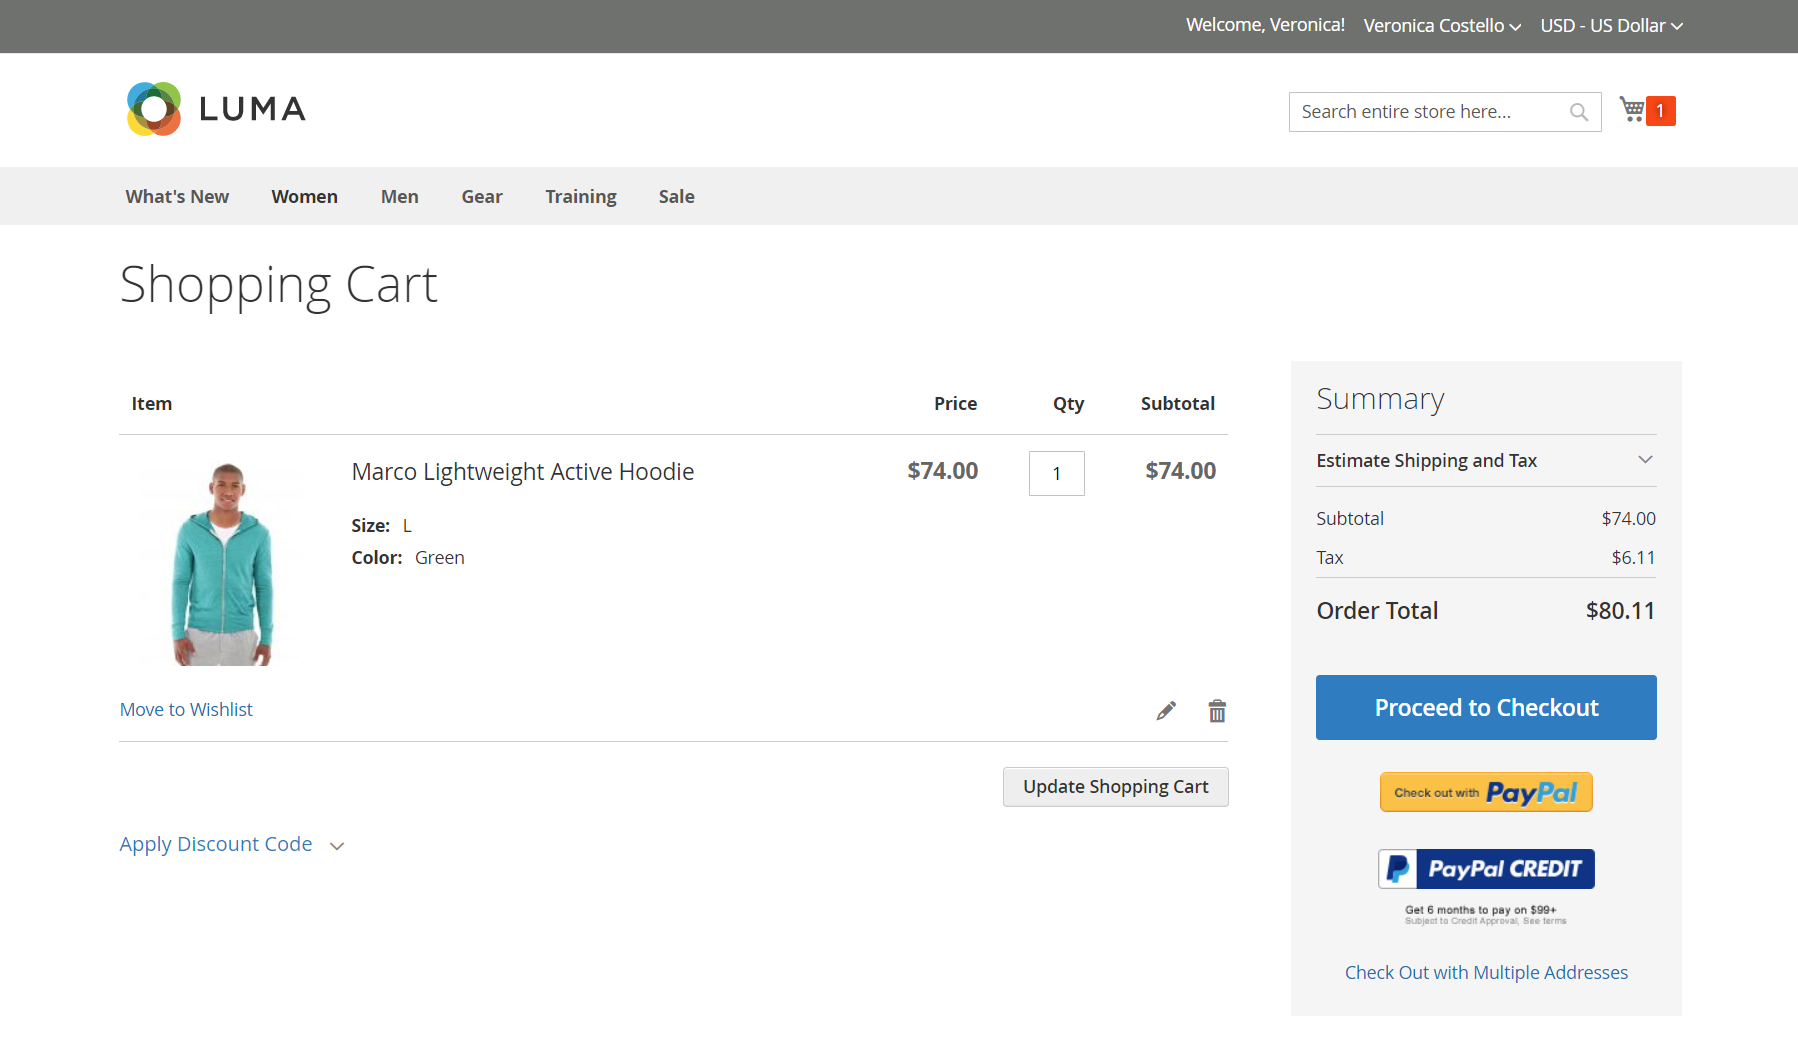 Checkout with PayPal
Payment Services Directive Requirements:
As of September 14, 2019, European banks might decline payments that do not meet PSD2 requirements. To comply with PSD2, PayPal Payflow Pro must be integrated with Cardinal Commerce. To learn more, see 3-D Secure for Payflow.
Requirements
-
PayPal Business Account - The PayPal Payflow Pro gateway links the merchant account at PayPal with the merchant website, acting as both a gateway and a merchant account.
-
If you manage multiple Magento websites, you must have a separate PayPal merchant account for each website.
Customer workflow
| 1 | Customer goes to checkout | During checkout, the customer chooses to pay with PayPal PayFlow Pro, and enters the credit card information. Customers are not required to have personal PayPal accounts. However, depending on the merchant country, customers can also use their personal PayPal account to pay for the order. |
| 2 | Customer submits order | The customer submits the order, and the order information is sent to PayPal for processing. The customer does not leave the checkout page of your site. |
| 3 | PayPal completes the transaction | Payments are accepted at the time the order is placed. Depending on the payment action specified n the configuration, either a sales order or a sales order and an invoice is created. |
Online order processing workflow
| 1 | Administrator submits online invoice | The store administrator submits an online invoice. and as a result a corresponding transaction and an invoice is created. |
| 2 | PayPal receives the transaction | The order information is sent to PayPal. A record of the transaction and an invoice is generated. You can view all Payflow Pro Gateway transactions in your PayPal merchant account. |
Partial invoices and partial refunds are not supported by PayPal Payflow Pro.
Configure your PayPal account
-
Log in to your PayPal business account.
-
Configure the Hosted Checkout Pages using PayPal Manager with the following settings:
-
Under Choose your settings, set Transaction Process Mode to
Live. -
Under Display options on payment page, set Cancel URL Method to
POST. -
Under Billing Information, select the card security code CSC checkboxes for both required and editable fields.
-
Under Payment Confirmation, set Return URL Method to
POST. -
Under Security Options, complete the following settings:
AVS NoCSC NoEnable Secure Token Yes -
Choose Customize, and then choose Layout C.
Layout C shows only credit and debit card fields, and can either be framed on your site or used as a stand-alone popup. The size is fixed at 490 x 565 pixels, with extra space for error messages. On some systems, this setting corrects an issue with transparent redirect.
-
-
When the configuration settings are complete, click Save and Publish.
-
In the PayPal Manager menu, choose Account Administration.
-
Under Manage Security, click Transaction Settings and do the following:
-
Set Allow reference transactions to
Yes. -
Click Confirm.
If you have multiple Magento websites, you must create a separate PayPal Payments Advanced account for each.
-
-
Set up an additional user (recommended by PayPal):
-
In the second row of the main menu, click Manage Users.
-
To add another user to the account, click Add User. The link is located just above the Manage Users title.
-
Complete the required fields in the following sections of the Add User form:
- Admin Confirmation
- User Information
- User Login Information
- Assign Privilege to User
-
Click Update.
-
-
Make sure to log out of your PayPal account.
Set up PayPal Payflow Pro in Magento
Click Save Config at any time to save your progress.
Step 1: Begin the Magento configuration
This setup method assumes you have an existing PayPal account.
-
On the Admin sidebar, go to Stores > Settings > Configuration.
-
In the left panel, expand Sales and choose Payment Methods.
-
If your Magento installation has multiple websites, stores, or views, set Store View to the store view where you want to apply this configuration.
-
In the Merchant Location section, select the Merchant Country where your business is located.
This setting determines the selection of PayPal Solutions that appear in the configuration.
 Merchant Country
 -
Expand PayPal Payment Gateways (if needed) and click Configure for Payflow Pro.
 Payflow Pro - Configure
Step 2: Complete the required PayPal settings
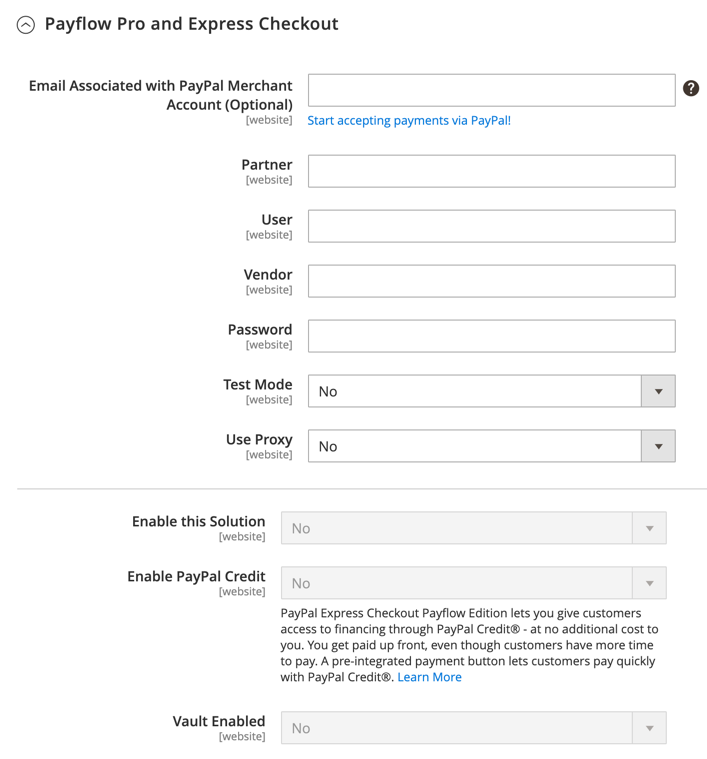 Required PayPal Settings - PayPal Payflow Pro
-
(Optional) Enter the Email Associated with your PayPal Merchant Account.
Email addresses are case sensitive. To receive payment, the email address must match the email address specified in your PayPal merchant account.
-
Enter one of the following credentials that you use to log in to your PayPal merchant account:
Partner Your PayPal Partner ID. User The ID of an additional user who is set up on your PayPal account. Vendor Your PayPal user login name. -
Enter the Password that is associated with your PayPal account.
-
If you want to run test transactions, set Test Mode to
Yes.When testing the configuration in a sandbox, use only credit card numbers that are recommended by PayPal. When you are ready to go live, return to the configuration and set Test Mode to
No. -
If your system uses a proxy server to establish the connection to the PayPal system, set Use Proxy to
Yesand do the following:-
Enter the IP address of the Proxy Host.
-
Enter the port number of the Proxy Port.
A proxy is used when the server firewall prevents direct access to the PayPal server. In such a case, a third-party server is used to relay traffic.
-
-
Set Enable This Solution to
Yes. -
If you want to offer PayPal Credit to your customers, set Enable PayPal Credit to
Yes. -
If you want to securely store customer payment/credit card details, so customers do not have to reenter payment information each time, set Vault Enabled to
Yes.
Step 3: Set up Advertise PayPal Credit (optional)
-
Expand
 the Advertise PayPal Credit section.
 Advertise PayPal Credit
 -
Click Get Publisher ID from PayPal and follow the instructions to get your account information.
-
Enter your Publisher ID.
-
Expand
 the Home Page section.
 Advertise PayPal Credit - Home Page settings
 -
To place a banner on the page, set Display to
Yes. -
Set Position to one of the following:
Header (center)Sidebar (right)
-
Set Size to one of the following:
190 x 100234 x 60300 x 50468 x 60728 x 90800 x 66
-
Expand
 the remaining sections and repeat the previous steps for the home page settings:
- Catalog Category Page
- Catalog Product Page
- Checkout Cart Page
Step 4: Complete the basic settings
-
Expand
 the Basic Settings - PayPal Payflow Pro section.
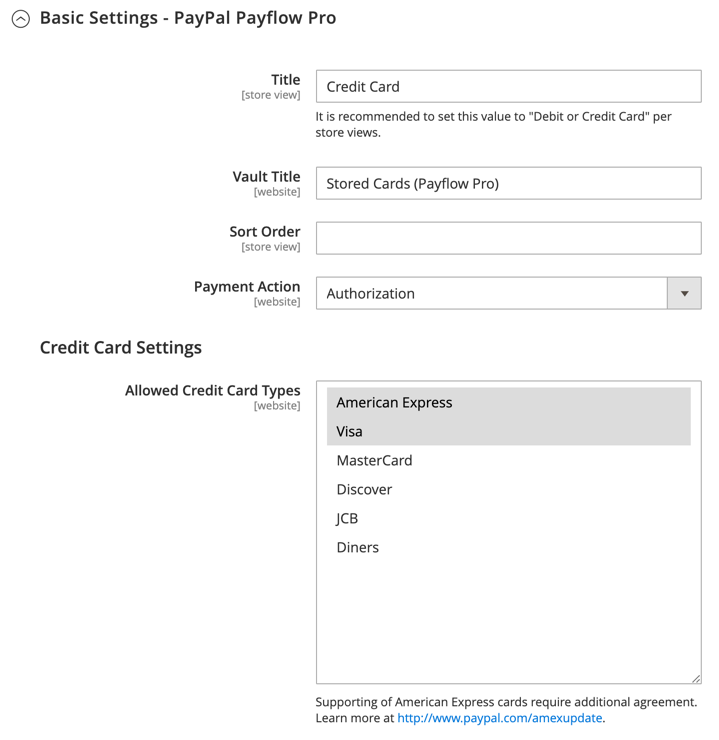 Basic Settings - PayPal Payflow Pro
 -
Enter a Title to identify PayPal Payflow Pro during checkout.
It is recommended that you use the title Debit or Credit Card.
-
If you offer multiple payment methods, enter a number for Sort Order to determine the sequence in which Payflow Pro appears when listed with the other payment methods.
This is relative to the other payment methods. (
0= first,1= second,2= third, and so on.) -
Set Payment Action to one of the following:
AuthorizationApproves the purchase and puts a hold on the funds. The amount is not withdrawn until it is captured by the merchant. SaleThe amount of the purchase is authorized and immediately withdrawn from the customer’s account. -
For Credit Card Settings, select the credit cards that you accept for payment in your store.
To select multiple cards, hold down the Ctrl key (PC) or the Command key (Mac) and click each one.
American Express requires an additional agreement.
Step 5: Complete the advanced settings
-
Expand
 the Advanced Settings section.
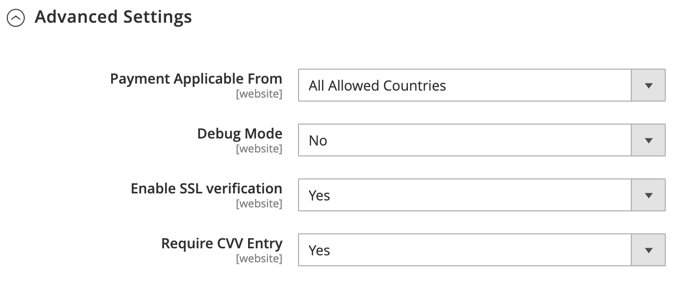 Advanced Settings - PayPal Payflow Pro
 -
Set Payment Applicable From to one of the following:
All Allowed CountriesCustomers from all countries specified in your store configuration can use this payment method. Specific CountriesAfter choosing this option, the Payment from Specific Countries list appears. Hold down the Ctrl key and select each country in the list where customers can make purchases from your store. -
To write communications with the payment system into the log file, set Debug Mode to
Yes.In accordance with PCI Data Security Standards, credit card information is not recorded in the log file.
-
To enable host authenticity verification, set Enable SSL Verification to
Yes. -
To require that customers enter a CVV code, set Require CVV Entry to
Yes. -
Complete the following sections, as needed for your store:
CVV and AVS Settings
To determine when a transaction should be rejected when the Address Verification System identifies a mismatch, specify how to handle various scenarios.
-
Expand
 the CVV and AVS Settings section.
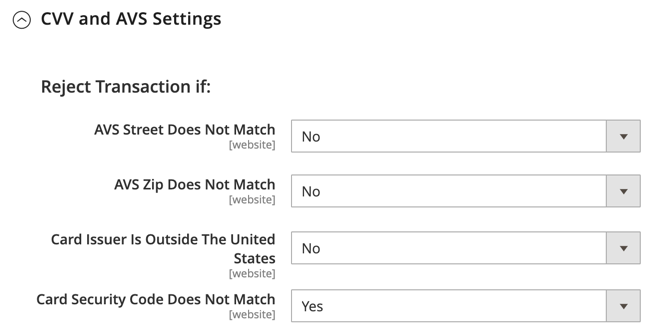 CVV and AVS Settings - PayPal Payflow Pro
 -
To reject a transaction based on a mismatched street mismatch, set AVS Street Does Not Match to
Yes. -
To reject a transaction based on a mismatched ZIP code, set AVS Zip Does Not Match to
Yes. -
To reject a transaction based on mismatched country identifier, set International AVS Indicator Does Not Match to
Yes. -
To reject a transaction based on a mismatched CVV code, set Card Security Code Does Not Match to
Yes.
Settlement Report Settings
-
Expand
 the Settlement Report Settings section.
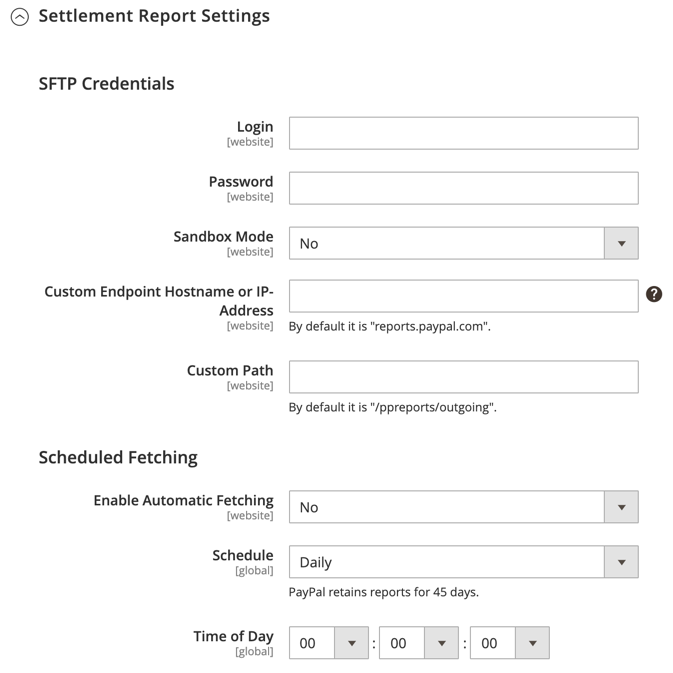 Settlement Report Settings - PayPal Payflow Pro
 -
For SFTP Credentials, do the following:
-
If you have signed up for the PayPal Secure FTP Server, enter the following SFTP login credentials:
- Login
- Password
-
To run test reports before going live with Express Checkout on your site, set Sandbox Mode to
Yes. -
Enter the Custom Endpoint Hostname or IP Address.
By default, the value is:
reports.paypal.com -
Enter the Custom Path where reports are saved.
By default, the value is:
/ppreports/outgoing
-
-
To generate reports according to a schedule, complete the Scheduled Fetching settings:
-
Set Enable Automatic Fetching to
Yes. -
Set Schedule to one of the following:
DailyEvery 3 DaysEvery 7 DaysEvery 10 DaysEvery 14 DaysEvery 30 DaysEvery 40 Days
PayPal retains each report for 45 days.
-
Set Time of Day to the hour, minute, and second when you want the reports to be generated.
-
Frontend Experience Settings
The Frontend Experience Settings give you the opportunity to choose which PayPal logos appear on your site, and to customize the appearance of your PayPal merchant pages.
-
Expand
 the Frontend Experience Settings section.
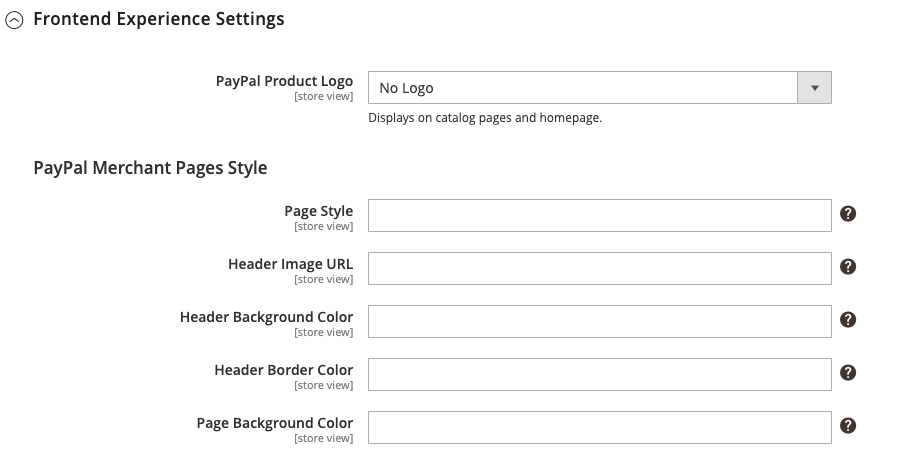 Frontend Experience Settings - PayPal Payflow Pro
 -
Select the PayPal Product Logo that you want to appear in the PayPal block in your store.
The PayPal logos are available in four styles and two sizes:
No LogoWe Prefer PayPal (150 x 60 or 150 x 40)Now Accepting PayPal (150 x 60 or 150 x 40)Payments by PayPal (150 x 60 or 150 x 40)Shop Now Using PayPal (150 x 60 or 150 x 40)
-
To customize the appearance of your PayPal merchant pages, do the following:
-
Enter the name of the Page Style that you want to apply to your PayPal merchant pages:
paypalUses the PayPal page style. primaryUses the page style that you identified as the primary style in your account profile. your_custom_valueUses a custom payment page style, which is specified in your account profile. -
For Header Image URL, enter the URL of the image that you want to appear in the upper-left corner of the payment page. The maximum file size is 750 pixels wide by 90 pixels high.
PayPal recommends that the image be located on a secure (https) server. Otherwise, a browser may warn that the page contains both secure and nonsecure items.
-
To set the color for your pages, enter the six-character hexadecimal code, without the
#symbol, for each of the following:Header Background Color Background color for the checkout page header. Header Border Color Color for two-pixel border around the header. Page Background Color Background color for the checkout page and around the header and payment form.
-
Step 6: Complete the basic settings for PayPal Express Checkout
-
Expand
 the Basic Settings - PayPal Express Checkout section.
 Basic Settings - PayPal Express Checkout
 -
Enter a Title to identify this payment method during checkout.
It is recommended to set the title to PayPal for each store view.
-
If you offer multiple payment methods, enter a number for Sort Order to determine the sequence in which PayPal Express Checkout appears when listed with the other payment methods.
This is relative to the other payment methods. (
0= first,1= second,2= third, and so on.) -
Set Payment Action to one of the following:
AuthorizationApproves the purchase and puts a hold on the funds. The amount is not withdrawn until it is captured by the merchant. SaleThe amount of the purchase is authorized and immediately withdrawn from the customer’s account. -
To display the Check out with PayPal button on the product page, set Display on Product Details Page to
Yes.
Step 7: Complete the advanced settings for PayPal Express Checkout
-
Expand
 the Advanced Settings section.
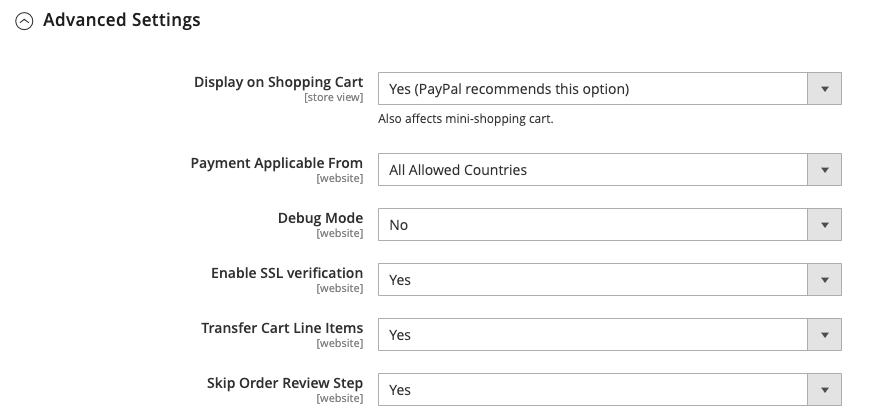 Advanced Settings - PayPal Express Checkout
 -
Set Display on Shopping Cart to
Yes. -
Set Payment Applicable From to one of the following:
All Allowed CountriesCustomers from all countries specified in your store configuration can use this payment method. Specific CountriesAfter choosing this option, the Payment from Specific Countries list appears. To select multiple countries, hold down the Ctrl key (PC) or the Command key (Mac) and click each item. -
To write communications with the payment system into the log file, set Debug Mode to
Yes.In accordance with PCI Data Security Standards, credit card information is not recorded in the log file.
-
To enable host authenticity verification, set Enable SSL Verification to
Yes. -
To display a full summary of the customer order by line item from the PayPal site, set Transfer Cart Line Items to
Yes. -
To allow the customer to complete the transaction from the PayPal site without returning to your Magento store for Order Review, set Skip Order Review Step to
Yes. -
When complete, click Save Config.
Step 8: Add Google reCAPTCHA
To better protect PayPal PayFlow Pro checkout, enable Google reCAPTCHA. It includes options to run reCAPTCHA using a clickable interface or an invisible check to validate the customer. We recommend the invisible option to increase sales conversion and protect your store. For details, see Google reCAPTCHA.