Configuring Magento for Vertex Tax Calculations
To complete the Magento configuration for Vertex tax calculations, you will need to enter a few values from Vertex Cloud. If you need help, see Vertex Field Mapping.
When enabled, the Tax configuration page includes the following Vertex sections:
| Vertex Settings | Vertex integration and account configuration |
| Vertex Company Information | Configure your company information |
| Vertex Delivery Terms | Configure the shipping terms for shipments. Set a global term, with an option to add overrides per country |
| Vertex Shipping Product Codes | Displays available shipping methods and costs |
| Vertex Logging | Located at the bottom of the page. Provides logging information and configuration |
Begin the Magento configuration
-
On the Admin sidebar, go to Stores > Settings > Configuration.
-
To define the scope of the configuration for a multisite or multistore installation, set the Store View chooser in the upper-left corner to the specific website or store view that is to be configured.
-
In the left panel, expand Sales and choose Tax.
-
Expand
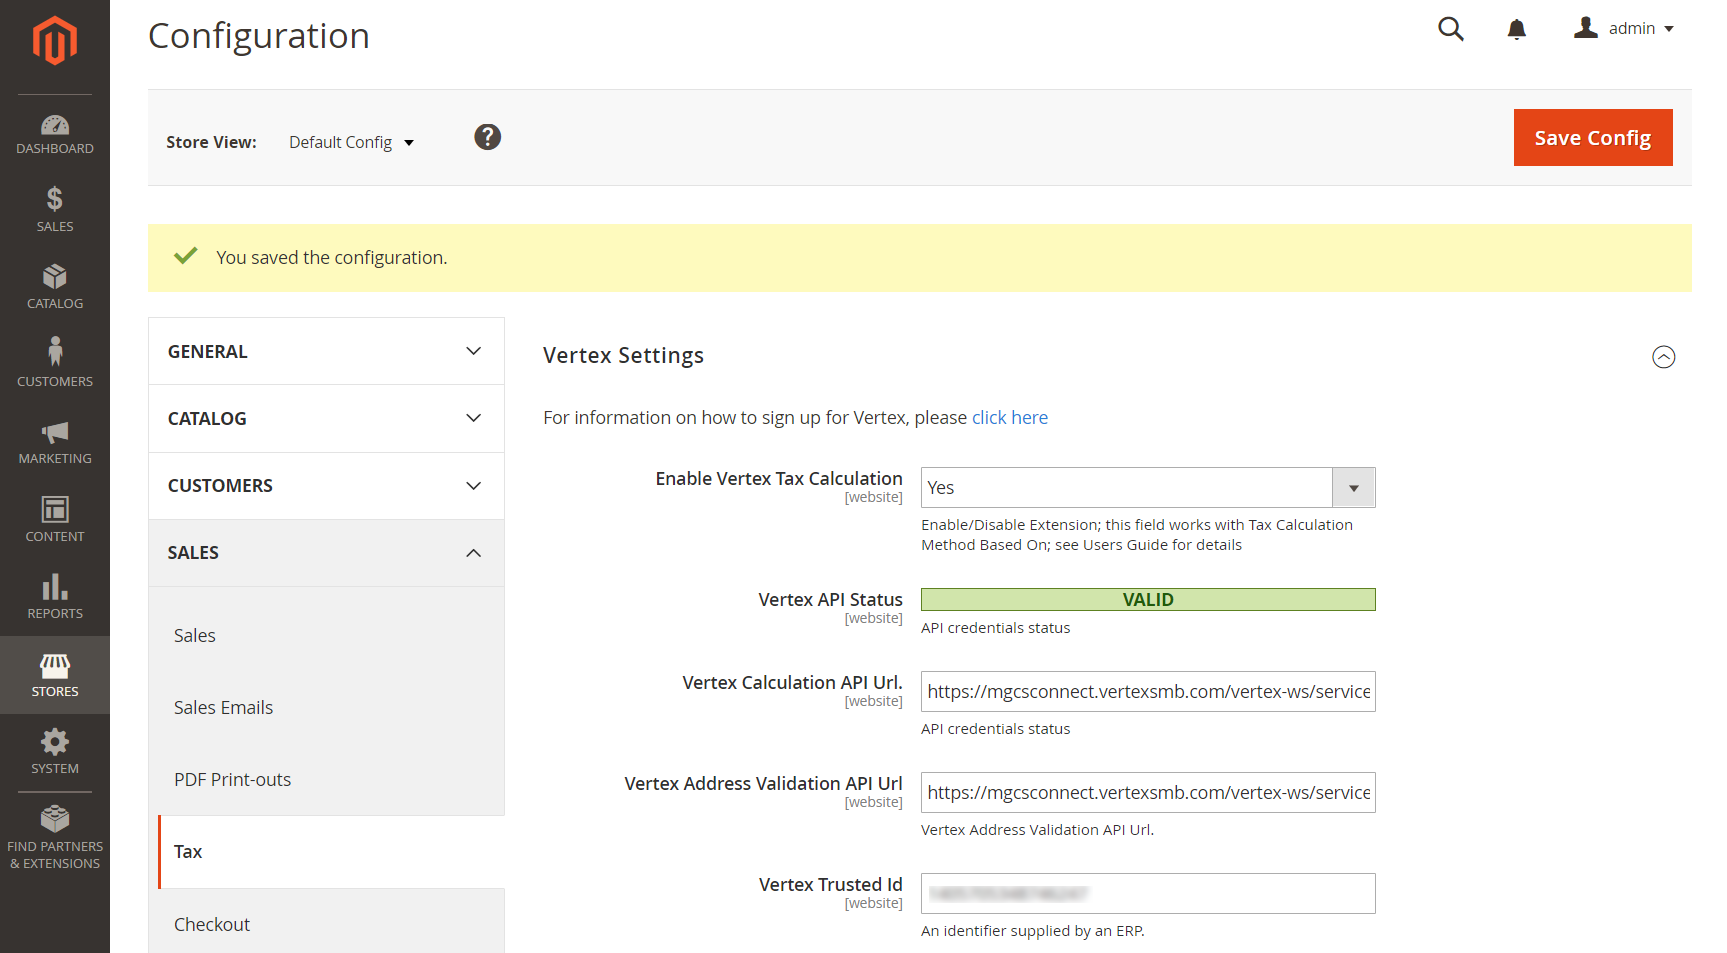
 the Vertex Settings on the page to enable Vertex and configure initial settings.
-
Set Use Vertex Tax Links to
Enable. This setting enables performance enhancements and allows you to enable and configure Vertex settings. -
Set Vertex Tax Calculation to
Enablethe extension and configure settings.You must have this option set to use Vertex and save configurations.
-
Enter the Vertex Trusted ID from your Vertex Cloud account. To find your Vertex Trusted ID, log in to your Vertex Cloud account and go to Settings > View All Connectors.
-
Verify the default values for the Vertex Calculation API URL and Vertex Address Validation API URL.
These connect the integration with Vertex Cloud and must match the URL displayed in your Vertex Connectors page for the Magento connector in the ERP Connector URL and Address Lookup URL fields. Clear the Use system value checkbox and change these values if needed.
-
To determine when tax is calculated for an invoice according to the workflow, set When to send invoiced to Vertex to one of the following:
When Invoice CreatedThe tax is calculated and sent to Vertex when the invoice generates. When Order Status is ChangedThe invoice generates when orders enter the selected status. If this value is selected, set the Invoice when Order Status option to specify the status. -
To set the Use Vertex for orders shipping to, select the countries and nations to apply Vertex taxes for destination addresses.
If a shipping address is not available on the order, the billing address is used.
-
Set how you want to Summarize Tax By. Choose
Product and ShippingorJurisdiction.
-
-
Expand
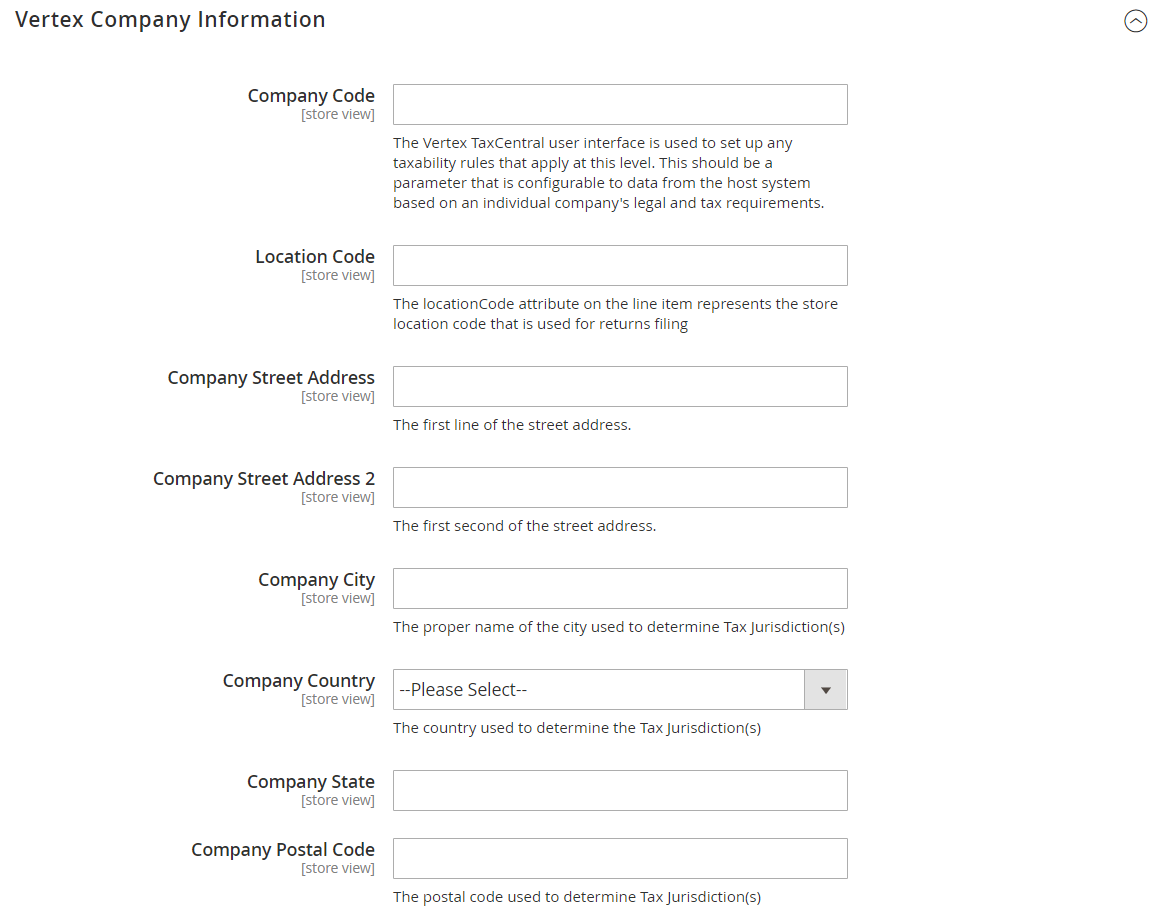
 the Vertex Company Information section. Then, do the following:
-
Enter the Company Code from the heading of the Configure Company page of your Vertex Cloud account.
-
Enter the Location Code from the Registration Details section of your Vertex Cloud account.
This is the specific jurisdiction where the company is registered to file tax returns. This value corresponds to the Location Code that is entered as a Registered Location.
-
Complete the remaining company address fields.
-
-
Click Save Config.
If the configuration settings are correct, the Vertex API Status field turns green and indicates the status is
Valid. At this point, you can continue with the remaining Vertex configuration settings, or complete them later.You need to save the configuration again if you modify any of the Vertex tax class or calculation settings.
-
When you are ready to continue, complete the following sections.
Vertex delivery terms
Set the delivery terms (shipping terms) that determines the vendor or customer jurisdiction where the title transfer of a supply takes place. You can set a global term and overrides per country. These options provide support to EU VAT.
-
Expand
 the Vertex Delivery Terms section.
 -
To change the default Global Delivery Term, select an option (
SUP - Supplier Shipsis the default). -
(Optional) Create a Delivery Term Override for each country you want a specific delivery term that differs from the global.
Click Add and select a country and term.
Vertex Shipping product codes
The Vertex Shipping Product Codes section lists all shipping methods and rates that are currently mapped to product SKUs in Vertex Cloud.
Vertex Flexible Fields
If you need to identify taxability based on information in your Magento store beyond the standard customer and and product taxability drivers defined by Vertex, configure the flexible fields to be used in your Vertex Tax Assist Rules.
Step 1: Create custom Flexible Field in Magento
-
Expand
 the Vertex Flexible Fields section.
 -
Expand the area for the category you want to use to map a Magento field. There are three available flexible field categories:
Code Fields Use this category to define a fields using an alphanumeric string value with a maximum length of 40 characters. Strings that exceed the size limit are truncated. You can create a maximum of 25 flexible code fields. Numeric Fields Use this category to define fields using numeric values for data, such as durations and weights, including floating decimal points. You can create a maximum of 10 flexible numeric fields. Date Fields Use this category to define fields using dates in the format YYYY/MM/DD. You can create a maximum of five flexible date fields. -
For the Field ID you want to configure, click the Data Source option to display the list of Magento fields and select the field to use as a flexible field in Vertex Cloud.
You can enter a text string in the search field at the top of the list to filter the displayed items and help to find the field you want.
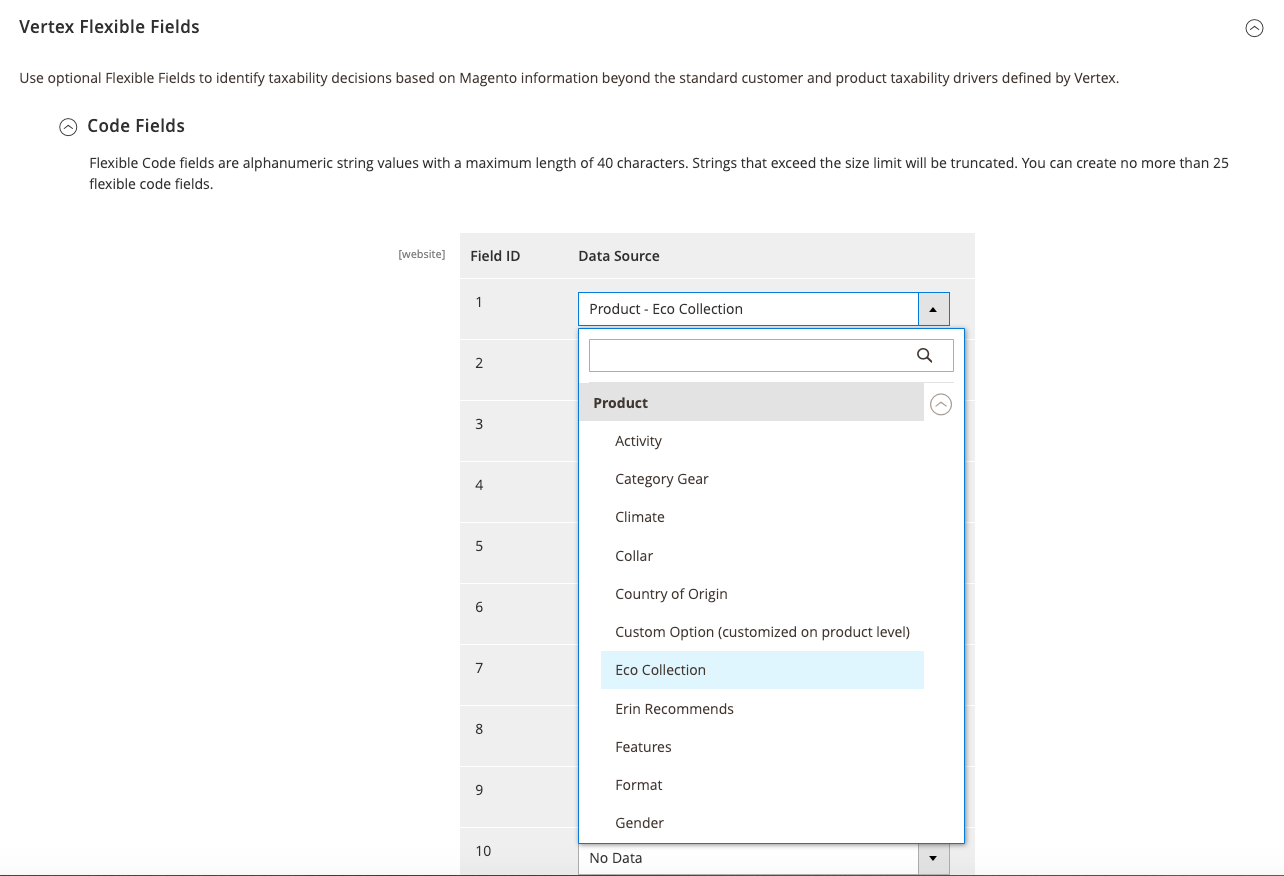 Code - Field ID 1
 -
Click Save Config.
Step 2: Use the Flex Field in a Vertex Tax assist rule
Add a new tax assist rule or edit an existing rule for your Vertex Cloud account that uses the configured flex field for tax calculation.
For detailed information about adding tax assist rules in the Vertex Cloud, see Add a tax assist rule (requires a login to the Vertex Documentation Center).
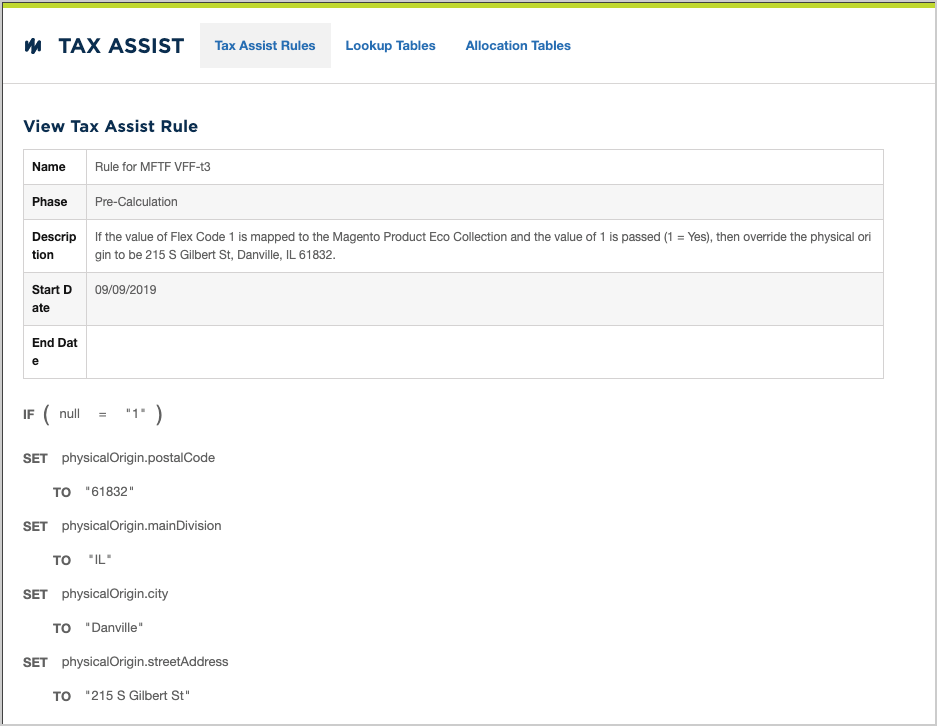 Vertex Tax Assist Rule
In this example, Flex Code 1 is mapped to Product > Eco Collection and when this has a value of 1, the Physical Origin/Ship From address (215 S Gilbert St, Danville, IL 61832) is used instead of the Company Address configured in Vertex.
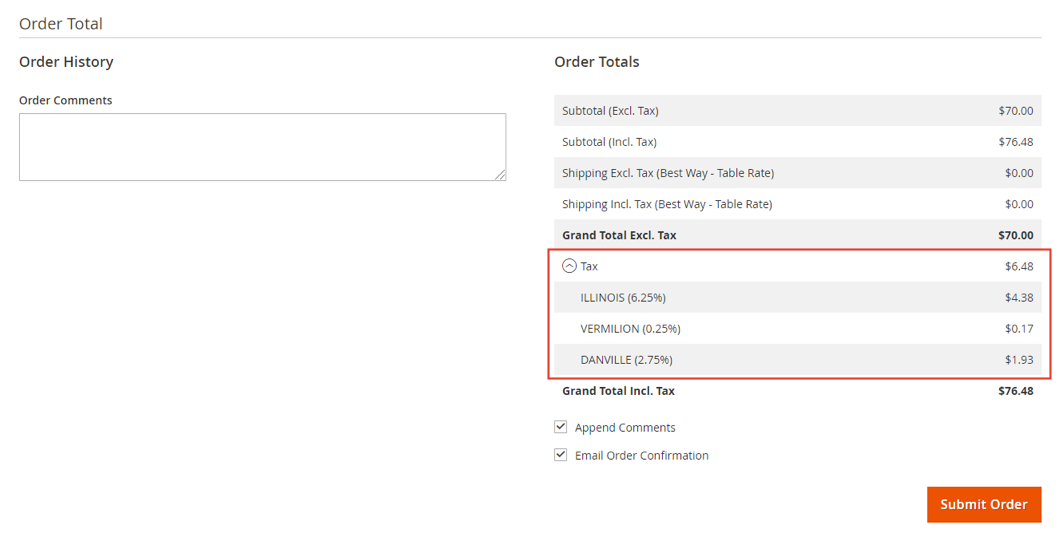 Vertex Tax Assist Rule
Vertex tax classes
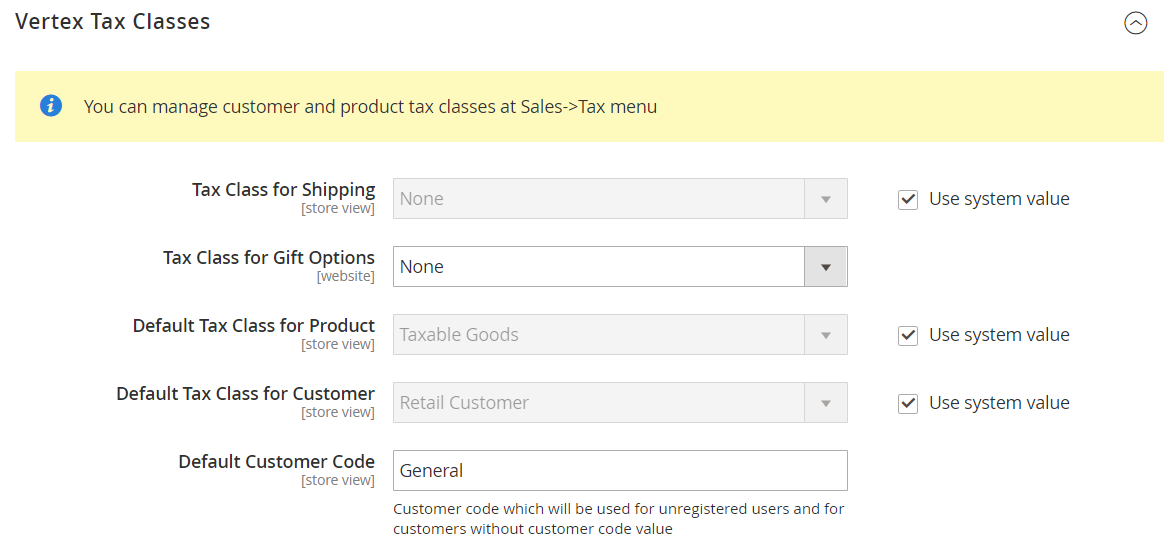
By default, many of the following tax classes are initially set to None.
-
Expand
 the Vertex Tax Classes section.
 -
To change the default Tax Class for Shipping, clear the Use System Value checkbox and choose the applicable tax class.
-
Set Tax Class for Gift Options to one of the following:
NoneGift Options
-
To change the Default Tax Class for Product, clear the Use System Value checkbox and choose the applicable tax class.
-
To change the Default Tax Class for Customer, clear the Use System Value checkbox and choose the applicable tax class.
-
Accept the default value for Default Customer Code, which is used for unregistered guests and customers who shop while not logged in to their accounts.
-
In the Vertex Tax Classes section, complete as many of the following settings as applicable:
Adjustment fees
-
Set Refund Adjustments Class to one of the following:
NoneRefund Adjustments
-
Accept the default value for Adjustment Fee Code.
-
Accept the default value for Adjustment Refund Code.

Gift wrap order
-
Set Gift Wrap for Order Class to one of the following:
NoneOrder Gift Wrapping
-
Accept the default value for Gift Wrap for Order Code.
Gift wrap single product
-
Set Gift Wrap Class for Single Product to one of the following:
NoneItem Gift Wrapping
-
Accept the default value for Gift Wrap Code Prefix for Single Product.
Printed gift card
-
Set Item Line Class for Printed Gift Card to one of the following:
NonePrinted Gift Card
-
Accept the default value for Item Line Code for Printed Gift Card.
Reward points
-
Set Class for Reward Points Discount Line Item to one of the following:
NoneReward Points
-
Accept the default value for Product Code for Reward Points Discount Line Item.
Vertex logging
-
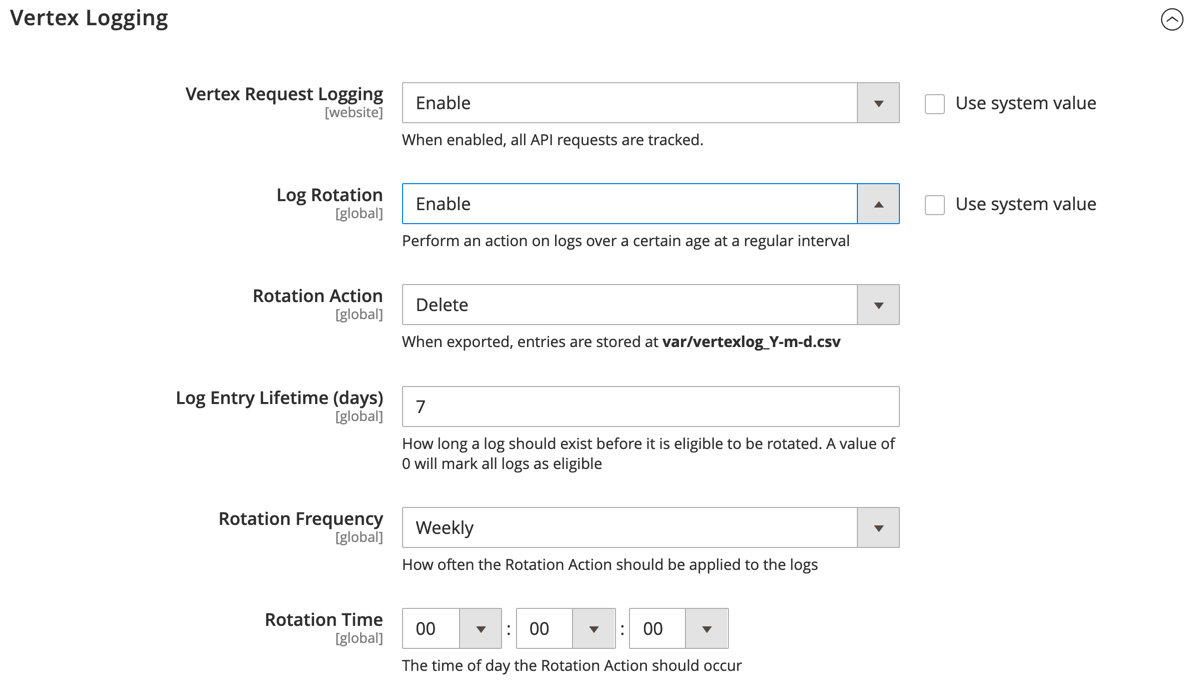
To track and review Vertex actions and taxes, enable the logging options.
This exports the logs and saves the information to the
var/vertexlog_Y-m-d.csvfile (year-month-day). -
When opening and reviewing the CSV log files, make sure to use a spreadsheet application that supports long cell contents.
Some applications, like Microsoft Excel, could cause issues with cut off data.
-
Expand
 the Vertex Logging section at the bottom of the page.
 -
Set Vertex Request Logging to
Enableto capture full logs. -
Set Log Rotation to
Enable. Additional configuration fields appear for setting the rotation. -
For Rotation Action, set to
DeleteorExport to File and Delete. -
For Log Entry Lifetime (days), set how long the log should exist before the rotation action occurs.
For example, if set to 7, on the 7th day the action completes on the schedule.
-
Set the Rotation Frequency to
Daily,Weekly, orMonthly. -
For Rotation Time, set the hours, minutes, and seconds in the day to complete the rotation action.
Complete the Magento configuration
-
Expand (
 ) the Calculation Settings section.
 -
For Tax Calculation Method Based On, clear the Use system value checkbox and set the value to
Vertex.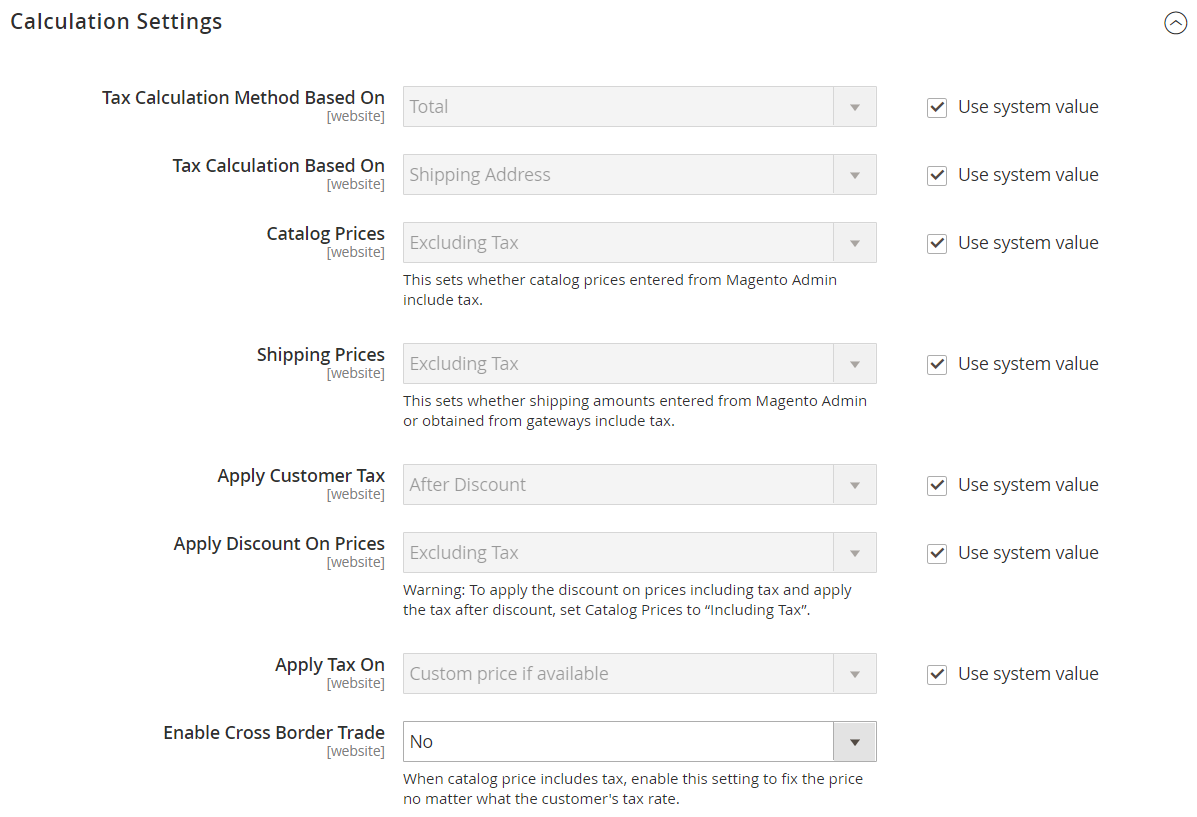 Calculation Settings
 -
When complete, click Save Config.
-
To refresh the cache, do the following:
-
On the Admin sidebar, go to System > Tools > Cache Management.
-
Select the checkbox of each invalid cache.
-
Set Actions to
Refresh. Then, click Submit.
-
Test the Vertex Configuration
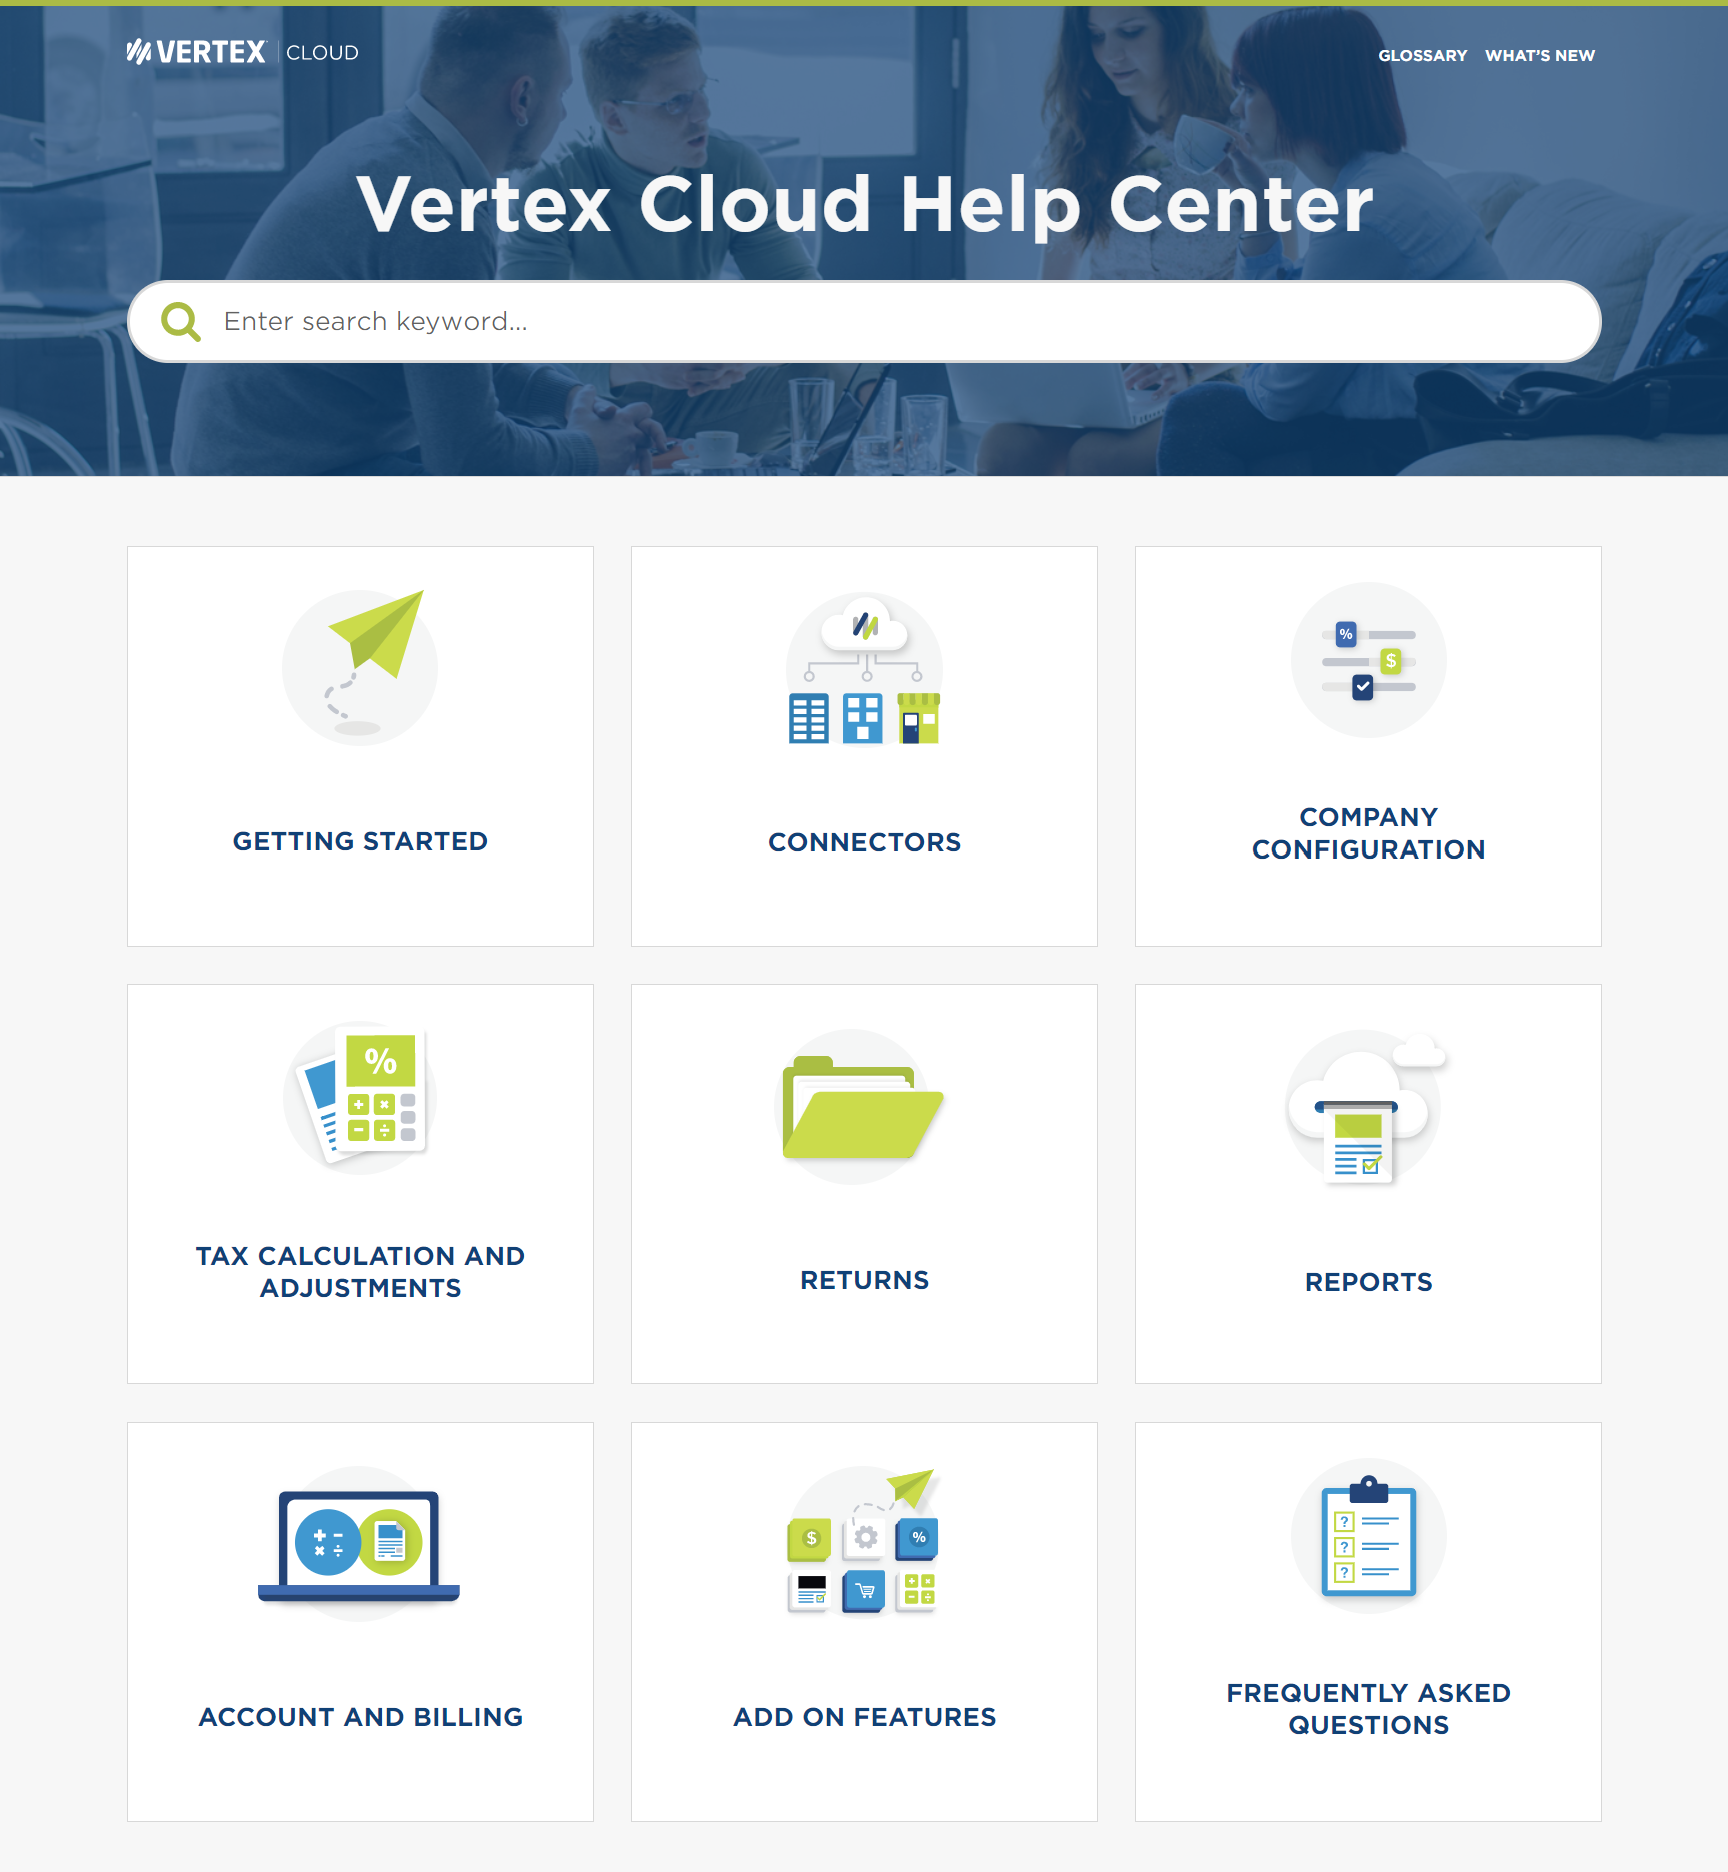
After completing the configuration, your Magento store is connected to Vertex Cloud. Visit the Vertex Cloud Help Center to review your settings in more detail, and to learn how to enter test transactions, generate returns, and run reports.
Vertex Cloud has excellent documentation with videos to help you come up to speed. When your testing is complete and you are ready, you can Go Live with the click of a button.
Vertex API Automatically Disabled
When the Vertex connector is enabled and the Display prices in Catalog is set to Including Tax, updating your product prices in the Magento catalog to include tax could significantly degrade Magento performance. In this situation, the Vertex connector will automatically disable and you will see an error message in the Vertex configuration page. You must set this value to Excluding Tax to re-enable the Vertex connector.
 Vertex API error
Vertex Cache Management
When clearing caches using Cache Management, Vertex has a cache option included. This option improves performance during the checkout process.

