Configure Global Options
Configure the default configuration options for product and stock for your websites. Some of these settings can be overridden per product through Configuring Product Options. To configure Distance Priority settings, see Configuring Distance Priority Algorithm.
Configure product and stock options globally
-
On the Admin sidebar, go to Stores > Settings > Configuration.
-
In the left panel, expand Catalog and choose Inventory.
-
Expand
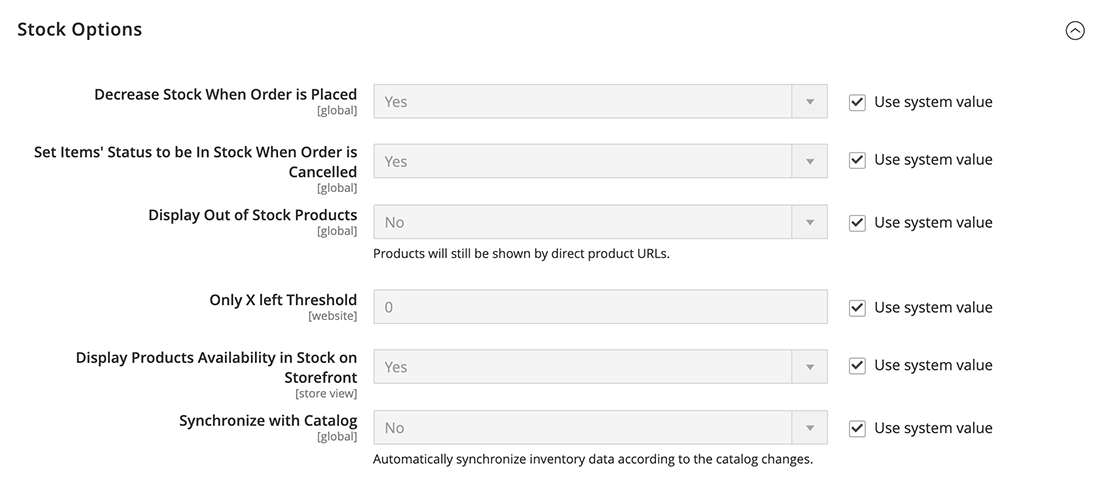
 the Stock Options section and set the options:
-
To adjust the quantity on hand when an order is placed, set Decrease Stock When Order is Placed to
Yes. -
To return items to stock if an order is canceled, Set Items’ Status to be in Stock When Order in Cancelled to
Yes. -
To continue to display products in the catalog that are no longer in stock, set Display Out of Stock Products to
Yes. -
If price alerts are enabled, customers can sign up to be notified when the product is back in stock.
-
To set the start for displaying the last remaining inventory amount on the product page, enter an amount for Only X left Threshold.
The message begins to appear when the quantity in stock reaches the threshold. For example, if set to
3, the message “Only 3 left” appears when the quantity in stock reaches three. The message adjusts to reflect the quantity in stock, until the quantity reaches zero. -
To display an “In Stock” or “Out of Stock” message on the product page, set Display Products Availability In Stock on Storefront to
Yes. -
To keep consistency between inventory and catalog, set Synchronize with Catalog to
Yes. With this option enabled, inventory data will be adjusted according to the catalog changes (such as product removed, product SKU changed, and product type changed).
-
-
Expand
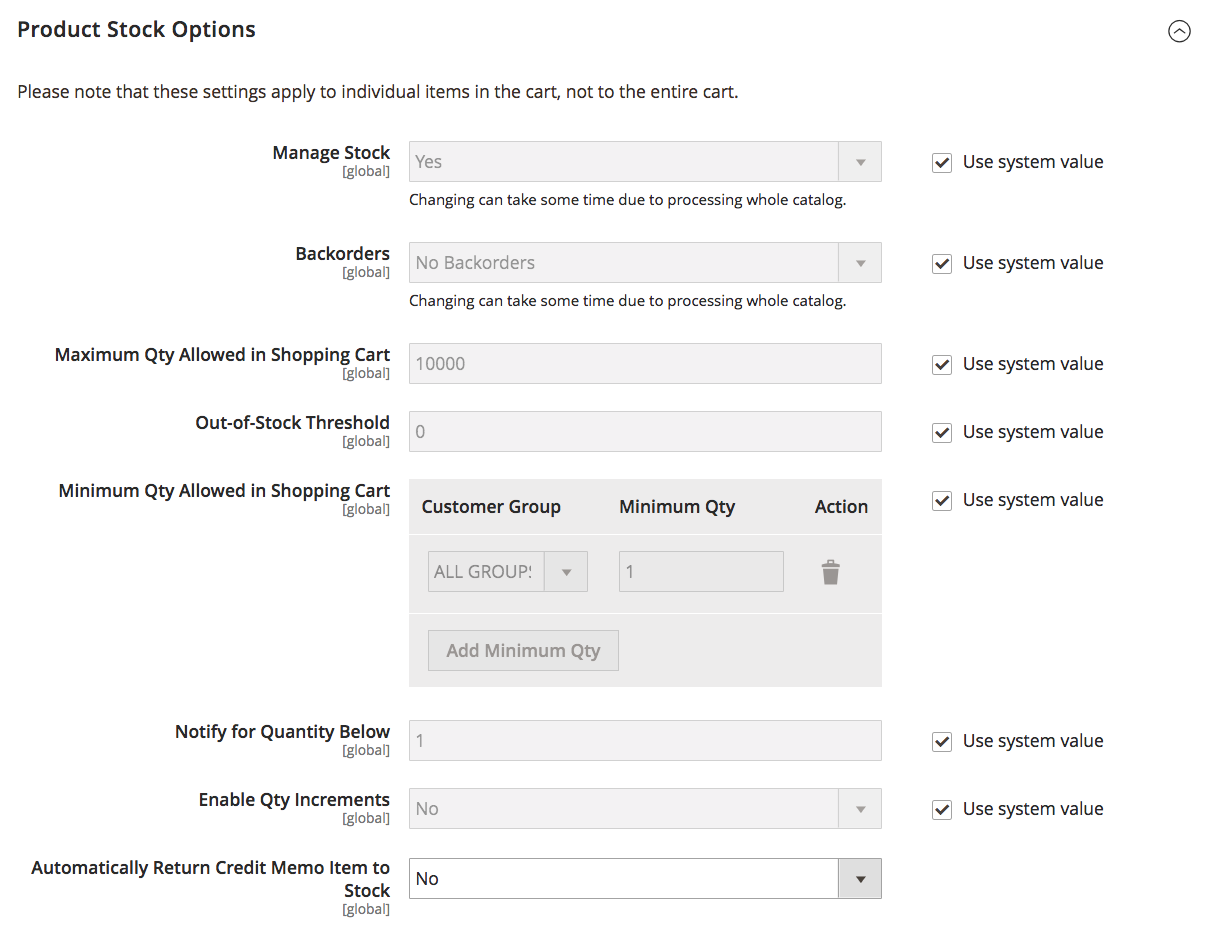
 the Product Stock Options section and set the options:
-
To activate inventory control for your catalog, set Manage Stock to
Yes. -
Set Backorders to one of the following:
No Backorders To not accept backorders when product is out of stock. Allow Qty Below 0 To accept backorders when the quantity falls below zero. Allow Qty Below 0 and Notify Customer To accept backorders when the quantity falls below zero, and notify the customer that the order can still be placed. -
Enter the Maximum Qty Allowed in Shopping Cart.
-
Enter an amount for the Out-of-Stock Threshold:
Positive amount With Backorders disabled, enter a positive amount. Zero With Backorders enabled, entering zero allows for infinite backorders. Negative amount With Backorders enabled, we recommend entering a negative amount. The amount is added to the Salable Quantity. For example, enter -50 to allow orders up to this amount. -
Enter the Minimum Qty Allowed in Shopping Cart for selected group and amounts.
-
In the Notify for Quantity Below field, enter the stock level that triggers notification that the item is out of stock.
-
To activate quantity increments for the product, set Enable Qty Increments to
Yes. Then in the Qty Increments field, enter the number of the items that must be purchased to meet the requirement.For example, an item that is sold in increments of 6 can be purchased in quantities of 6, 12, 18, and so on.
-
For Inventory Management, Automatically Return Credit Memo Item to Stock is set to
No. When submitting a credit memo, you enter and select to return stock to sources.
-
-
Expand
 the Admin bulk operations section.
-
Set Run asynchronously to run bulk operations asynchronously for mass product actions
This includes bulk assign sources, unassign sources, and transfer inventory to source. It collects bulk actions up to the Asynchronous batch size, then runs those actions. This option is disabled by default. We recommend reviewing your performance with bulk actions before enabling.
To configure and support asynchronous queue managers, you must issue a command using the command line. This step may require developer assistance. See Magento DevDocs, Start message queue consumers.
-
If enabled, set the Asynchronous batch size. The default batch size is 100. When bulk processes reach this amount, they perform them at that time.
-
-
When complete, click Save Config.


