Customizing layout illustration
What’s in this topic
This article features a step-by-step illustration of how a real-life layout customization task is performed. Namely, it illustrates how to change the layout of customer account links in a Magento store page header.
Moving customer account links
In their Orange theme, OrangeCo wants to transform the header links block to a drop-down, the way it is done in the Magento Luma theme:

To do this, they need to wrap the list of header links with a container and add a greeting with a drop-down arrow before the list.
The Orange theme inherits from Blank, so by default the rendered header links look like following:
1
2
3
4
5
6
7
8
9
10
11
<div class="panel header">
    ...
    <ul class="header links">
        <li class="item link compare" data-bind="scope: 'compareProducts'" data-role="compare-products-link">...</li>
        <li class="greet welcome" data-bind="scope: 'customer'">...</li>
        <li>...</li>
        <li class="link wishlist" data-bind="scope: 'wishlist'">...</li>
        <li class="authorization-link" data-label="or">...</li>
    </ul>
    ...
</div>
The markup required for the drop-down is the following:
1
2
3
4
5
6
7
8
9
10
11
12
13
14
15
16
17
18
19
20
21
22
23
24
25
26
27
28
29
30
31
32
<div class="panel header">
    ...
    <ul class="header links">
        <li class="greet welcome" data-bind="scope: 'customer'">...</li>
        <li class="customer-welcome">
            <span class="customer-name"
                  role="link"
                  tabindex="0"
                  data-mage-init='{"dropdown":{}}'
                  data-toggle="dropdown"
                  data-trigger-keypress-button="true"
                  data-bind="scope: 'customer'">
                <span data-bind="text: customer().fullname"></span>
                <button type="button"
                        class="action switch"
                        tabindex="-1"
                        data-action="customer-menu-toggle">
                    <span>Change</span>
                </button>
            </span>
            <div class="customer-menu" data-target="dropdown" aria-hidden="true">
                <ul class="header links">
                    <li>...</li>
                    <li class="link wishlist" data-bind="scope: 'wishlist'">...</li>
                    <li class="authorization-link" data-label="or">...</li>
                </ul>
            </div>
        </li>
        <li class="authorization-link" data-label="or">...</li>
    </ul>
    ....
</div>
Step 1: Define the layout blocks
OrangeCo applies the Luma theme. Using the approach described in Locate templates, layouts, and styles they find out that the original block responsible for displaying the header links is defined in
<Magento_Theme_module_dir>/view/frontend/layout/default.xml:
1
2
3
4
5
6
7
8
<container name="header.panel" label="Page Header Panel" htmlTag="div" htmlClass="panel header">
    ...
    <block class="Magento\Framework\View\Element\Html\Links" name="top.links">
        <arguments>
            <argument name="css_class" xsi:type="string">header links</argument>
        </arguments>
    </block>
</container>
(See app/code/Magento/Theme/view/frontend/layout/default.xml on GitHub).
Other modules use this block to add their specific links to the header using the referenceBlock instruction. For example, see how links are added in the Customer module: app/code/Magento/Customer/view/frontend/layout/default.xml#L10-L23
The Luma theme moves the top.links block to the new customer block in the extending layout file.
1
<Magento_luma_theme_dir>/Magento_Customer/layout/default.xml
1
2
3
4
5
6
7
<referenceBlock name="header.links">
    <block class="Magento\Customer\Block\Account\Customer" name="customer" template="account/customer.phtml" before="-"/>
    ...
</referenceBlock>
...
<move element="top.links" destination="customer"/>
...
The links that should be in header, but outside the drop-down menu are added in the new header.links block (<Magento_luma_theme_dir>/Magento_Theme/layout/default.xml):
1
2
3
4
5
6
7
<referenceContainer name="header.panel">
    <block class="Magento\Framework\View\Element\Html\Links" name="header.links">
        <arguments>
            <argument name="css_class" xsi:type="string">header links</argument>
        </arguments>
    </block>
</referenceContainer>
Step 2: Define the templates
Similar to the way they defined the layout on the previous step, OrangeCo
defines the template which is used as the drop-down container : <Magento_Customer_module_dir>/view/frontend/templates/account/customer.phtml.
1
2
3
4
5
6
7
8
9
10
11
12
13
14
15
16
17
18
19
20
21
22
23
24
25
26
27
28
29
30
31
32
33
34
35
36
37
<?php if($block->customerLoggedIn()): ?>
    <li class="customer-welcome">
        <span class="customer-name"
              role="link"
              tabindex="0"
              data-mage-init='{"dropdown":{}}'
              data-toggle="dropdown"
              data-trigger-keypress-button="true"
              data-bind="scope: 'customer'">
            <span data-bind="text: customer().fullname"></span>
            <button type="button"
                    class="action switch"
                    tabindex="-1"
                    data-action="customer-menu-toggle">
                <span><?php /* @escapeNotVerified */ echo __('Change')?></span>
            </button>
        </span>
        <script type="text/x-magento-init">
        {
            "*": {
                "Magento_Ui/js/core/app": {
                    "components": {
                        "customer": {
                            "component": "Magento_Customer/js/view/customer"
                        }
                    }
                }
            }
        }
            </script>
            <?php if($block->getChildHtml()):?>
            <div class="customer-menu" data-target="dropdown">
                <?php echo $block->getChildHtml();?>
            </div>
            <?php endif; ?>
        </li>
    <?php endif; ?>
See app/code/Magento/Customer/view/frontend/templates/account/customer.phtml.
Step 3: Extend the base layout to add a block
OrangeCo needs to create a new block, say, header.links, in the header.panel container, to move the links there. As the links can be added to this list by different modules, it is better to add this block to the default.xml page configuration of the Magento_Theme module.
So the following extending layout is added in the Orange theme:
1
app/design/frontend/OrangeCo/orange/Magento_Theme/layout/default.xml
1
2
3
4
5
6
7
8
9
10
11
12
<?xml version="1.0"?>
<page xmlns:xsi="http://www.w3.org/2001/XMLSchema-instance" xsi:noNamespaceSchemaLocation="urn:magento:framework:View/Layout/etc/page_configuration.xsd">
    <body>
        <referenceContainer name="header.panel">
            <block class="Magento\Framework\View\Element\Html\Links" name="header.links">
                <arguments>
                    <argument name="css_class" xsi:type="string">header links</argument>
                </arguments>
            </block>
        </referenceContainer>
    </body>
</page>
Step 4: Move links
To move the links to the header.links block, OrangeCo adds an extending layout:
app/design/frontend/OrangeCo/orange/Magento_Customer/layout/default.xml
1
2
3
4
5
6
7
8
9
10
11
12
<?xml version="1.0"?>
<page xmlns:xsi="http://www.w3.org/2001/XMLSchema-instance" xsi:noNamespaceSchemaLocation="urn:magento:framework:View/Layout/etc/page_configuration.xsd">
    <body>
        <referenceBlock name="header.links">
            <block class="Magento\Customer\Block\Account\Customer" name="customer" template="account/customer.phtml" before="-"/>
            <block class="Magento\Customer\Block\Account\AuthorizationLink" name="authorization-link-login" template="account/link/authorization.phtml"/>
        </referenceBlock>
        <move element="register-link" destination="header.links"/>
        <move element="top.links" destination="customer"/>
        <move element="authorization-link" destination="top.links" after="-"/>
    </body>
</page>
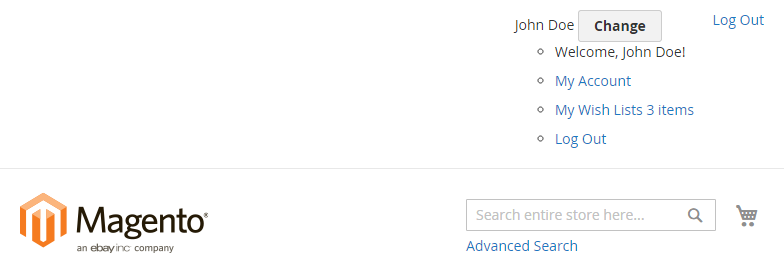
Now the customer links look like following:

Clicking the Change button toggles the active CSS class:
To add quick basic styling and visual behavior to the “dropdown” menu, OrangeCo added _extend.less to their theme with the following customizations:
- Redundant elements are hidden with CSS.
- The
.lib-dropdown()mixin from Magento UI library was applied to the corresponding element.
app/design/frontend/OrangeCo/orange/web/css/source/_extend.less
1
2
3
4
5
6
7
8
9
10
11
12
13
14
15
16
17
18
19
20
21
22
23
24
25
26
27
28
29
30
31
32
33
34
35
36
37
38
39
40
41
42
43
44
45
46
47
48
49
50
51
52
53
54
55
56
57
58
59
60
61
//
//  Common
//  _____________________________________________

& when (@media-common = true) {
    .header.panel .header.links {
        .customer-welcome + .authorization-link {
            display: none;
        }
    }
}

//
//  Mobile
//  _____________________________________________

.media-width(@extremum, @break) when (@extremum = 'max') and (@break = @screen__m) {
    .customer-name,
    .customer-welcome + .authorization-link {
        display: none;
    }
}

//
//  Desktop
//  _____________________________________________

.media-width(@extremum, @break) when (@extremum = 'min') and (@break = @screen__m) {
    .customer-welcome {
        .lib-dropdown(
            @_toggle-selector: ~'.action.switch',
            @_options-selector: ~'.customer-menu .header.links',
            @_dropdown-actions-padding: 0,
            @_icon-font-text-hide: true,
            @_icon-font-size: 22px,
            @_icon-font-line-height: 22px,
            @_dropdown-list-min-width: 160px,
            @_dropdown-list-item-hover: transparent,
            @_dropdown-list-pointer-position: right,
            @_dropdown-list-position-right: 0
        );

         li {
            a {
                .lib-link(
                @_link-color: #333,
                @_link-text-decoration: none,
                @_link-color-visited: #333,
                @_link-text-decoration-visited: none,
                @_link-color-hover: #333,
                @_link-text-decoration-hover: none,
                @_link-color-active: #333,
                @_link-text-decoration-active: none
                );
                display: block;
                line-height: 1.4;
                padding: 8px;
            }
        }
    }
}
As a result, the customer links look like following:
