
Create a Storefront
Welcome to your Commerce Storefront journey. Our goal is to make the journey fun and informative. We start every topic with big-picture overviews and relevant vocabulary. We then walk you through the details step-by-step. Let’s get started.
Big picture
Section titled “Big picture”The tutorial helps you quickly create a new Edge Delivery Services storefront using the Commerce boilerplate template . The boilerplate provides a starter storefront that uses a pre-configured Adobe Commerce environment.
After completing this tutorial, you will have a new GitHub repository with a storefront that is pre-configured with all the necessary components and services to get you started. You will also have a local development environment where you can explore the boilerplate and start customizing it to develop your own production storefront.
The following diagram shows the steps you’ll take to create and configure your starter storefront:
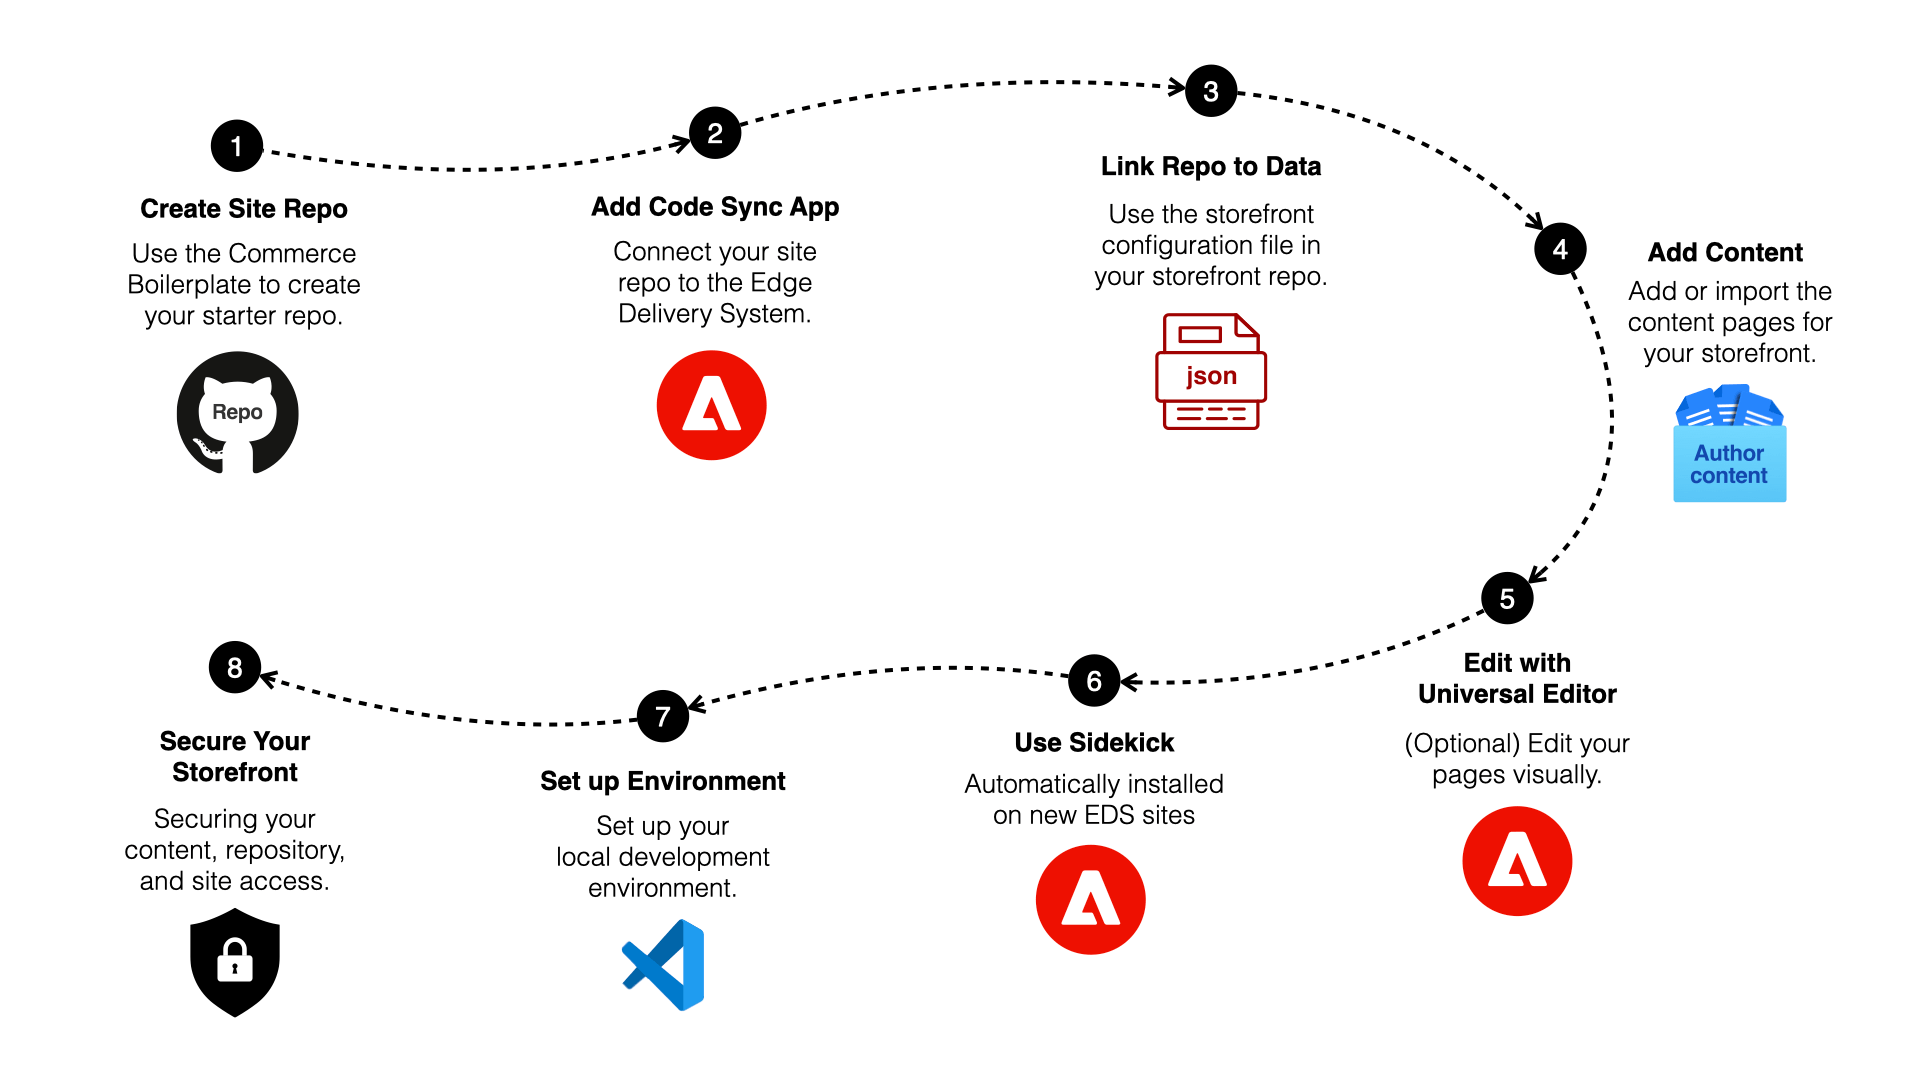
- Create Site Repo by generating a storefront repository from the boilerplate template .
- Add Code Sync App to your newly created repo. This app automatically redeploys your storefront when you push changes to the main branch. It also provides the Edge Delivery system (Helix Admin) with access to your repo so it can coordinate code changes with content changes. Installing it on your repo automatically configures the content pointer in your site’s helix configuration.
- Link Repo to Data using the values in your storefront configuration in your GitHub repo.
- Add Content to the Document Author environment hosted at
https://da.live/using the Site Creator tool. - (Optional) Use Universal Editor for content editing to edit content on your storefront.
- (Optional) Use Sidekick and configure it to preview, publish, and edit content on your storefront.
- Set up Local Environment to enable the development of the boilerplate into your own storefront.
- Secure your storefront to protect your content, repository, and site access before deploying to production or sharing with external users.
Which backend do you have?
Section titled “Which backend do you have?”Storefront supports three distinct customer scenarios. Each has different prerequisites and setup steps. Follow only the guidance for your backend. See the Backend options page for details.
| Scenario | Description | Prerequisites |
|---|---|---|
| Commerce PaaS | Existing Adobe Commerce Platform-as-a-Service customers who previously accessed Storefront without Adobe Commerce as a Cloud Service or Adobe Commerce Optimizer licenses | Manual installation: Storefront Compatibility package, Storefront services (Data Connection, Services Connector, Catalog Service, Live Search, Product Recommendations). See PaaS prerequisites. |
| Adobe Commerce as a Cloud Service | New Adobe Commerce as a Cloud Service customers whose license includes Storefront | All requirements and services are automatically managed. See Adobe Commerce as a Cloud Service prerequisites. |
| Adobe Commerce Optimizer | New Adobe Commerce Optimizer customers whose license includes Storefront, or existing Commerce customers who add Adobe Commerce Optimizer | Fully managed SaaS. See Adobe Commerce Optimizer prerequisites for supported backend combinations. |
Confirm your backend’s prerequisites before continuing. Unless a step says otherwise, it applies to all backend types; only Link repo to commerce data is backend-specific.
Vocabulary
Section titled “Vocabulary”Before we dive into the step-by-step guide, let’s review some key vocabulary that will help you understand the process of creating and configuring your storefront.
Boilerplate template
Section titled “Boilerplate template”Pre-configured storefront with the components and services you need to get started.
Code Sync app
Section titled “Code Sync app”Syncs your repo with the Edge Delivery code bus and purges CDN caches when you push. It is installed on a repository—global installation on a user or org space is not allowed. Installing it on a repo configures your site’s content pointer in the helix configuration to your DA (Document Authoring) folder.
Content folder
Section titled “Content folder”Folder for your storefront content (images, text, assets). Edge Delivery Services uses it for document-based authoring: editing, previewing, and publishing.
Sidekick
Section titled “Sidekick”A browser extension that allows creators to edit, preview, and publish content from a content folder. It pushes content to the Edge Delivery content bus for previews and publishing. It also helps developers open the source document from a published page. For example, on yoursite.net/apparel, clicking the Edit button from Sidekick opens another browser tab showing the source document from your content folder.
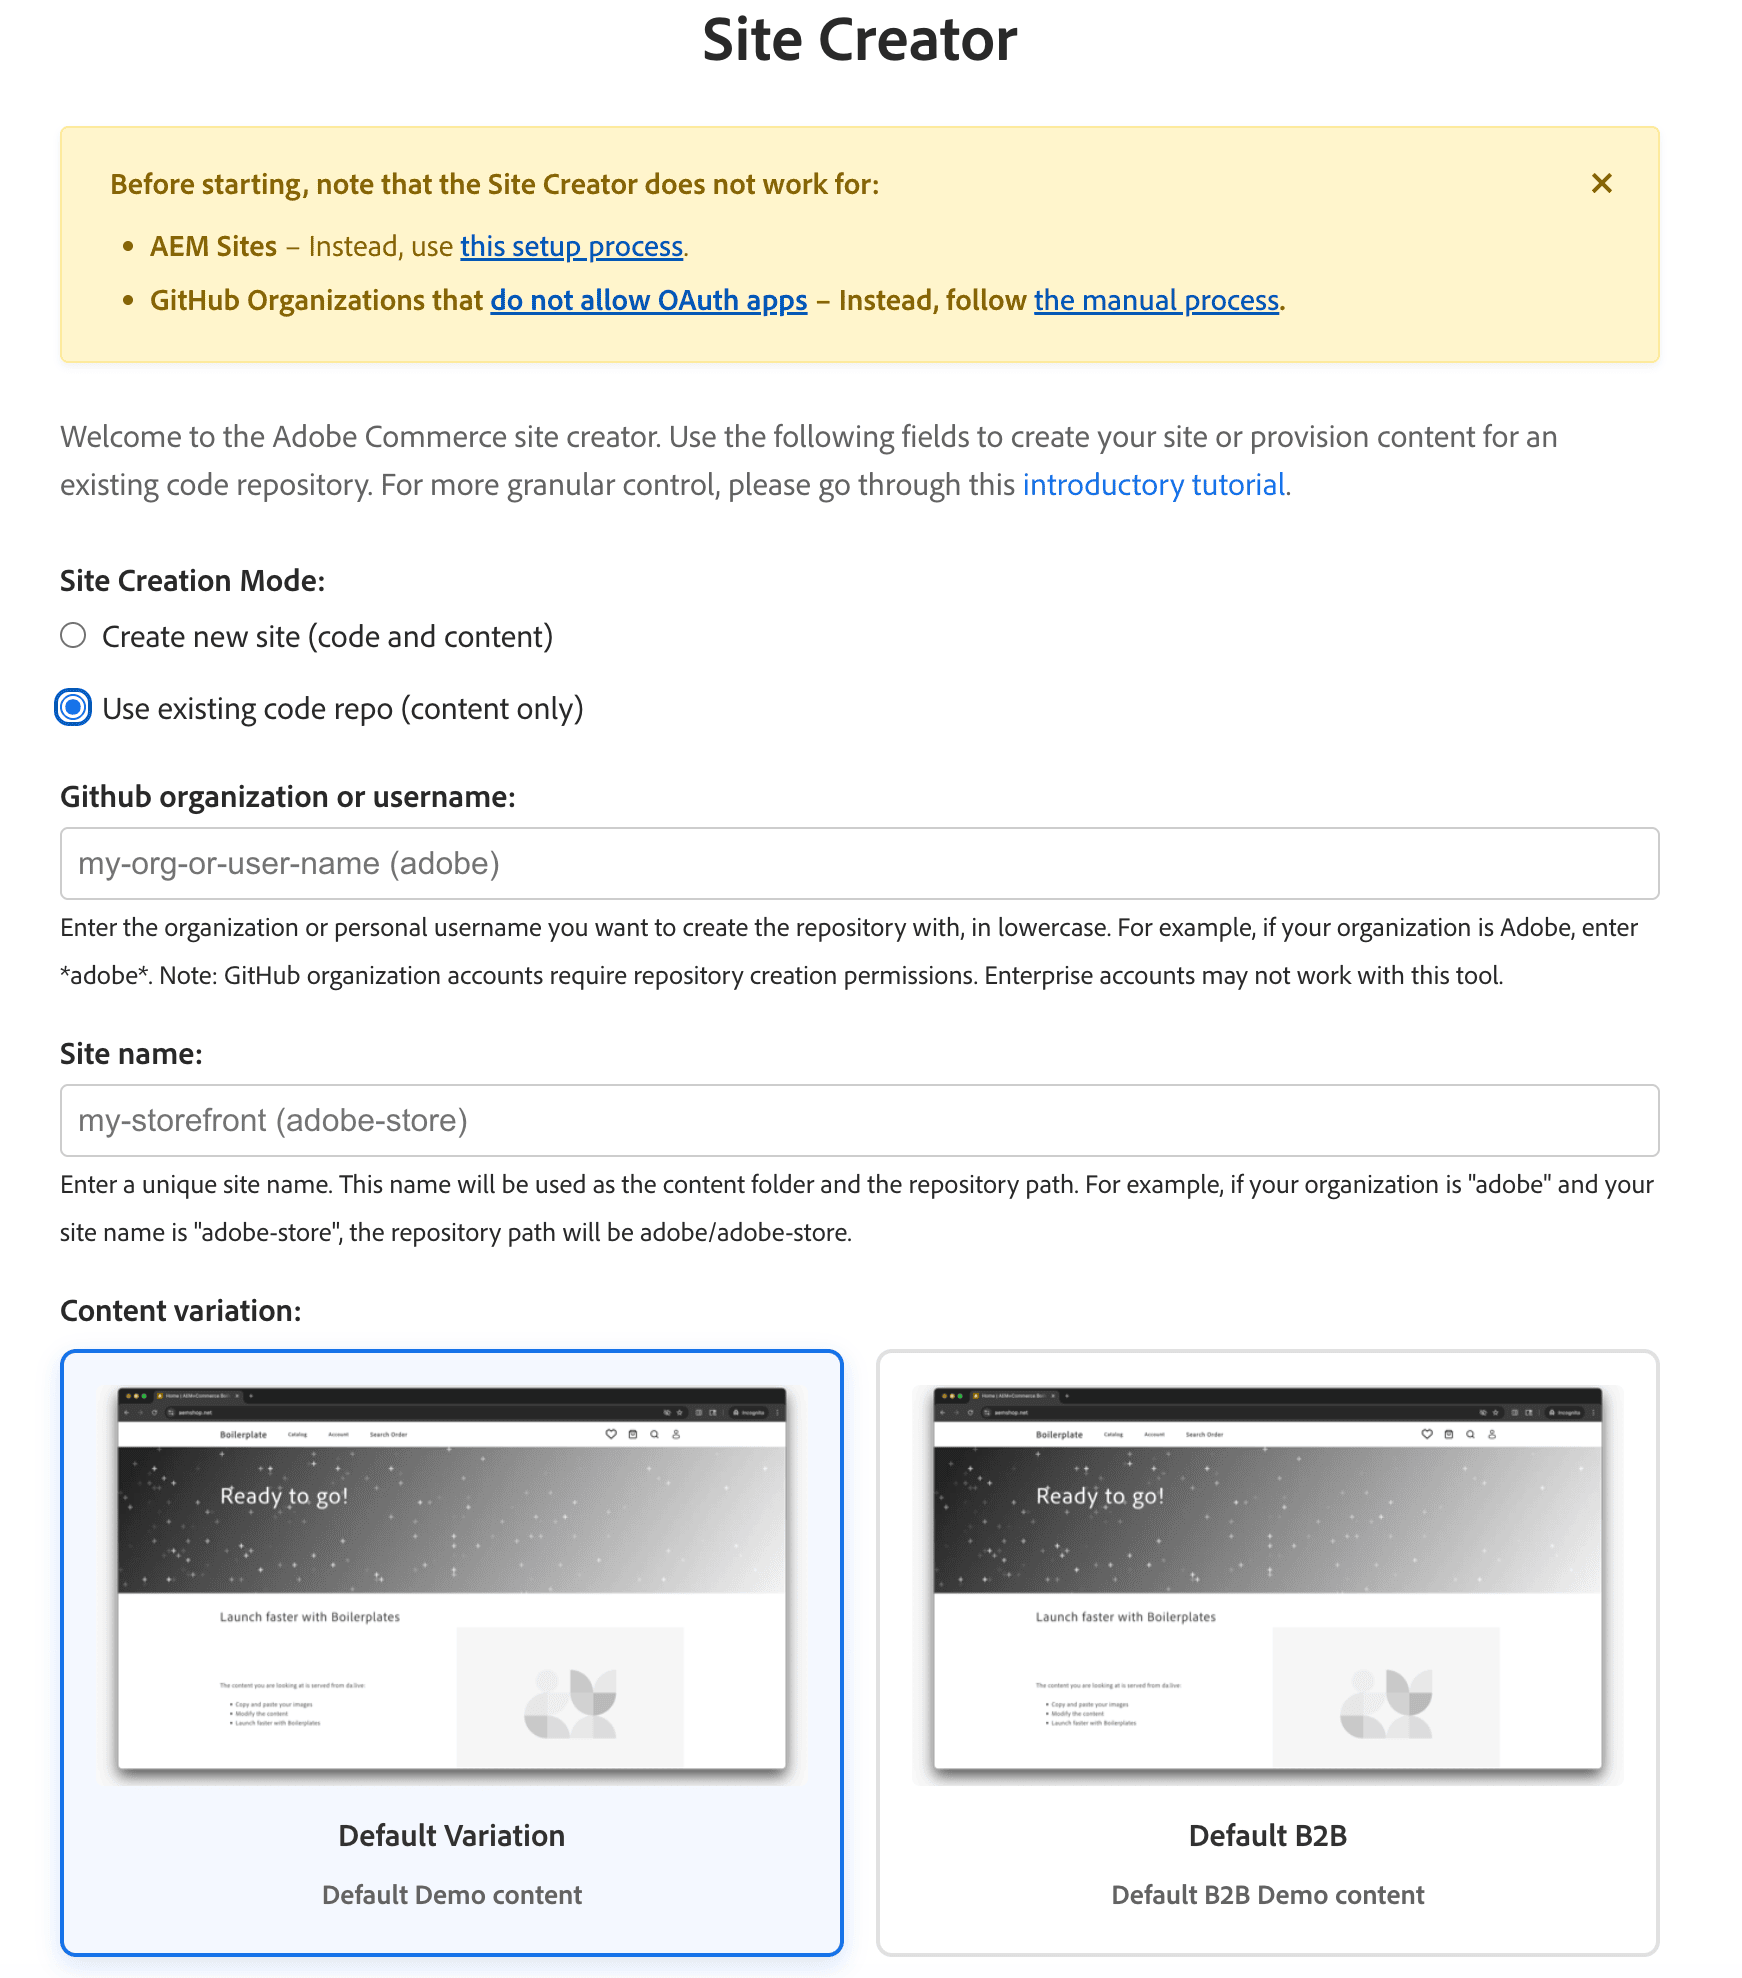
Site Creator
Section titled “Site Creator”An app in Document Author (DA.live) that creates and initializes your storefront. Choose content only or code and content and pick a base theme for B2C (default) or B2B. The app generates the storefront configuration and fills in values from the API where possible.
Example
Section titled “Example”Our CitiSignal demo site was built from the same boilerplate you will set up to develop your own storefront. You can access the full demo site here: main--citisignal-one--adobedevxsc.aem.live .
Step-by-step
Section titled “Step-by-step”The centerpiece of this 20-minute storefront is our Commerce boilerplate template.
Prerequisites
Section titled “Prerequisites”Before you begin, take a moment to set up these required tools and accounts as needed.
Create site repo
Section titled “Create site repo”This task requires you to have a GitHub account with access to the organization or owner where you want to create your new repo. All three backends use the same boilerplate template.
Create the repo under your personal account. When you select Owner, choose your username. Install the Code Sync app on the repository in the next step.
Create the repo under your organization. When you select Owner, choose the organization. You may need organization admin approval to install the Code Sync app on a repository. Ensure you have permission to create repositories and install GitHub Apps in the organization.
-
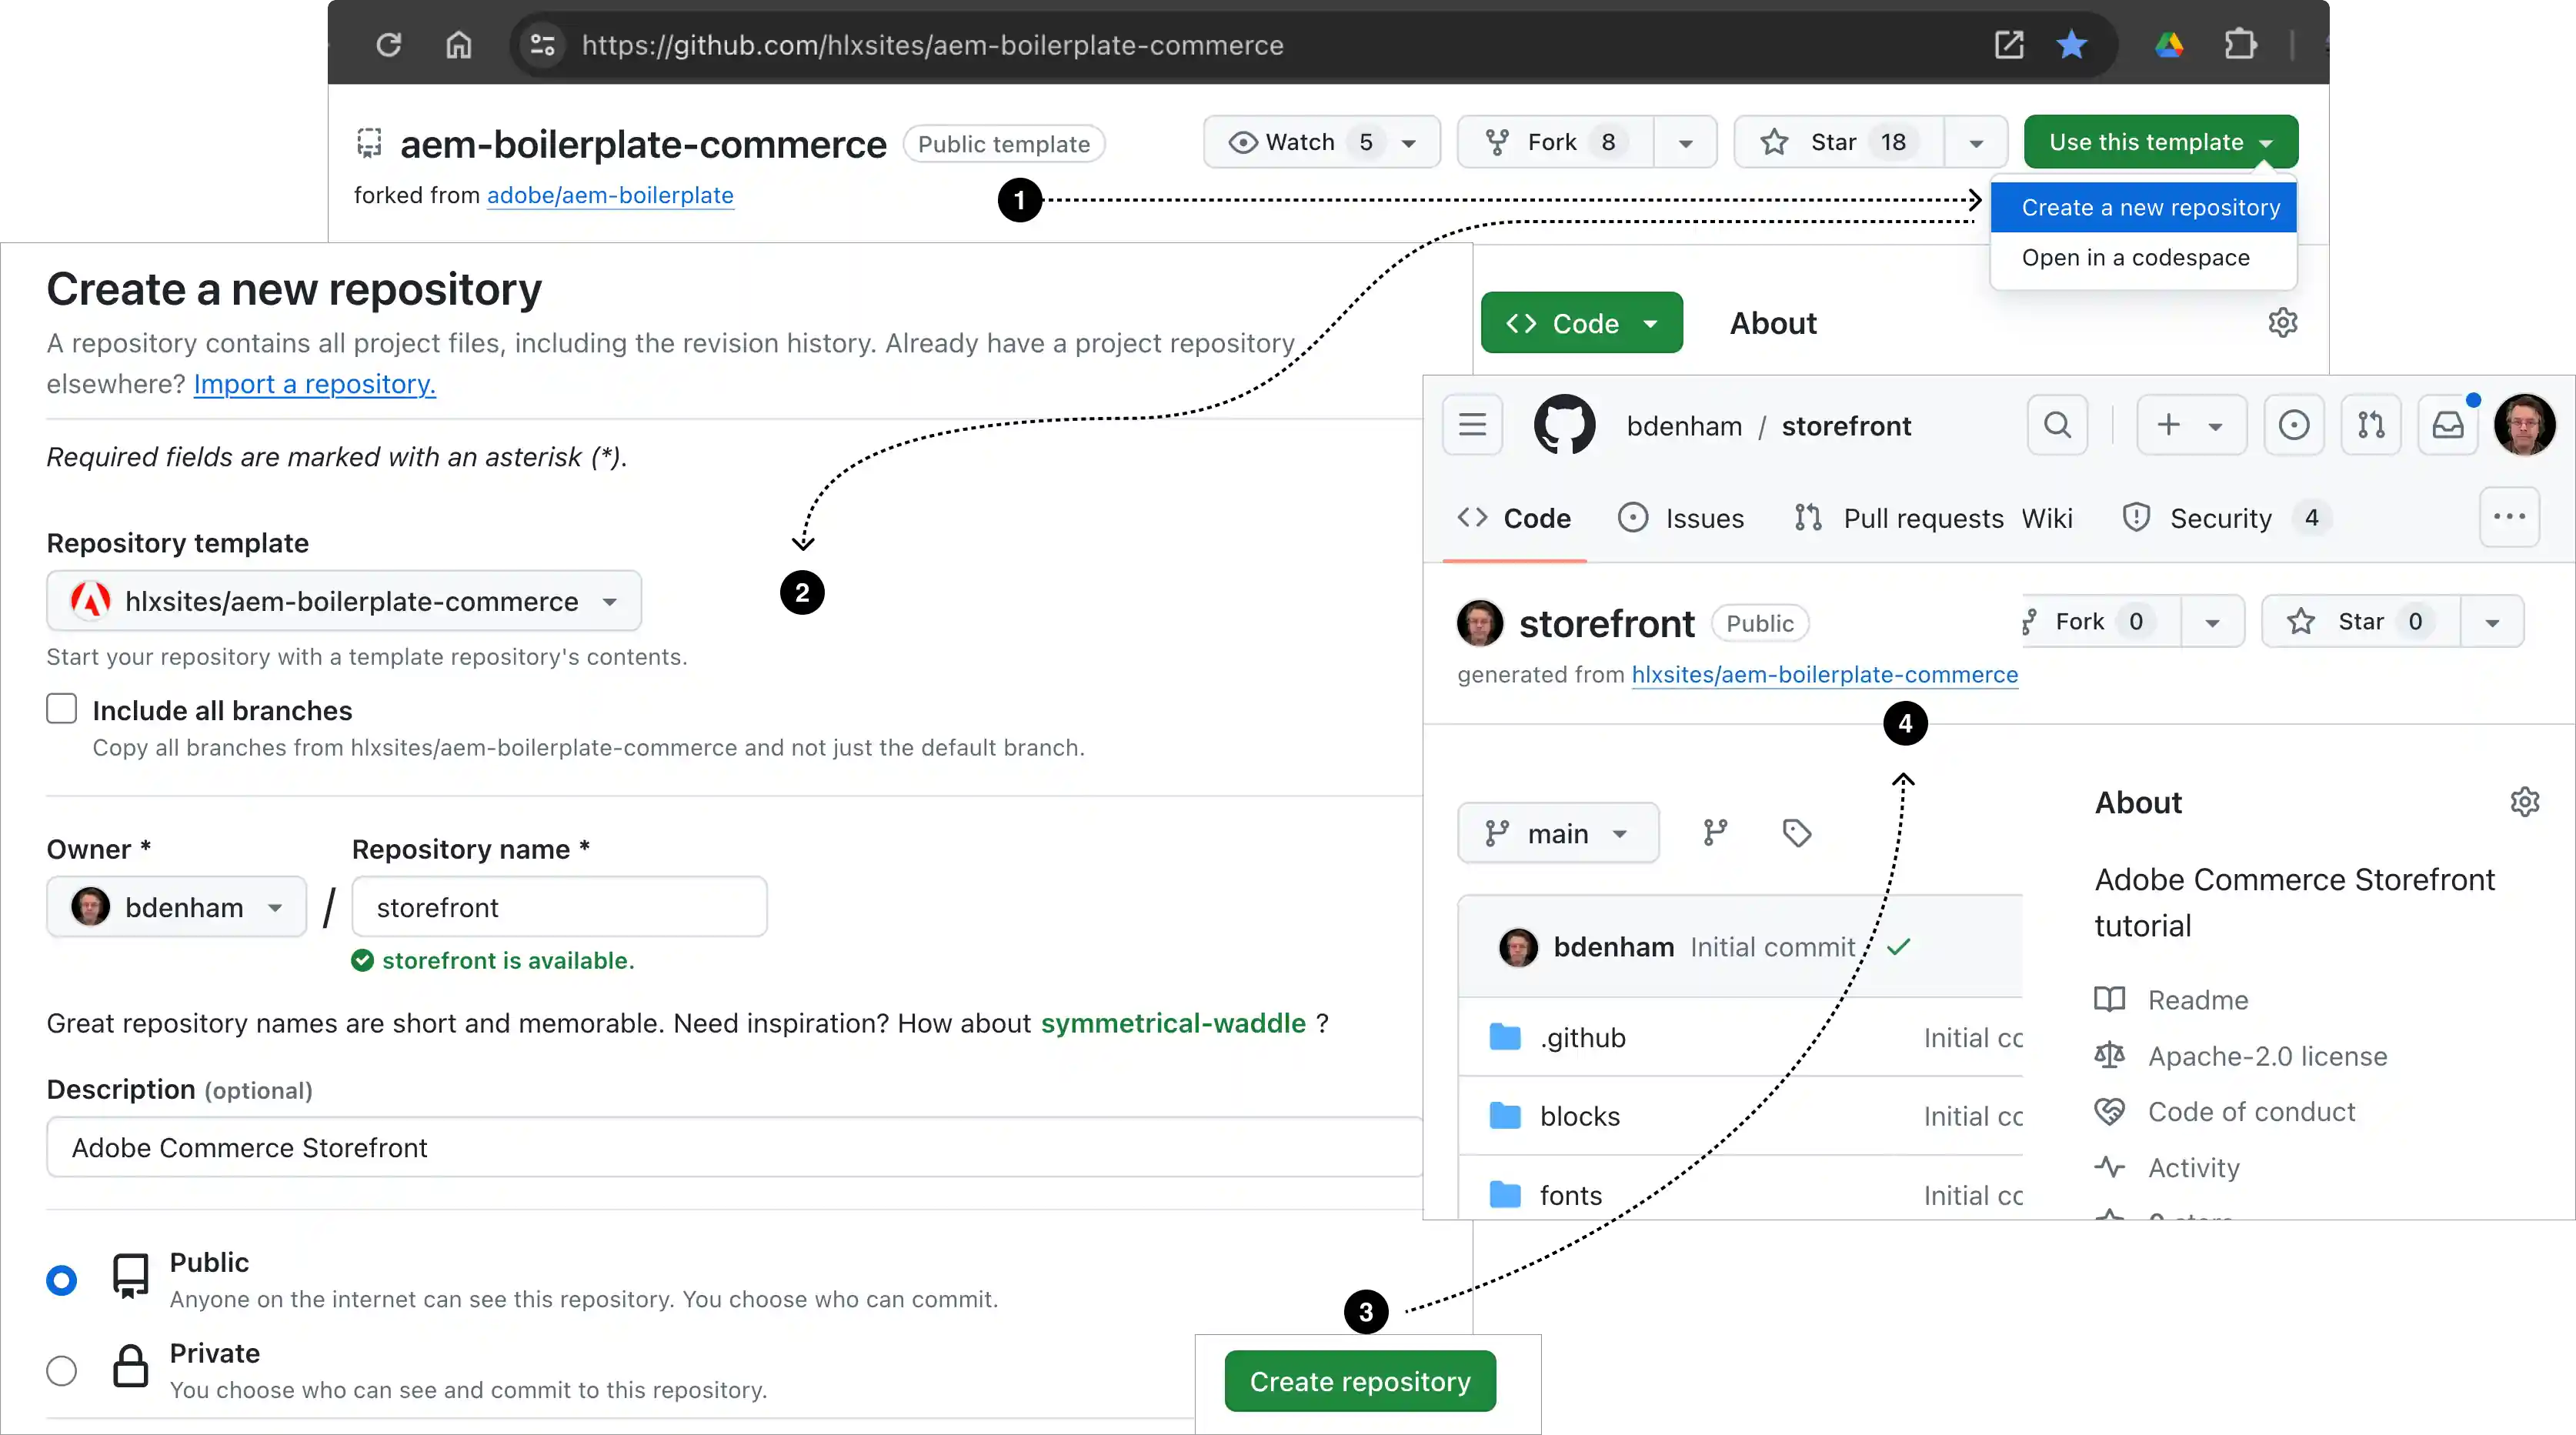
Navigate to aem-boilerplate-commerce , select the Use this template button, then select the Create a new repository option to open the form.
-
Complete the form with the following details:
- Repository template:
hlxsites/aem-boilerplate-commerce(default). - Include all branches: Do not include all branches (default).
- Owner: Your organization or account (required).
- Repository name: A unique name for your new repo (required). Must be lowercase and can only contain letters, numbers, and hyphens (no underscores or periods).
- Description: A brief description of your repo (optional).
- Public or Private: We recommend public (default).
- Repository template:
-
Select the Create repository button and watch GitHub create your new storefront repo.
-
After a few seconds, you should be redirected to the home page of your new repo.
Add the Code Sync app
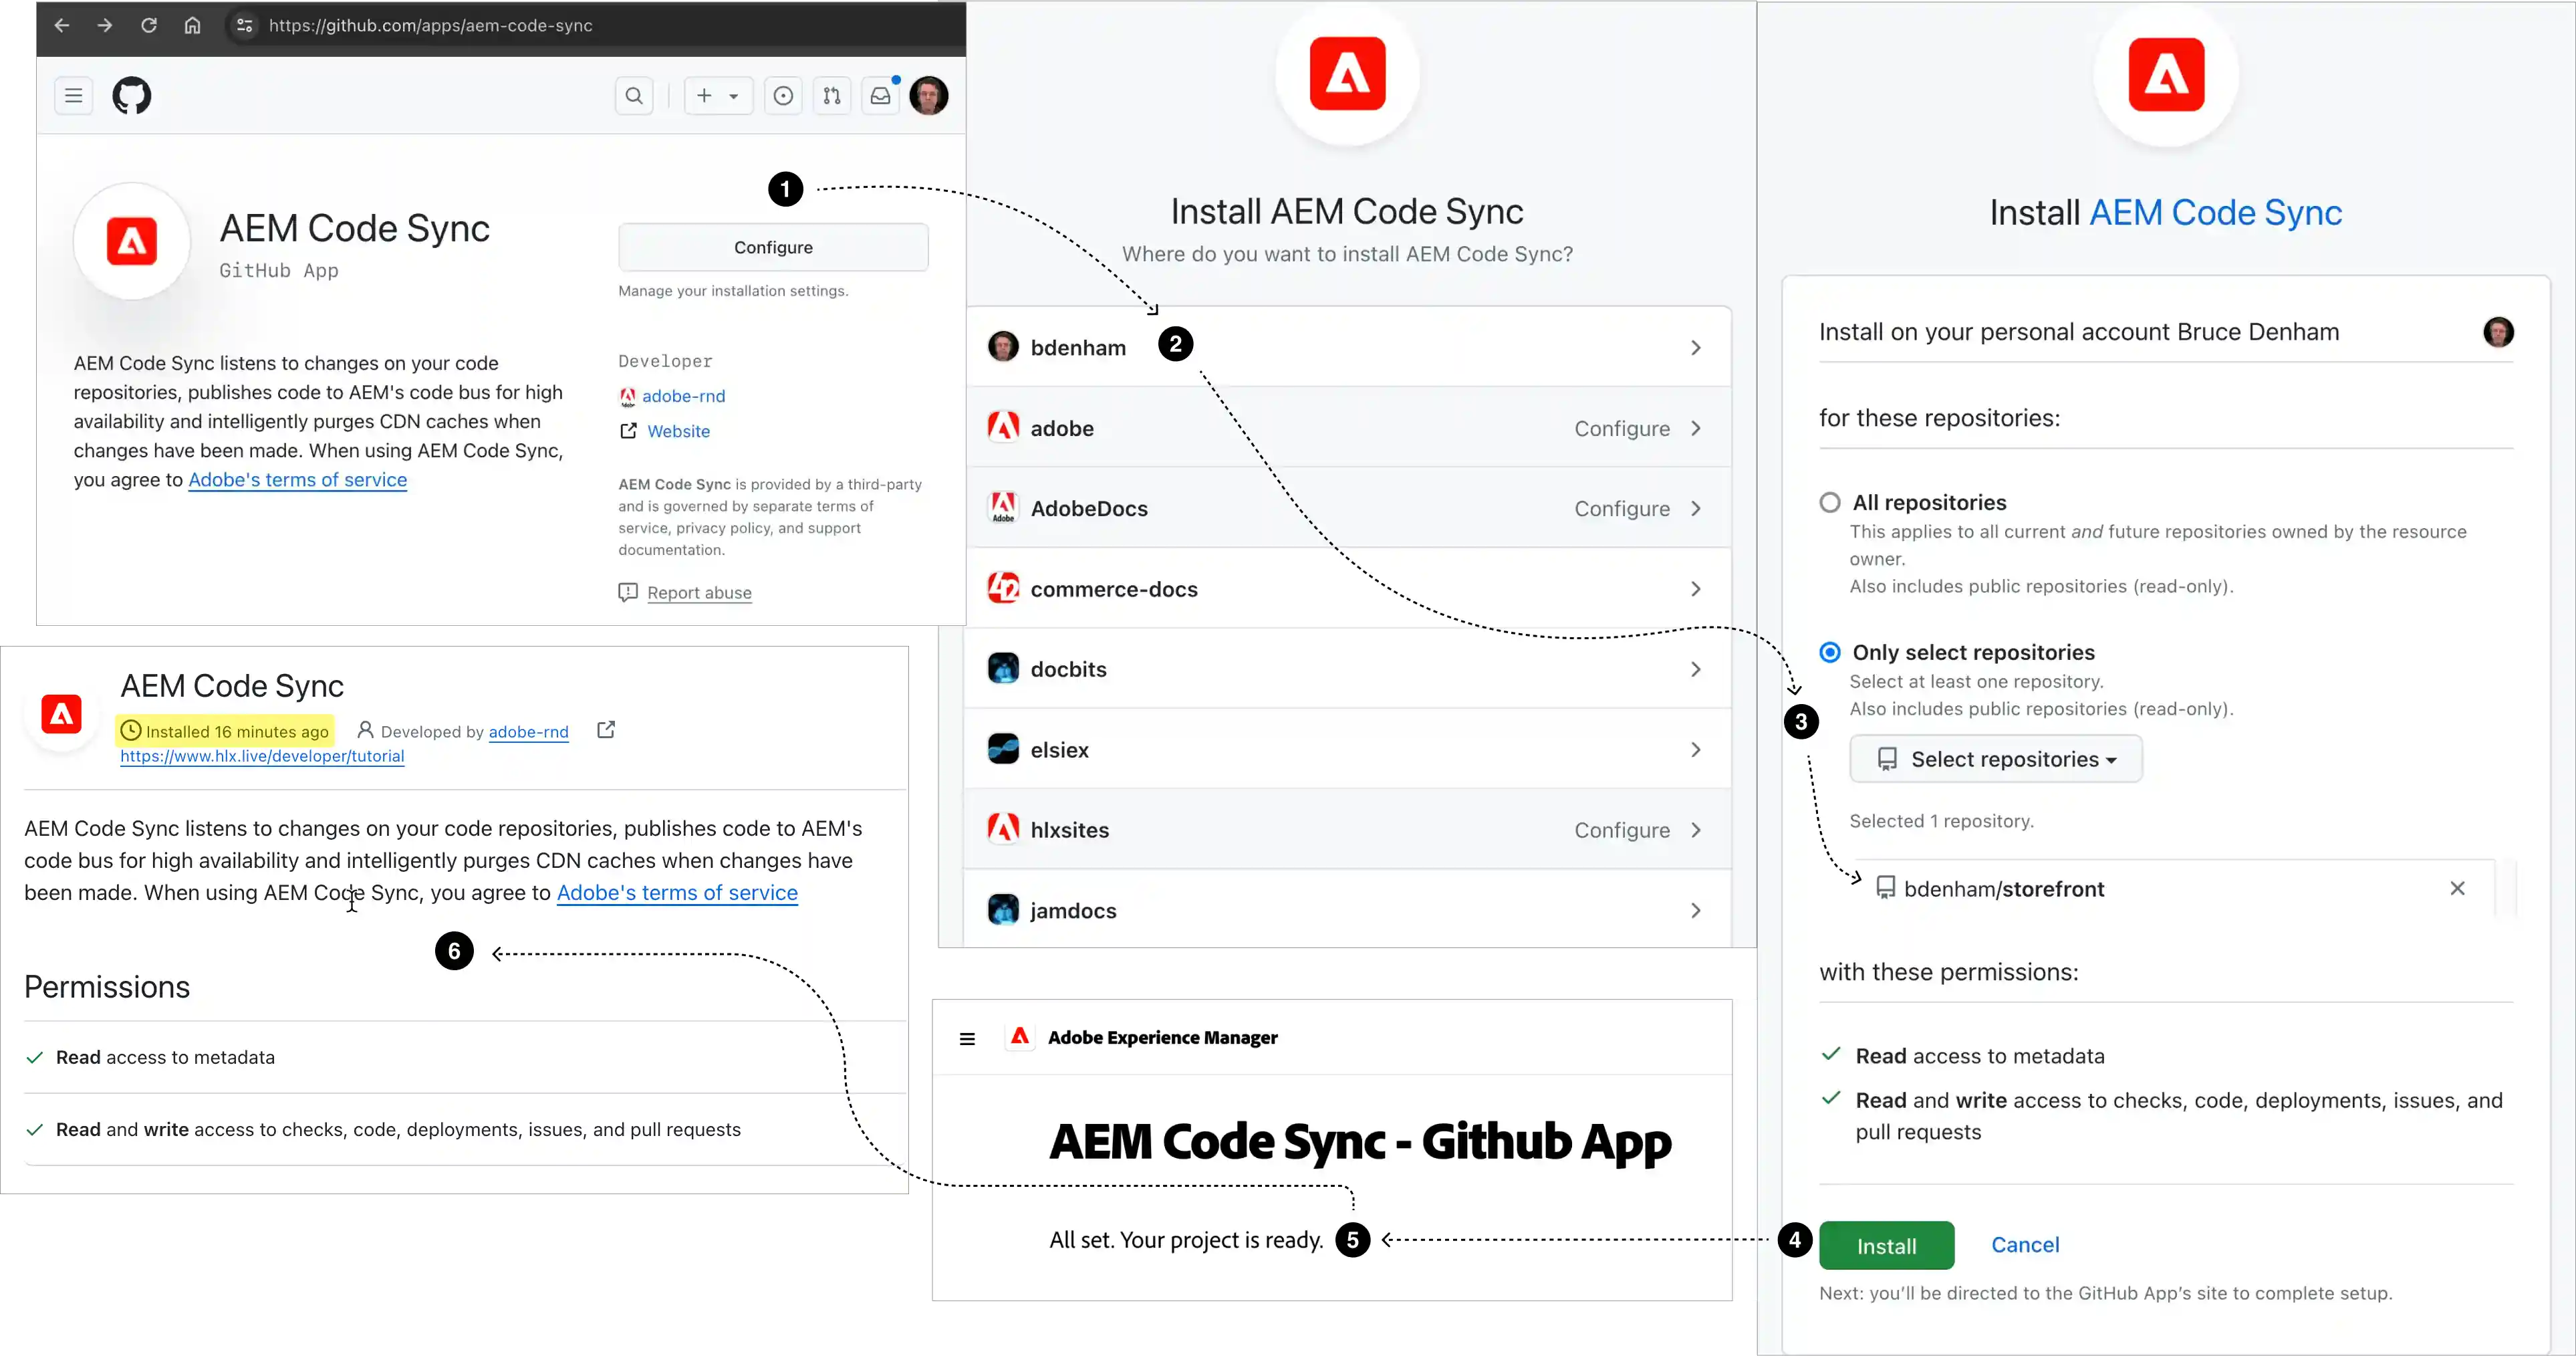
Section titled “Add the Code Sync app”Install the Code Sync app on your repository (it cannot be installed globally on a user or org). It redeploys your storefront site whenever you push or merge changes to the main branch. Same for all backends.
Select your username when choosing where to install. You’ll see your personal repositories in the selector.
Select your organization. You may need admin approval to install the Code Sync app on repositories. If your organization uses SAML SSO, you may need to authorize the app for SAML SSO access.
-
Navigate to the AEM Code Sync app and select the Configure button (top right) to open the page where you choose which repository to install it on.
-
Select the organization or account that owns the repo you just created.
-
From the form, choose Only select repositories, open the Select repositories selector, and choose your repo from the list.
-
Select Install (or Save, see note above) to install Code Sync on your repository.
-
You should see a success screen if the installation completed without errors. Your repo is now connected to the Edge Delivery Services code bus.
-
(Optional) If you return to the account selection page , your repo’s organization or account will now be gray with “Configure” added. Select your org or account again to access the Code Sync configuration page, where you can see which repositories have Code Sync installed and add it to more repositories.
Link repo to commerce data
Section titled “Link repo to commerce data”To link your storefront repo to your commerce backend, use the config generator tool to automatically generate a storefront configuration file for your site based on your Commerce backend. The configuration differs significantly by backend — follow only the tab for your backend.
Update the storefront configuration for your project:
- Open the config generator tool and select your backend type to generate the correct storefront configuration structure.
- Enter the values for your project. See the Storefront configuration reference for field descriptions (select the tab for your backend).
- Replace the storefront configuration file in your repo with the generated file.
- Commit and push the updated file to the repo.
Add content
Section titled “Add content”Now let’s create and initialize the content side of your storefront. We’ll create a new folder within the Document Author environment. Same for all backends.
- Open the Site Creator app in DA, and select Use existing repository.
- Copy the GitHub owner and site values to the input fields and click Create site.
- Follow the prompts, and by the end the content will have been copied to your content folder.
- You may have to manually preview or publish the content, depending on whether you followed the prerequisites.
(Optional) Use Universal Editor for content editing
Section titled “(Optional) Use Universal Editor for content editing”See Using the Universal Editor for workflow and documentation links.
(Optional) Use Sidekick for content editing
Section titled “(Optional) Use Sidekick for content editing”Set up local environment
Section titled “Set up local environment”-
Go to your GitHub repo and select the Code button to copy the repo’s git URL for cloning (HTTPS or SSH).
-
Open a terminal on your local machine and clone your storefront repo:
git clone [HTTPS or SSH URL] -
Navigate to the root of your local repo and install the dependencies.
npm install -
Install the AEM client.
npm install -g @adobe/aem-cli -
Start the development server to view the boilerplate storefront.
npm startThe first page of your boilerplate storefront should be visible in your browser at
http://localhost:3000.
-
Open the project in your favorite code editor. You’re now ready to explore the boilerplate and start customizing your storefront!
(Optional) Secure your storefront
Section titled “(Optional) Secure your storefront”While your storefront is now functional, it’s important to understand that your site is not protected by default. We recommend securing your content, repository, and site access before deploying to production or sharing with external users. See Security and access in the Launch checklist for step-by-step instructions.