Customize the view of a checkout step
Customize Checkout
This topic contains the basic information about how to customize the view of an existing checkout step. In the Magento application, checkout is implemented using UI components. You can customize each step by changing the JavaScript implementation or template for a component, adding, disabling, or removing a component.
Change the component’s .js implementation and template
To change the .js implementation and template used for components rendering, you need to declare the new files in the checkout page layout. To do this, take the following steps:
- In your custom module directory, create the following new file:
<your_module_dir>/view/frontend/layout/checkout_index_index.xml. (For your checkout customization to be applied correctly, your custom module should depend on the Magento_Checkout module.) -
In this file, add the following:
1
2
3
4
5
6
7
8
9
10
11
12
 <page xmlns:xsi="http://www.w3.org/2001/XMLSchema-instance" xsi:noNamespaceSchemaLocation="urn:magento:framework:View/Layout/etc/page_configuration.xsd">
     <body>
         <referenceBlock name="checkout.root">
                 <arguments>
                     <argument name="jsLayout" xsi:type="array">
                         <!-- Your customization will be here -->
                         ...
                     </argument>
                 </arguments>
         </referenceBlock>
     </body>
 </page>
-
In the
<Magento_Checkout_module_dir>/view/frontend/layout/checkout_index_index.xmlfile, find the component that you need to customize. Copy the corresponding node and all parent nodes up to<argument>. There is no need to leave all the attributes and values of parent nodes, as you are not going to change them. - Change the path to the component’s
.jsfile, template or any other property.
Example:
The Magento_Shipping module adds a component rendered as a link to the Shipping Policy info to the Shipping step:
<Magento_Shipping_module_dir>/view/frontend/layout/checkout_index_index.xml looks like following:
1
2
3
4
5
6
7
8
9
10
11
12
13
14
15
16
17
18
19
20
21
22
23
24
25
26
27
28
29
30
31
32
33
34
35
36
<page xmlns:xsi="http://www.w3.org/2001/XMLSchema-instance" xsi:noNamespaceSchemaLocation="urn:magento:framework:View/Layout/etc/page_configuration.xsd">
    <body>
        <referenceBlock name="checkout.root">
            <arguments>
                <argument name="jsLayout" xsi:type="array">
                    <item name="components" xsi:type="array">
                        <item name="checkout" xsi:type="array">
                            <item name="children" xsi:type="array">
                                <item name="steps" xsi:type="array">
                                    <item name="children" xsi:type="array">
                                        <item name="shipping-step" xsi:type="array">
                                            <item name="children" xsi:type="array">
                                                <item name="shippingAddress" xsi:type="array">
                                                    <item name="children" xsi:type="array">
                                                        <item name="before-shipping-method-form" xsi:type="array">
                                                            <item name="children" xsi:type="array">
                                                                <item name="shipping_policy" xsi:type="array">
                                                                    <item name="component" xsi:type="string">Magento_Shipping/js/view/checkout/shipping/shipping-policy</item>
                                                                </item>
                                                            </item>
                                                        </item>
                                                    </item>
                                                </item>
                                            </item>
                                        </item>
                                    </item>
                                </item>
                            </item>
                        </item>
                    </item>
                </argument>
            </arguments>
        </referenceBlock>
    </body>
</page>
Add the new component to the checkout page layout
Any UI component is added in the checkout_index_index.xml similar to the way a checkout step component is added.
Make sure that you declare a component so that it is rendered correctly by the parent component. If a parent component is a general UI component (referenced by the uiComponent alias), its child components are rendered without any conditions. But if a parent component is an extension of a general UI components, then children rendering might be restricted in certain way. For example a component can render only children from a certain displayArea.
Move a component
To move any component on your checkout page, find the component (parent) where it needs to be placed, and paste your component as a child of the parent.
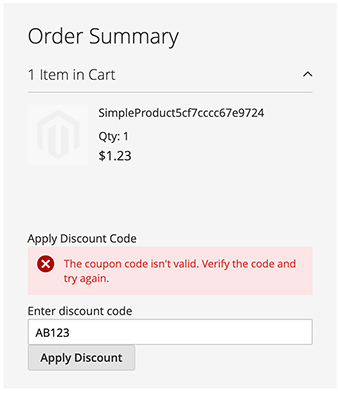
The following example shows how to move the discount component to the order summary block, which will display on both shipping and billing steps.
1
2
3
4
5
6
7
8
9
10
11
12
13
14
15
16
17
18
19
20
21
22
23
24
25
26
27
28
29
30
31
32
33
34
35
<page xmlns:xsi="http://www.w3.org/2001/XMLSchema-instance"
            xsi:noNamespaceSchemaLocation="urn:magento:framework:View/Layout/etc/page_configuration.xsd">
    <body>
        <referenceBlock name="checkout.root">
            <arguments>
                <argument name="jsLayout" xsi:type="array">
                    <item name="components" xsi:type="array">
                        <item name="checkout" xsi:type="array">
                            <item name="children" xsi:type="array">
                                <item name="sidebar" xsi:type="array">
                                    <item name="children" xsi:type="array">
                                        <item name="summary" xsi:type="array">
                                            <item name="children" xsi:type="array">
                                                <item name="summary-discount" xsi:type="array">
                                                    <item name="component" xsi:type="string">Magento_SalesRule/js/view/payment/discount</item>
                                                    <item name="children" xsi:type="array">
                                                        <item name="errors" xsi:type="array">
                                                            <item name="sortOrder" xsi:type="string">0</item>
                                                            <item name="component" xsi:type="string">Magento_SalesRule/js/view/payment/discount-messages</item>
                                                            <item name="displayArea" xsi:type="string">messages</item>
                                                        </item>
                                                    </item>
                                                </item>
                                            </item>
                                        </item>
                                    </item>
                                </item>
                            </item>
                        </item>
                    </item>
                </argument>
            </arguments>
        </referenceBlock>
    </body>
</page>
Remember to disable or remove the component from its original location, or they will conflict with each other.
Order Summary Result

Disable a component
To disable the component in your checkout_index_index.xml use the following instructions:
1
2
3
4
5
<item name="%the_component_to_be_disabled%" xsi:type="array">
    <item name="config" xsi:type="array">
        <item name="componentDisabled" xsi:type="boolean">true</item>
    </item>
</item>
Remove a component
To keep a component from being rendered, create a layout processor. A layout processor consists of a class, implementing
the \Magento\Checkout\Block\Checkout\LayoutProcessorInterface interface, and thus a LayoutProcessorInterface::process($jsLayout) method.
1
2
3
4
5
6
7
8
9
10
11
12
13
14
15
16
17
18
19
<?php

namespace <Vendor>\<Module>\Block\Checkout;

use Magento\Checkout\Block\Checkout\LayoutProcessorInterface;

class OurLayoutProcessor implements LayoutProcessorInterface
{
    /**
     * @param array $jsLayout
     * @return array
     */
    public function process($jsLayout)
    {
        //%path_to_target_node% is the path to the component's node in checkout_index_index.
        unset($jsLayout['components']['checkout']['children']['steps'][%path_to_target_node%]);
        return $jsLayout;
    }
}
Once created, add the layout processor through Dependency Injection (DI).
1
2
3
4
5
6
7
8
9
10
<?xml version="1.0"?>
<config xmlns:xsi="http://www.w3.org/2001/XMLSchema-instance" xsi:noNamespaceSchemaLocation="urn:magento:framework:ObjectManager/etc/config.xsd">
    <type name="Magento\Checkout\Block\Onepage">
        <arguments>
            <argument name="layoutProcessors" xsi:type="array">
                <item name="ourLayoutProcessor" xsi:type="object"><Vendor>\<Module>\Block\Checkout\OurLayoutProcessor</item>
            </argument>
        </arguments>
    </type>
</config>
To use this sample in your code, replace the %path_to_target_node% placeholder with real value.
Disable vs remove a component: A disabled component is loaded but not rendered. If you remove a component, it is removed and not loaded.