
Customers of traditional stores and online web stores love coupons. Typically, a merchant sends coupons to customers who input them when checking out. The coupon saves the customer money and hopefully entices the customer to visit the store more frequently. In addition, the merchant can track coupon codes to individual customers to target market those customers.
Magento CE 1.7 introduced a new method of creating coupon codes—auto generation. Auto generating coupons means Magento programmatically creates several coupon codes at one time quickly and easily. However, if Magento generates the coupon codes, you'd have to manually distribute them to customers.
Magento's REST API is extensible and can easily be called by an outside program to auto generate coupon codes. You can use this feature, for example, to e-mail coupon codes to your top 100 customers.
No programming is necessary to implement the extension module discussed in this guide; however, basic familiarity with Magento modules and PHP programming is desirable.
The Coupon AutoGen API enables any authorized external program to instruct Magento to:
.php fileThis guide discusses how to use coupon auto generation and a web service to dynamically call the Magento REST API to generate a series of codes. The web service instantiates the underlying Magento sales rule (salesrule/rule) coupon code generator and creates a pool of new codes. These codes returned to the caller as a JSON string.
For more information about the Magento REST API, see Introduction to REST API. To extend the REST API to add a web service for generating and retrieving coupon codes, this guide discusses the following:
.xml files and one .php file to create the web service.To implement and test the Coupon AutoGen API, you must have all of the following:
phpmyadmin, which makes it easier to view and manipulate the Magento database. You can use phpmyadmin for convenience to get the OAuth key and shared secret later in this guide.This section discusses how to install the pecl OAuth extension on Ubuntu. Consult the pecl.php.net documentation for installation instructions on other operating systems.
The pecl OAuth extension requires the PEAR installer. The following sections discuss the installation in detail:
root privileges.Before you begin, create a phpinfo.php file, if you have not already done so, to determine if you already have OAuth running.
To create phpinfo.php:
phpinfo.php anywhere on the web server's docroot:
<?php
// Show all information, defaults to INFO_ALL
phpinfo();
http://host-or-ip[:port]/path-to-phpinfo/phpinfo.php
www.example.com and you put phpinfo.php in the web server's docroot, enter:
http://www.example.com/phpinfo.php
OAuth.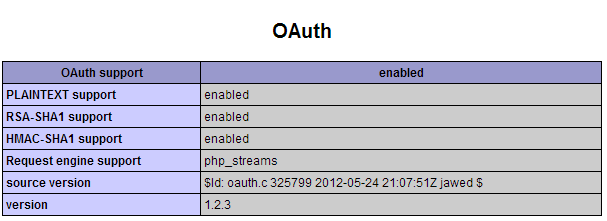
The pecl OAuth extension requires both PEAR (which enables you to install the package) and libpcre3-dev, which enables the OAuth package to be compiled.
To install the packages and confirm that OAuth is enabled:
apt-get install php-pear
apt-get install libpcre3-dev
pecl install oauth
root privileges.Wait while each package is installed. The message Build process completed successfully displays to indicate OAuth installed successfully.
Error: `make' failed displays after you enter pecl install oauth, see OAuth Package Installation Error: `make' failed.php.ini file to find the OAuth library:
configuration option "php_ini" is not set to php.ini location
You should add "extension=oauth.so" to php.ini
php.ini in a text editor.phpinfo.php page output.
Add the following anywhere in php.ini:
[OAuth]
extension=oauth.so
php.ini and exit the text editor.service apache2 restart
If your phpinfo.php page is still open in a web browser, press Control+R to force a refresh; otherwise, enter the URL shown in Creating a phpinfo File to view it.
The following figure shows an example of a properly set up OAuth extension.

To define a Magento coupon code generation rule:
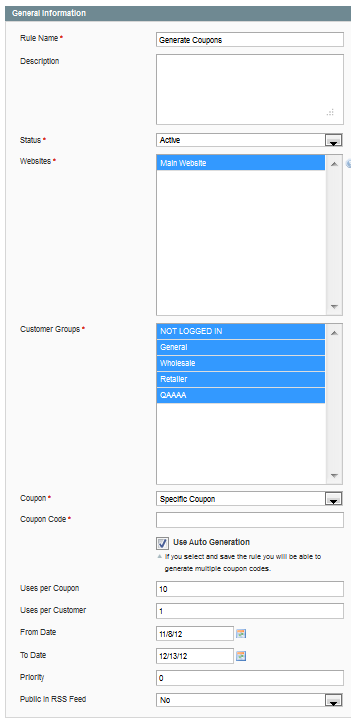
| Item | Description |
|---|---|
| Rule Name | Enter Generate Coupons. |
| Description | Enter an optional description of the rule, such as Rule that generates a sequence of coupon codes. |
| Status | From the list, click Active. |
| Websites | Click the websites on which you want the coupons to display. Hold down the Shift key and click the names of all items to select them. |
| Customer Groups | Hold down the Shift key and click the names of all items to select them. |
| Coupon | Click Specific Coupon |
| Coupon Code | Leave the field blank. |
| CE only. Auto Generation | Select the Use Auto Generation checkbox. |
| CE only. Uses per Coupon | Enter 10. |
| Uses per Customer | Enter 1. |
| From Date | Select today's date. |
| To Date | Select any date in the future. |
| Priority | Enter 0. |
| Public In RSS Feed | Click No. |
The rule has been saved displays at the top of the page to indicate that Magento successfully saved the rule you just created.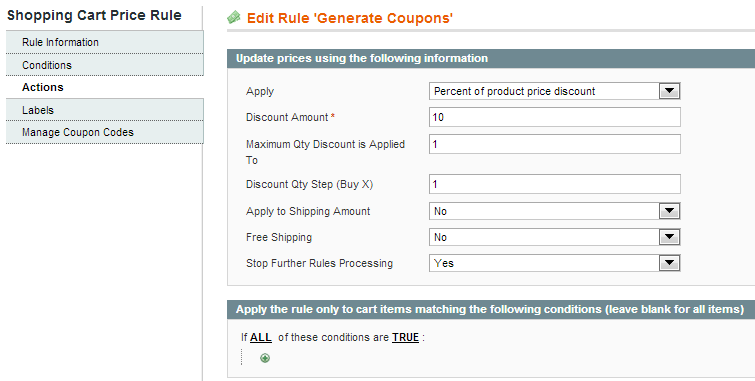
| Item | Description |
|---|---|
| Apply | From the list, click Percent of product price discount. |
| Discount Amount | Enter 10. |
| Maximum Qty Discount is Applied To | Enter 1. |
| Discount Qty Step (Buy X) | Enter 1. |
| Apply to Shipping Amount | From the list, click No. |
| Free Shipping | From the list, click No. |
| Stop Further Rules Processing | From the list, click Yes. |
| EE only Add Reward Points | Enter 0. |
The rule has been saved displays to indicate that Magento saved the rule action options you just entered. Notice that this page now has a row for the Generate Coupons rule you just defined.
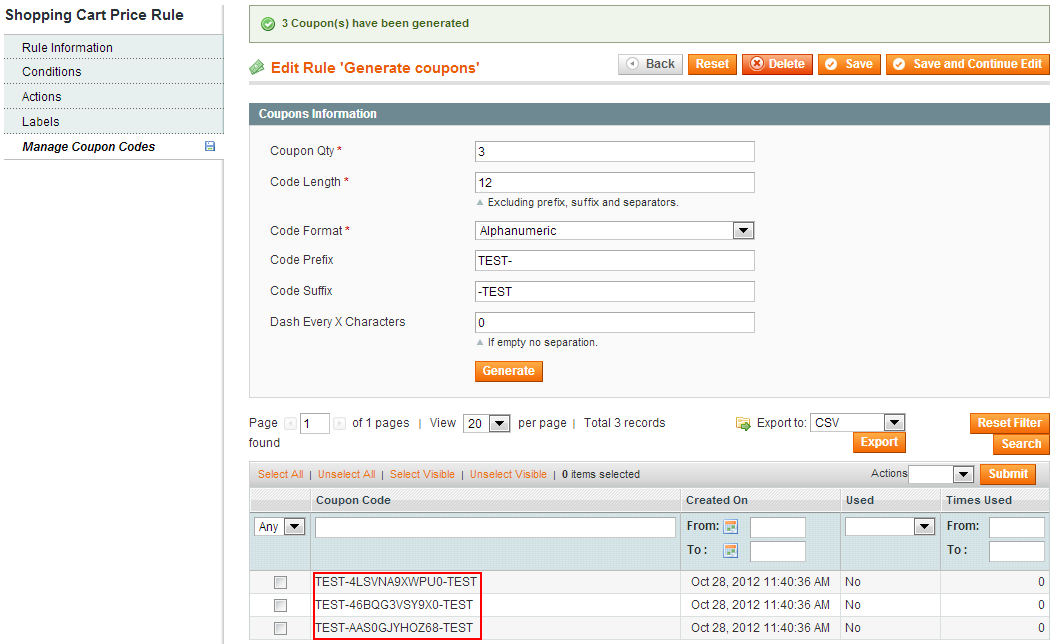
Now that you've created a rule, this section discusses how to use the rule to manually generate a sequence of coupon codes.
| Item | Description |
|---|---|
| Coupon Qty | Enter 3. |
| Code Length | Enter 12. |
| Code Format | Click Alphanumeric. |
| Coupon Prefix | Enter TEST-. |
| Coupon Suffix | Enter -TEST. |
| Dash Every X Characters | Enter 0. |
In the preceding section, you created a Shopping Cart Price Rule named Generate Coupons that manually generates a set of coupon codes. To use those codes, you could export them to a file, and then import them into any external program you want; however, this is a time-consuming procedure!
Fortunately, you can automate this process by adding a coupon code auto-generate API to Magento's existing REST API. Using this API, an external program can automatically get the coupon codes it needs.
The following sections discuss how to extend Magento's REST API to include the Coupon AutoGen API:
While you're implementing the Coupon AutoGen API, you must disable Magento's caching so Magento will find and use your new code immediately.
To disable the cache:

This section discusses how to create a module (also referred to as an extension). The module consists of configuration files that create a web service that extends the Magento REST API to take input from an external program. This program uses HTTP POST and OAuth calls to auto-generate coupon codes.
In this guide, the external program is a PHP script; however, it could be any application that uses OAuth and REST calls.
For more information about Magento module development, see developer documentation on Magento Connect.
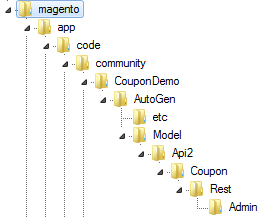
root and change the permissions appropriately later. Consult an IT administrator if you're not sure how to proceed.magento-install-dir/app/code/community/CouponDemo magento-install-dir/app/code/community/CouponDemo/AutoGen magento-install-dir/app/code/community/CouponDemo/AutoGen/etc magento-install-dir/app/code/community/CouponDemo/AutoGen/Model magento-install-dir/app/code/community/CouponDemo/AutoGen/Model/Api2 magento-install-dir/app/code/community/CouponDemo/AutoGen/Model/Api2/Coupon magento-install-dir/app/code/community/CouponDemo/AutoGen/Model/Api2/Coupon/Rest magento-install-dir/app/code/community/CouponDemo/AutoGen/Model/Api2/Coupon/Rest/AdminFor example, if Magento is installed in
/var/www/magento, create the following directories:
/var/www/magento/app/code/community/CouponDemo
/var/www/magento/app/code/community/CouponDemo/AutoGen/etc
/var/www/magento/app/code/community/CouponDemo/AutoGen/Model/Api2/Coupon/Rest/Admin
The following figure shows an example.
magento-install-dir/app/etc/modules directory.CouponDemo_AutoGen.xml and have the following contents.
<?xml version="1.0"?>
<config>
    <modules>
        <CouponDemo_AutoGen>
            <active>true</active>
            <codePool>community</codePool>
        </CouponDemo_AutoGen>
    </modules>
</config>
CouponDemo_AutoGen.xml and exit the text editor.magento-install-dir/app/code/community/CouponDemo/AutoGen/etc directory.config.xml with the following contents.
<?xml version="1.0"?>
<config>
    <modules>
        <CouponDemo_AutoGen>
            <version>0.1.0</version>
        </CouponDemo_AutoGen>
    </modules>
    <global>
        <models>
            <autogen>
                <class>CouponDemo_AutoGen_Model</class>
            </autogen>
        </models>
    </global>
</config>
api2.xml with the following contents.
<config>
    <api2>
        <resource_groups>
            <autogen translate="title" module="CouponDemo_AutoGen">
                <title>CouponDemo API</title>
                <sort_order>10</sort_order>
            </autogen>
        </resource_groups>
        <resources>
            <autogen translate="title" module="CouponDemo_AutoGen">
                <group>autogen</group>
                <model>autogen/api2_coupon</model>
                <title>Coupon Code Auto Generation</title>
                <sort_order>10</sort_order>
                <privileges>
                    <admin>
                        <create>1</create>
                        <retrieve>1</retrieve>
                    </admin>
                </privileges>
                <attributes>
                    <coupon_id>Coupon ID</coupon_id>
                    <code>Code</code>
                    <qty>Quantity</qty>
                    <length>Length</length>
                    <format>Format</format>
                </attributes>
                <routes>
                    <route>
                        <route>/coupondemo/rules/:rule_id/codes</route>
                        <action_type>collection</action_type>
                    </route>
                </routes>
                <versions>1</versions>
            </autogen>
        </resources>
    </api2>
</config>
api2.xml and exit the text editor.magento-install-dir/app/code/community/CouponDemo/AutoGen/Model/Api2 directory.Coupon.php with the following contents.
<?php
class CouponDemo_AutoGen_Model_Api2_Coupon extends Mage_Api2_Model_Resource
{
}
Coupon.php and exit the text editor.magento-install-dir/app/code/community/CouponDemo/AutoGen/Model/Api2/Coupon/Rest/Admin directory.V1.php with the following contents.
<?php
/* Coupon AutoGen REST API
*
* @category CouponDemo
* @package CouponDemo_AutoGen
* @author Chuck Hudson (used with permission). For more recipes, see Chuck's book http://shop.oreilly.com/product/0636920023968.do
*/
class CouponDemo_AutoGen_Model_Api2_Coupon_Rest_Admin_V1 extends CouponDemo_AutoGen_Model_Api2_Coupon
{
    /**
     * Generate one or more coupon codes using the Generate Coupons rule defined in Magento.
     * Expected parameters are:
     * {
     *    'qty': int, - number of coupon codes to instruct Magento to generate
     *    'length': int, - length of each generated coupon code
     *    'format': string, - alphanum (for alphanumeric codes), alpha (for alphabetical codes), and num (for numeric codes)
     * }
     *
     * @param array $couponData
     * @return string|void
     */
    protected function _create($couponData)
    {
        $ruleId = $this->getRequest()->getParam('rule_id');
        $couponData['rule_id'] = $ruleId;
        $rule = $this->_loadSalesRule($ruleId);
        // Reference the MassGenerator on this rule.
        /** @var Mage_SalesRule_Model_Coupon_Massgenerator $generator */
        $generator = $rule->getCouponMassGenerator();
        // Validate the generator
        if (!$generator->validateData($couponData)) {
            $this->_critical(Mage::helper('salesrule')->__('Coupon AutoGen API: Invalid parameters passed in.'),
                Mage_Api2_Model_Server::HTTP_BAD_REQUEST);
        } else {
            // Set the data for the generator
            $generator->setData($couponData);
            // Generate a pool of coupon codes for the Generate Coupons rule
            $generator->generatePool();
        }
    }
    /**
     * Retrieve list of coupon codes.
     *
     * @return array
     */
    protected function _retrieveCollection()
    {
        $ruleId = $this->getRequest()->getParam('rule_id');
        $rule = $this->_loadSalesRule($ruleId);
        /** @var Mage_SalesRule_Model_Resource_Coupon_Collection $collection  */
        $collection = Mage::getResourceModel('salesrule/coupon_collection');
        $collection->addRuleToFilter($rule);
        $this->_applyCollectionModifiers($collection);
        $data = $collection->load()->toArray();
        return $data['items'];
    }
    /**
     * Load sales rule by ID.
     *
     * @param int $ruleId
     * @return Mage_SalesRule_Model_Rule
     */
    protected function _loadSalesRule($ruleId)
    {
        if (!$ruleId) {
            $this->_critical(Mage::helper('salesrule')
                ->__('Rule ID not specified.'), Mage_Api2_Model_Server::HTTP_BAD_REQUEST);
        }
        $rule = Mage::getModel('salesrule/rule')->load($ruleId);
        if (!$rule->getId()) {
            $this->_critical(Mage::helper('salesrule')
                ->__('Rule was not found.'), Mage_Api2_Model_Server::HTTP_NOT_FOUND);
        }
        return $rule;
    }
}
V1.php and exit the text editor.File permissions and ownership are important for any Linux application. Magento provides general guidelines for permission and ownership although following them are not a requirement for this guide. The configuration files and directories can be owned by root or other users and it won't prevent the procedures discussed in this guide from completing successfully.
Consult your network administrator if you are not sure how to set file permissions and ownership. The procedure that follows is a suggestion only.
The Magento guidelines discussed in the following procedure are taken from this Magento Wiki article and set the following:
your-login-name:apache-user-group.ps -ef | grep apache2. The following procedure assumes it is www-data.To optionally set permissions and ownership according to Magento guidelines:
root privileges, enter the following commands in the order shown to change ownership of the files and directories you created as discussed in this guide:cd magento-install-dir/app/code/community
chown -R your-login-name:www-data CouponDemo
find . -type f -exec chmod 644 {} +
find . -type d -exec chmod 755 {} +root privileges, enter the following commands in the order shown to change the permissions and ownership of CouponDemo_AutoGen.xmlcd magento-install-dir/app/etc/modules chown your-login-name:www-data CouponDemo_AutoGen.xml chmod 644 CouponDemo_AutoGen.xml
For security reasons, Magento allows only authorized external programs to call the Magento REST API.
The following sections discuss how to enable the test script (discussed in the next section) to call the Coupon AutoGen API:
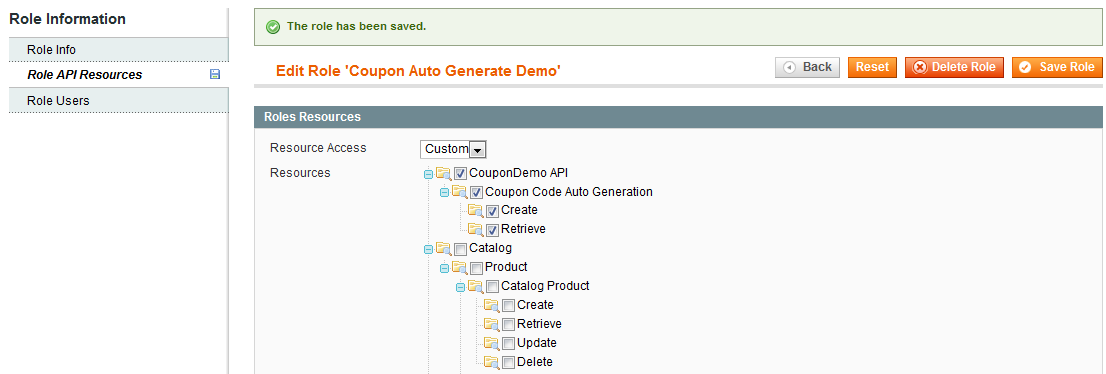
To use the Magento Admin Panel to create a role for the Coupon AutoGen API:
Coupon Auto Generate Demo.Select the checkbox next to the node labeled CouponDemo API.
Magento automatically checks the child checkboxes as the following figure shows.
Now that you have a role, you must add users to give them permission to call the Coupon AutoGen API as follows:

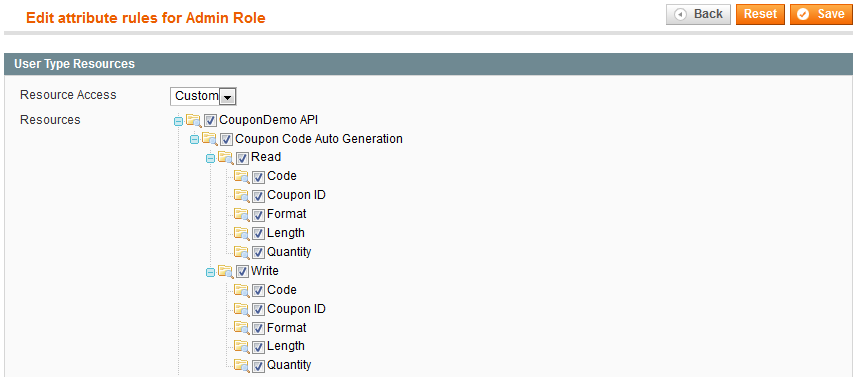
This section discusses how to enable any user with a REST Admin role to use the Coupon AutoGen API.
To set REST attributes for the REST Admin role:
This section discusses how to create a consumer so you can test the Coupon AutoGen API before you deploy it in a production system. After successfully testing the API, you can remove this user.

Coupon AutoGen Test Driver.oauth_consumer. It might be more convenient for you to use phpmyadmin or database tools to retrieve them from the database after you save the role.This section discusses how to create a simple PHP file that acts as an external program and, with permissions you granted the OAuth consumer, enables the program to use the HTTP POST method to auto generate coupon codes.
You can use any type of OAuth/REST call, in fact, such as using the Firefox REST Client plug-in as discussed here.
The following sections discuss how to create and run the test script:
The test script you create calls the Coupon AutoGen API, thereby causing Magento to generate the specified coupon codes and return them to the caller (rest_test.php) in the form of a JSON-encoded string. Finally, the server responds to the browser's request with an HTML page containing the generated coupon codes.
The PHP code that follows:
consumerKey and consumerSecret to set up the OAuth client.$couponGenerationData. The data should include the following:
fetch command with the resourceUrl for the web service call.Finally, the server responds to the browser's request with an HTML page containing the generated coupon codes.
To create the test script, named rest_test.php:
magento-install-dir/rest_test.php with the following contents.
<?php
/********************************************************************
File name: rest_test.php
Description:
A PHP test script that calls the Coupon AutoGen extension
to Magento's REST API.
The Coupon AutoGen API takes:
-- the rule ID of the "Generate Coupons" rule to execute
-- the number of coupon codes to generate
-- the length of each coupon code
-- the format of each coupon code
The API returns the generated coupon codes, in JSON-encoded form
 ********************************************************************/
// Replace <<...>> below with the key and secret values generated for the Coupon AutoGen Test Driver
$consumerKey = '<<YOUR CONSUMER KEY>>'; // from Admin Panel's "REST - OAuth Consumers page"
$consumerSecret = '<<YOUR CONSUMER SECRET>>'; // from Admin Panel's "REST - OAuth Consumers page"

// Set the OAuth callback URL to this script since it contains the logic
// to execute *after* the user authorizes this script to use the Coupon AutoGen API
$callbackUrl = "http://<<host-or-ip:port>>/<<path>>/rest_test.php";

// Set the URLs below to match your Magento installation
$temporaryCredentialsRequestUrl = "http://<<host-or-ip:port>>/<<path>>/oauth/initiate?oauth_callback=" . urlencode($callbackUrl);
$adminAuthorizationUrl = 'http://<<host-or-ip:port>>/<<path>>/admin/oauth_authorize';
$accessTokenRequestUrl = 'http://<<host-or-ip:port>>/<<path>>/oauth/token';
$apiUrl = 'http://<<host-or-ip:port>>/<<path>>/api/rest';

session_start();
if (!isset($_GET['oauth_token']) && isset($_SESSION['state']) && $_SESSION['state'] == 1) {
    $_SESSION['state'] = 0;
}
try {
    $authType = ($_SESSION['state'] == 2) ? OAUTH_AUTH_TYPE_AUTHORIZATION : OAUTH_AUTH_TYPE_URI;
    $oauthClient = new OAuth($consumerKey, $consumerSecret, OAUTH_SIG_METHOD_HMACSHA1, $authType);
    $oauthClient->enableDebug();
    if (!isset($_GET['oauth_token']) && !$_SESSION['state']) {
        $requestToken = $oauthClient->getRequestToken($temporaryCredentialsRequestUrl);
        $_SESSION['secret'] = $requestToken['oauth_token_secret'];
        $_SESSION['state'] = 1;
        header('Location: ' . $adminAuthorizationUrl . '?oauth_token=' . $requestToken['oauth_token']);
        exit;
    } else if ($_SESSION['state'] == 1) {
        $oauthClient->setToken($_GET['oauth_token'], $_SESSION['secret']);
        $accessToken = $oauthClient->getAccessToken($accessTokenRequestUrl);
        $_SESSION['state'] = 2;
        $_SESSION['token'] = $accessToken['oauth_token'];
        $_SESSION['secret'] = $accessToken['oauth_token_secret'];
        header('Location: ' . $callbackUrl);
        exit;
    } else {
        // We have the OAuth client and token. Now, let's make the API call.
        $oauthClient->setToken($_SESSION['token'], $_SESSION['secret']);
        // Set the array of params to send with the request
        $ruleId = <<RULE_ID>>; // Set to the rule ID of the Generate Coupons rule
        $couponGenerationData = array();
        $couponGenerationData['qty'] = 2; // Number of coupons codes to create
        $couponGenerationData['length'] = 7; // Length of each coupon code
        // Options for format include:
        // alphanum (for alphanumeric codes), alpha (for alphabetical codes), and num (for numeric codes)
        $couponGenerationData['format'] = "alphanum"; // Use alphanumeric for the coupon code format
        // Generate coupon codes via POST
        $resourceUrl = "$apiUrl/coupondemo/rules/{$ruleId}/codes";
        $oauthClient->fetch($resourceUrl, json_encode($couponGenerationData), OAUTH_HTTP_METHOD_POST, array(
            'Accept' => 'application/json',
            'Content-Type' => 'application/json',
        ));
        // Retrieve list of created coupons via GET
        $collectionFilters = array('limit' => $couponGenerationData['qty'], 'order' => 'coupon_id', 'dir' => 'dsc');
        $oauthClient->fetch($resourceUrl, $collectionFilters, OAUTH_HTTP_METHOD_GET, array(
            'Accept' => 'application/json',
            'Content-Type' => 'application/json',
        ));
        $coupons = json_decode($oauthClient->getLastResponse(), true);
        // Display the newly generated codes to demonstrate that the Coupon AutoGen API works
        // In reality, you might put these codes in emails to customers, store them in a database, etc.
        echo "New coupon codes:
";
        foreach ($coupons as $coupon) {
            echo " --> " . $coupon['code'] . "
";
        }
    }
} catch (OAuthException $e) {
    print_r($e->getMessage());
    echo "
";
    print_r($e->lastResponse);
}
| String to change | How to change it |
|---|---|
| <<YOUR CONSUMER KEY>> | Coupon AutoGen Test Driver OAuth consumer's key. You can view this in the Admin Panel: System > Web Services > REST - OAuth Consumers or you can get the value from the |
| <<YOUR CONSUMER SECRET>> | Coupon AutoGen Test Driver OAuth consumer's secret. You can view this in the Admin Panel: System > Web Services > REST - OAuth Consumers or you can get the value from the |
| <<host-or-ip:port>>/<<path>> | Your Magento instance's fully qualified hostname or IP address and port, if you are using a port other than 80, and the path to your Magento installation. If you are running Magento on localhost, enter For example, if your Magento server's hostname is |
| <<RULE_ID>> | Generate Coupons rule ID. Get this value by clicking Promotions > Shopping Cart Price Rules . |
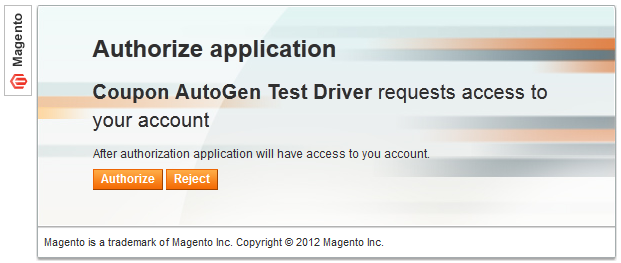
To run the test script:
http://magento-server-host-or-ip[:port]/rest_test.php

To optionally see these codes in the Admin Panel:
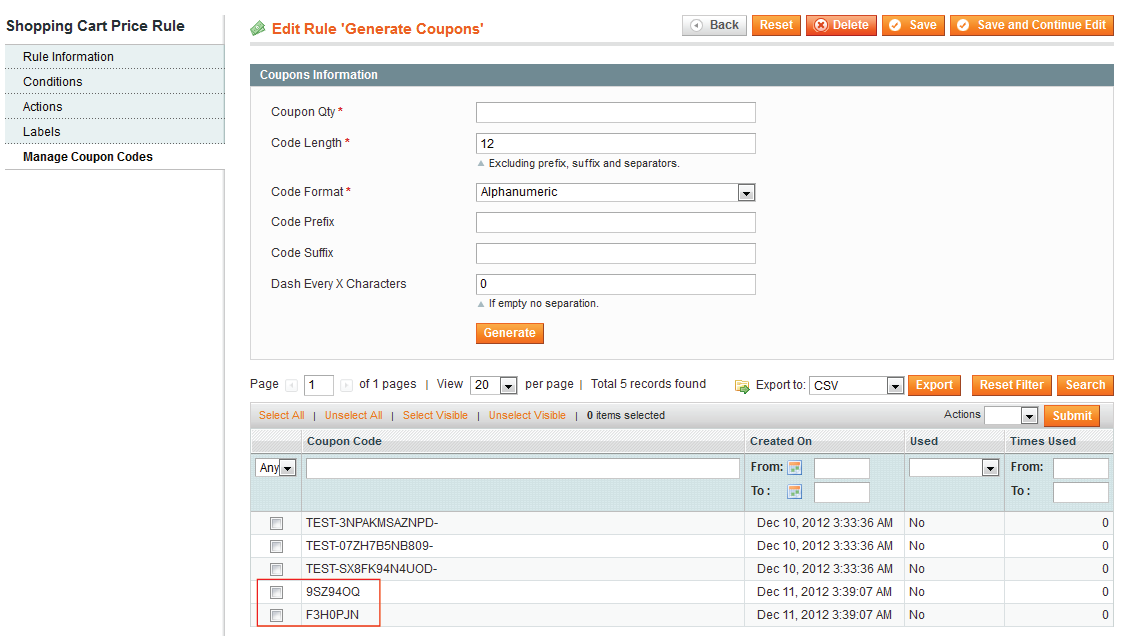
Only after successfully completing the test, you should re-enable Magento's caching system, so performance returns to normal.
To re-enable the Magento cache:
Enable from the Actions list.Refresh from the Actions list.Congratulations! You have successfully added the Coupon AutoGen API to Magento's REST API. Following the same procedure, you can expose lots of Magento functionality to external programs.
The following sections discuss solutions to issues you might encounter when setting up this demonstration:
Problem: OAuth package installation fails with the error ERROR: `make' failed.
Description: In some cases, the pecl install oauth command does not install a C compiler. If you encounter the following error, you must install the make package; otherwise, OAuth won't compile:
1: make: not found
ERROR: `make' failed
Solution:
root privileges:
apt-get install make
pecl install oauth
Build process completed successfully displays to indicate OAuth compiled successfully.php.ini file to find the OAuth library:
configuration option "php_ini" is not set to php.ini location
You should add "extension=oauth.so" to php.ini
php.ini in a text editor.phpinfo.php page output.
Add the following anywhere in php.ini:
[OAuth]
extension=oauth.so
php.ini and exit the text editor.service apache2 restart
Problem: After setting up the CouponDemo configuration files, the CouponDemo API Calls checkboxes do not display in the Admin Panel. A sample is shown in a figure earlier in this guide.
Description: The CouponDemo API Calls checkboxes display to indicate you set up the module correctly. If they don't display, either the Magento cache hasn't been entirely cleared or there's something wrong with the directory structure or configuration files.
Solution: Use the following steps to isolate and correct the issue:
rm -r magento-install-dir/var/cache
rm -r magento-install-dir/var/session
.xml configuration files to make sure there is no leading white space (that is, there are no blank lines at the beginning of the files..xml files.The following sections discuss issues you might encounter when you run rest_test.php in a web browser:
The following error displays in the web browser:
Invalid auth/bad request (got a 401, expected HTTP/1.1 20X or a redirect)
{"messages":{"error":[{"code":401,"message":"oauth_problem=consumer_key_rejected"}]}}
Description: Your OAuth authentication attempt failed because the credentials are incorrect.
Solution: Open rest_test.php in a text editor and verify the values of the following:
$consumerKey = 'value';
$consumerSecret = 'value';
You can find these values in the oauth_consumer database table or in the Admin Panel: System > Web Services > REST - OAuth Consumers.
After verifying the correct values, save your changes to rest_test.php and try again.
The following error displays in the web browser:
Invalid auth/bad request (got a 404, expected HTTP/1.1 20X or a redirect)
{"messages":{"error":[{"code":404,"message":"Rule was not found."}]}}
Description: The shopping cart promotion rule could not be found.
Solution: Open rest_test.php in a text editor and verify the value of the following:
$ruleId = value;
You can find this value in the Admin Panel: Promotions > Shopping Cart Price Rules.
Change the value in rest_test.php, save it, and try again.
The following error displays in the web browser:
Invalid auth/bad request (got a 404, expected HTTP/1.1 20X or a redirect)
Not Found
The requested URL /magento/oauth/initiate was not found on this server.
Description: The HTTP redirect failed, most likely because web server rewrites are not properly enabled.
Solution: Make sure web server rewrites are enabled. The procedure you use depends on your web server and operating system. An example for Ubuntu can be found here.
Refer to Magento APIs—REST for documentation explaining how the Magento's REST API framework works.